Thursday, February 23, 2017
Pedro was saying he had a problem with sudden interruption of the root path ...its not kernel so...what they are doing is ...and what he can do is..
gitbook-plugin-hidden
Hide blocks unless authorized with .htpasswd
This plugin is meant to be used on a PHP enabled server.
First you need a
.htaccess in your root directory.
# Enable Basic Auth

AuthType Basic

AuthName "SomeDescription"


# Point to our password file

AuthUserFile /path/to/.htpasswd

Require valid-user


# Redirect all `*.html` to `*.php`

RewriteEngine On

RewriteRule ^(.*)\.html$ $1.php [L]
Then in a
.htpasswd file, you can enter username/password pairs. Passwords are hashed using the MD5 algorithm. You can generate a password with
$ htpasswd /path/to/.htpasswd user1
or use this website
Here is an example
.htpasswd
user1:$apr1$OS3sZCvx$KRmhPMpZ9bYs4INph8s6w.

user2:$apr1$3Vfr8Z9d$UeKjYDdJK2XFQRUPw7h9T.
You can set the usernames using the plugins configuration in the
book.json:
{

  "plugins": ["hidden"],

  "pluginsConfig": {

    "hidden": {

      "usernames": ["user1", "user2"],

      "path": "_book",

      "env": "production"

    }

  }

}
usernames: is an array of authorized users (default: [])path: is the path to your generated html GitBook (default: _book)env: NODE_ENV value you want this plugin to be fully executed in. Useful for local development as this plugin breaks functionality of gitbook serve (default: production)
Now in your markdown, you can have hidden blocks:
{% hidden %}

### This will be hidden except for authorized users

{% endhidden %}
Hello guys! welcome back to war! Today my problem is how to install silently unity for running any program on the terminal; I need a cookie, this cookie comes in txt.file, because its the only argument to give input to the user attack ..(ugh i'm trying to explain my best simple way) ...then...most important answer from search is
http://stackoverflow.com/questions/14742899/using-cookies-txt-file-with-python-requests
Using cookies.txt file with Python Requests
I'm trying to access an authenticated site using a
cookies.txt file (generated with a Chrome extension) with Python Requests:import requests, cookielib
cj = cookielib.MozillaCookieJar('cookies.txt')
cj.load()
r = requests.get(url, cookies=cj)
It doesn't throw any error or exception, but yields the login screen, incorrectly. However, I know that my cookie file is valid, because I can successfully retrieve my content using it with
wget. Any idea what I'm doing wrong?
Edit:
I'm tracing
cookielib.MozillaCookieJar._really_load and can verify that the cookies are correctly parsed (i.e. they have the correct values for the domain, path, secure, etc. tokens). But as the transaction is still resulting in the login form, it seems that wget must be doing something additional (as the exact same cookies.txt file works for it).MozillaCookieJar inherits from FileCookieJar which has the following docstring in its constructor:Cookies are NOT loaded from the named file until either the .load() or
.revert() method is called.
You need to call
.load() method then.
Also, like Jermaine Xu noted the first line of the file needs to contain either
# Netscape HTTP Cookie File or # HTTP Cookie File string. Files generated by the plugin you use do not contain such a string so you have to insert it yourself. I raised appropriate bug at http://code.google.com/p/cookie-txt-export/issues/detail?id=5
EDIT
Session cookies are saved with 0 in the 5th column. If you don't pass
ignore_expires=True to load() method all such cookies are discarded when loading from a file.
File
session_cookie.txt:# Netscape HTTP Cookie File
.domain.com TRUE / FALSE 0 name value
Python script:
import cookielib

cj = cookielib.MozillaCookieJar('session_cookie.txt')
cj.load()
print len(cj)
Output:
0
NEXT PROBLEM GUYS..ACCESSING MANAGEMENT CODE...
Wednesday, February 22, 2017
let's game ... multiple addresses on the same user ID box ....besides you can change the root user email account.....(hide your ass)
Forwarding to an address
To forward mail to to another address, you need to place the email address of the account you want to forward to in the .forward file.- echo someone@somewhere.else > .forward (replace someone... with an email address)
The .forward file may contain multiple locations to forward your e-mail. For example, you may wish to forward mail from one account to several, or keep a copy of the mail you forward in your local account. To do this, simply add a line in your .forward for every location you wish to forward e-mail to. So, if Bob wanted to forward his mail to Mary and Joe, but also keep a copy of it, he could have a .forward that looks like this:
        \bob,
        mary@socrates.berkeley.edu,
        joe@socrates.berkeley.edu
The backslash (" \ ") before Bob's address leaves a copy of the message in Bob's account as well as forwards a copy of the message to Mary and Joe.Warning: Please take care when forwarding mail. Place the .forward file in the account you want to forward mail from containing the destination e-mail address. The destination address should NOT be the same as the source address. Also, the destination address should NOT be an address which will forward mail back to the source address. These kinds of loops cause mail to be bounced between machines and will eventually cause your mail not to be delivered.
Appending to Files
The ~/.forward file can contain the names of files onto which mail is to be appended. Such filenames must begin with a slash character that cannot be quoted. For example, if a user wishes to keep a backup copy of incoming mail:
\user
/home/user/mail/in.backup
The first line (
\user) tells sendmail to deliver directly to the user's mail spool file using the local delivery agent. The second line tells sendmail to append a copy of the mail message to the file specified (in.backup).
If the
SafeFileEnvironment option is set, the user should be advised to specify the path of that safe directory:\user /arch/bob.backup here /arch was specified by the SafeFileEnvironment option
When the
SafeFileEnvironment option is used, the cooperation of the system administration may be needed if users are to have the capability of saving mail to files via the ~/.forward file.Pipes in ~/.forward file
Any delivery agent for which the F=| flag is set can also pipe messages through programs. To disable this ability, simply remove the F=| flag from all delivery agent declarations in your configuration file.
The syntax is as follows:
|prg
"|prg args"
|"prg args"
http://www.softpanorama.org/Mail/pipes_in_dot_forward_file.shtml
do u know what i'm thinking guys...check it out...traceback with an @ alias ...they use AMD64 because they are using the aliases on the games sessions
Terminal 101: Creating Aliases for Commands

Every Monday (or in this case, Tuesday), we'll show you how to do something new and simple with Apple's built-in command line application. You don't need any fancy software, or a knowledge of coding to do any of these. All you need is a keyboard to type 'em out!
While using Terminal, you may discover that you constantly run a string of commands so often, it's ridiculous that you have to type them in at all. Well, just as you can create shortcuts to applications and automate actions in OS X, you can also do so for Terminal commands that are in constant rotation. These are called aliases, and you can set them up to run temporarily or permanently through your Mac’s command line interface.
Creating a Temporary Alias

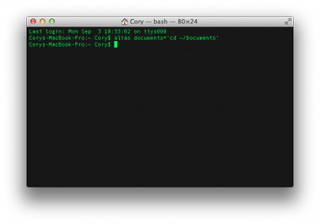
To create a temporary alias that is good for the current terminal session, you will use the following format to create the alias:
alias new_name='command to be performed'
Just about any command can be used to create an alias, but we'll use this sample command throughout this how to. This command will let us jump to our Documents folder just by typing in "documents":
alias documents='cd /Documents'
Once the command has been assigned to its alias, you can type in the alias name followed by the enter key to perform the action assigned to the alias.
Recording Aliases Permanently

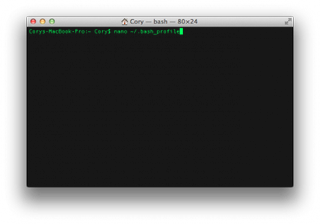
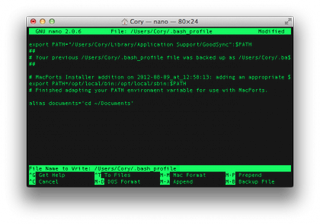
If you assign an alias using the above method, then it will only be available for the current terminal session. Once you close the terminal window, the alias will no longer be available. To make the alias permanent, you will need to edit a file called “.bash_profile” by running the following command:
nano /.bash_profile

This will open nano (a command line text editor). Use the arrow keys to place the cursor at the bottom of the file, and type in the aliases that you wish to use, one per line, just as you did when creating temporary aliases. When you are done, press Control + O (Write Out) to save the file. Press Command + X to exit nano and go back to the command line.
When you quit and re-open the Terminal application, your aliases will work without having to re-create them each time.
Subscribe to:
Comments (Atom)
Intel Portugal cyber cibercrime gov pt ministério público PGR login
https://cibercrime.ministeriopublico.pt/en/user/login https://webmail.pgr.pt/owa/auth/swivel/ChangePIN.aspx?redirect=/owa/auth/logon.aspx


