Monday, October 16, 2017
so let me start again. I want to connect a probe receptor either on the power outlet , on the common wall, with my neibourhood, either on the phone line outside on the street
Data Exfiltration from air gapped systems using power line communication
Proof-of-concept
To prove this attack actually works a small proof-of-concept implementation was written. For this POC BPSK modulation is used with a configurable carrier frequency and baud rate. All tools have been developed and tested on Linux.
The tools are available for download on Github: https://github.com/dimhoff/powercom.


"PASSPORT FORGERY (part 3)

Circuit Diagram of RFID based Attendance System
Microcontroller
AT89C52 Microcontroller from 8051 family is used in this system. It consists of four ports and 40 pins.
Oscillator Circuit
Oscillator circuit is connected between the 18 and 19 th pin of the microcontroller and consist of an oscillator with a frequency of 11.0592 MHz and two capacitors of 33pF.
Preset Circuit
The 9th pin of the microcontroller is RST pin, which is reset pin. This preset circuit comprises a switch, a capacitor of (10u) and a resistor of 10k. When the switch is pressed, the RST pin is connected to the power supply(Vcc) and the microcontroller gets reset
LCD Display
The LCD display is used for displaying the data. It consists of 16 pins: three pins are connected to the power supply, and the remaining pins are connected to the port 2 of the microcontroller.
RFID Reader
The RFID reader is a module with RFID reader and antenna. It is small in size and integrates with any sort of hardware design. It is used to read the data stored in the RFID tags.
Circuit Working
The data stored in this tag is referred to as the identification and attendance of the person. Once the student places the card in front of the RFID reader, it reads the data and compares the data stored in the microcontroller which is programmed by using Embedded C language. If the data matches, then it displays the information on the LCD. This RFID attendance system also makes use of the status button for retrieving the status of students’ attendance, which is interfaced to the microcontroller. By using this advanced concept, a lot of time can be saved as all the students’ attendance information is directly stored in the database." (these are features from attendance RFID's but also passports)
https://www.elprocus.com/rfid-based-attendance-management-system/
PadBuster - Automated script for performing Padding Oracle attacks
PadBuster is a Perl script for automating Padding Oracle Attacks. PadBuster
provides the capability to decrypt arbitrary ciphertext, encrypt arbitrary plaintext,
and perform automated response analysis to determine whether a request is vulnerable
to padding oracle attacks.
https://github.com/GDSSecurity/PadBuster
Sunday, October 15, 2017
NATO HACKING SECURE COMMUNICATIONS
"PTTID for Unit 1234 is:
(hexidecimal) 01 80 1234 2E3E 00 6580A862DD8808
01 is the command opcode
80 is its argument
1234 is the unit ID
2E3E is presumably the CRC (though the "inverted CCITT-CRC" hint seems reasonable, I haven't successfully found the exact algorithm/input data ordering that works)
00 is an unknown field (it is 00 for PTTIDs, 76 for STS and MSG)
and 6580A862DD8808 is the FEC (convolutional code) bits
Now, for the successful hacking of the evening...
To generate the convolutional code bits, perform the following operation:
1. reverse the bit order for each byte of the first 7 bytes (to undo the reversal performed for display, above)
2. feed those bits into a shift register which is preloaded with all zeros
3. for each bit, calculate the modulo-2 sum: bit(n)+bit(n-2)+bit(n-5)+bit(n-6)
4. then for each byte of resulting output, again reverse those bits to generate the values listed above (for display)
Note that because of the constraint length and lack of trailer of this convolutational code, it does not protect (most of) the final "unknown" field. "
Advanced traffic interception for mobile apps using Mallory and Burp
Intercepting non HTTP/S traffic with Mallory
I was testing an application for a client and found that I could intercept the initial login request and response using burp suite, after that the application displayed a spinning wait dial and then closed down. When I removed the proxy the application would function so clearly something was amiss.
The problem with setting your devices to use burp is that it only fully handles HTTP/S and websockets, and it tends to drop traffic which does not fit this criteria. There are likely a number of ways to get around this by redirecting traffic but we also want to play with that non HTTP/S traffic so for this we will use Mallory Proxy.
Mallory is a transparent TCP and UDP proxy and it’s quite a powerful tool! Unfortunately it hasn’t been updated in quite a while and a lot of the documentation is TBC so it can take a while to get to know the ins and outs of it.
The following tutorial is pretty good at getting Mallory set up on a Kali box:
http://blog.opensecurityresearch.com/2012/05/mallory-mitm-fix-ssl-decryption.html
http://blog.opensecurityresearch.com/2012/05/mallory-mitm-fix-ssl-decryption.html
If you have any specific issues a more up to date thread can be found here
https://intrepidusgroup.com/insight/2013/07/getting-mallory-to-run-in-modern-versions-of-ubuntu/
https://intrepidusgroup.com/insight/2013/07/getting-mallory-to-run-in-modern-versions-of-ubuntu/
I don’t believe at the time of setup I ran into any issues with the setup script which downloads all the dependencies etc.
When Mallory is running it will listen on a specific port the problem is getting traffic to that port.
I found that setting my Kali vmware to act as a gateway was the best option. I set two bridged interfaces to link onto my testing LAN:
eth0 inet addr:192.168.0.184 Bcast:192.168.168.255 Mask:255.255.255.0
eth1 inet addr:192.168.0.180 Bcast:192.168.168.255 Mask:255.255.255.0
eth1 inet addr:192.168.0.180 Bcast:192.168.168.255 Mask:255.255.255.0
On the device I set the gateway to eth1/192.168.0.180 and then allow traffic to flow between the interfaces using iptables:
iptables -F
iptables -X
iptables -t nat -F
iptables -t nat -X
iptables -t mangle -F
iptables -t mangle -X
iptables -P INPUT ACCEPT
iptables -P FORWARD ACCEPT
iptables -P OUTPUT ACCEPT
iptables –table nat –append POSTROUTING –out-interface eth0 -j MASQUERADE
iptables –append FORWARD –in-interface eth1 -j ACCEPT
echo 1 > /proc/sys/net/ipv4/ip_forward
At this point you can fire up Wireshark and start to profile your application. What you want to do is pick out is the flow of traffic to specific hosts as well as the ports. At this point we start picking through and identifying our application traffic so as to redirect it to our respective proxies. Whilst Mallory is a powerful tool it lacks the flexibility that burp has which is why I separate the traffic streams.
I found that my mobile app was talking MQTT to a Mosquito server on a specific host, it was this MQTT traffic which Burp suite was dropping and thus causing the application to crash. So say we want to direct this traffic to our Mallory proxy we would use:
iptables -t nat -A PREROUTING -p tcp –dport -d -j REDIRECT –to-ports
If there is traffic to a certain host you want to just pass through you can use:
iptables -t nat -A PREROUTING -p tcp -d > -j ACCEPT
We can then tell iptables to route all our other 443 traffic to a burp instance:
iptables -t nat -A PREROUTING -p tcp –dport 443 -j DNAT –to-destination :
iptables -t nat -A POSTROUTING -p tcp –dport 443 -j MASQUERADE
iptables -t nat -A POSTROUTING -p tcp –dport 443 -j MASQUERADE
The following will redirect our port 80 traffic to a burp instance:
iptables -t nat -A PREROUTING -p tcp –dport 80 -j DNAT –to-destination :
iptables -t nat -A POSTROUTING -p tcp –dport 80 -j MASQUERADE
iptables -t nat -A POSTROUTING -p tcp –dport 80 -j MASQUERADE
Also the order of the IP tables rules is important, you need to have you host specific redirects before you main catch all redirects.
For a sanity check the following rules will redirect https://pentestpatners.com to Mallory and everything else to burp suite. I put my iptables rules in a little bash script so I can easily edit and rerun them.
#!/bin/bash
iptables -F
iptables -X
iptables -t nat -F
iptables -t nat -X
iptables -t mangle -F
iptables -t mangle -X
iptables -P INPUT ACCEPT
iptables -P FORWARD ACCEPT
iptables -P OUTPUT ACCEPT
iptables –table nat –append POSTROUTING –out-interface eth0 -j MASQUERADE
iptables –append FORWARD –in-interface eth1 -j ACCEPT
echo 1 > /proc/sys/net/ipv4/ip_forward
#redirect ssl pentestpartners.com to mallory
iptables -t nat -A PREROUTING -p tcp –dport 443 -d 78.129.201.147 -j REDIRECT –to-ports 4443
iptables -t nat -A PREROUTING -p tcp –dport 443 -d 78.129.201.147 -j REDIRECT –to-ports 4443
#redirect HTTP to burp
iptables -t nat -A PREROUTING -p tcp –dport 80 -j DNAT –to-destination 192.168.0.118:8080
iptables -t nat -A POSTROUTING -p tcp –dport 80 -j MASQUERADE
iptables -t nat -A PREROUTING -p tcp –dport 80 -j DNAT –to-destination 192.168.0.118:8080
iptables -t nat -A POSTROUTING -p tcp –dport 80 -j MASQUERADE
#redirect other SSL to burp
iptables -t nat -A PREROUTING -p tcp –dport 443 -j DNAT –to-destination 192.168.0.118:8080
iptables -t nat -A POSTROUTING -p tcp –dport 443 -j MASQUERADE
iptables -t nat -A PREROUTING -p tcp –dport 443 -j DNAT –to-destination 192.168.0.118:8080
iptables -t nat -A POSTROUTING -p tcp –dport 443 -j MASQUERADE
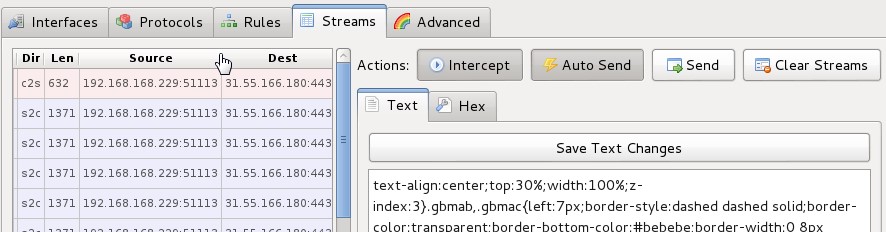
The following shows the streams running through Mallory
At this point hopefully you have successfully routed you troublesome traffic to Mallory and your standard HTTP/S to burp and your application should be running without any crashes. Mallory has some tampering features like burp which we will look at in the following section.
Using Mallory
Mallory can be quite troublesome to get working, as we have setup our own iptables rules do not toggle any of the options on the “Interfaces” tab. The protocols tab is pretty self-explanatory, you may need to define a new port if your traffic is non-standard but the help section is a little more complete there.
The streams tab will show the flow of traffic as well as the contents of each request, you need to enable “Intercept” and “Auto Send” on this page, if you disable auto send you have the option of editing requests before they go to the server and then manually send them.
The documentation for the rules tab is a little lighter:

The data will be affected by the rules sequentially top to bottom and the rule we are likely to use the most is the “Muck” rule.
These rules are configured as follows:
- Name: Name of the rule
- Direction: Do we want to replace server to client, client to server or both
- Address: Do we want to only target one address
- Port: Do we want to target one port
- Payload: A string to patch in the requests/response before the rule will run
- Muck: This is a regex like in the sed command FIND/REPLACE/GLOBALLY
- Passthu: Does the packet then go to the next rule?
Mallory won’t decode gziped responses so it’s best to remove the accept Encoding-Header from requests using the following rule:
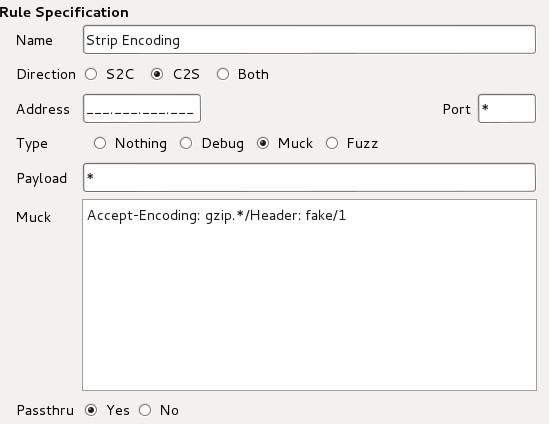
Make sure the rule is at the top of the list.
For a test we can use the following rule:
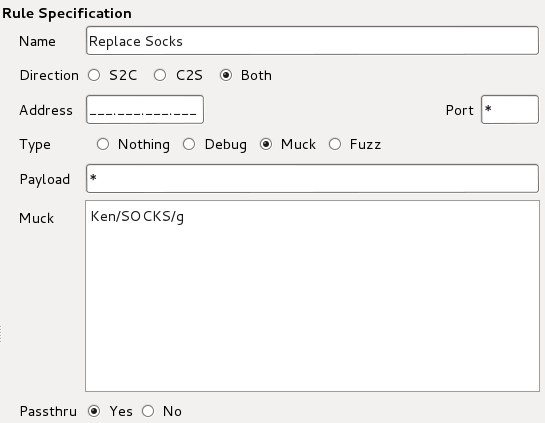
With the results:

For SSL traffic you can replace the ca.cer and ca.key in /mallory/current/src/ca/ with your exported burp files or you can import the ca.cer which Mallory generates onto your device.
The downside of mallory is that there is no way to export the streams into a meaningful format which can dissect the data, such as wireshark.
…unless you write a script to do it.
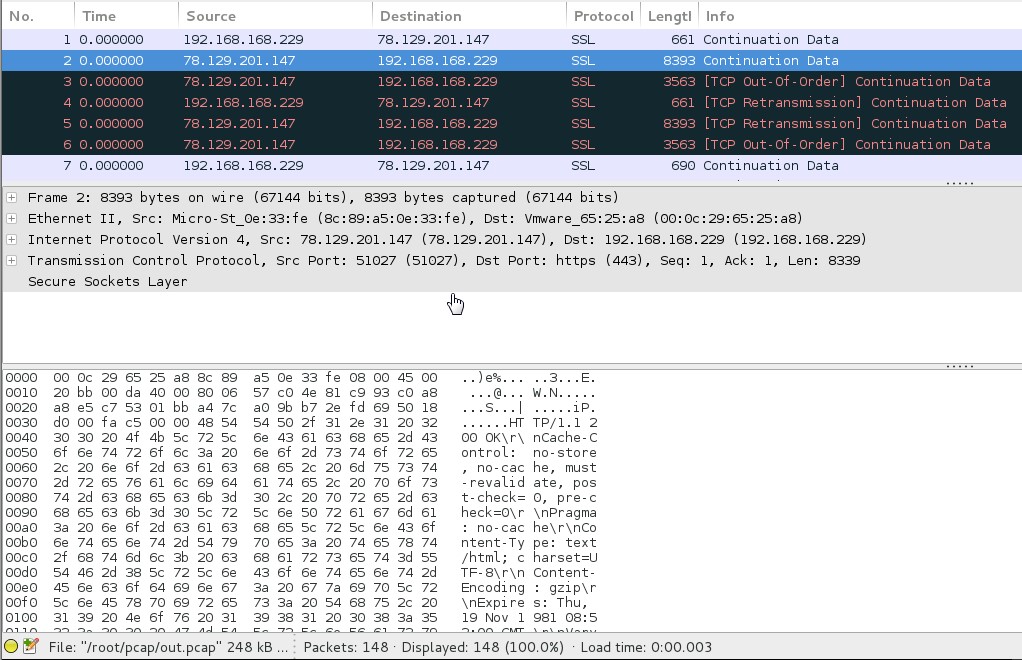
To save you the time and effort I have written one called mallory2pcap.py. There’ll be a separate post on that but there is a link to the code here. When given the mallory SQLite database and an output name it will write a pcap file on the fly using the contents of the database:
…unless you write a script to do it.
To save you the time and effort I have written one called mallory2pcap.py. There’ll be a separate post on that but there is a link to the code here. When given the mallory SQLite database and an output name it will write a pcap file on the fly using the contents of the database:

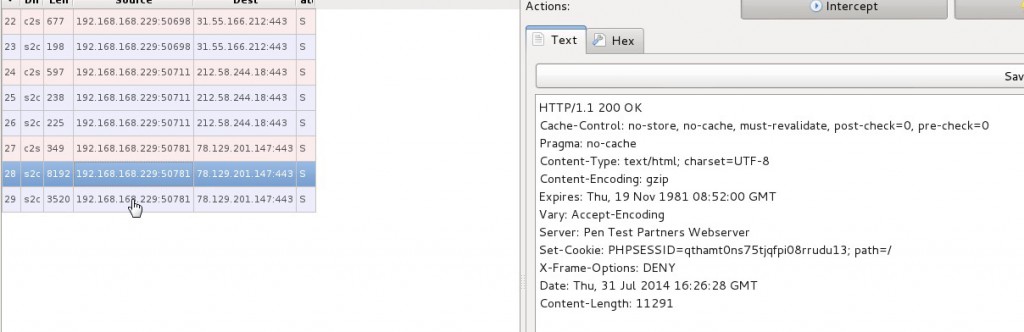
When this file is opened wireshark will dissect the requests and hopefully display the correct data:
I do have to say several bottles of strong cider were consumed when this script was coded so there may be bugs and it’s mainly held together with tape but it should work!!
Hopefully this how-to has provided an insight into intercepting mobile application traffic and using some less known tools and tricks.
Termius - SSH, Mosh and Telnet client App
Free Features:
· SSH client with support of ECDSA, ed25519, and chacha20-poly1305
· Desktop app for Windows, Mac, and Linux
· Mosh & Telnet protocol support
· Local terminal with bash
· Built-in RSA/DSA/ECDSA key generator and Putty keys importer
· XTerm-256 colors, VT100 and vanilla terminal types support
· Local, Remote, and Dynamic port forwarding
· Automatic icon recognition, e.g., Raspberry Pi, Ubuntu, Fedora
· Hardware keyboard support
· Password, key, and 2FA authentication
· 11 awesome color schemes
· Terminal Touch with the support of arrow keys, Ctrl and Alt.
· Organize hosts into groups to share settings among them
· No ads or banners
Premium Features, $9,99 annually.
· Cross-device sync *
· SSH key agent forwarding
· SFTP client
· Terminal tabs
· HTTP/SOCKS proxy
· CLI tool to export ~/.ssh/config
· Fingerprint protection
· Home Screen Widget
· AWS EC2 and Digital Ocean host import
· Host chaining
· Save and run snippets
· Env variables
* Using zero-knowledge cloud storage with 2FA protection. All the data encrypted on the client-side using AES-256.
https://play.google.com/store/apps/details?id=com.server.auditor.ssh.client&hl=pt_PT
Subscribe to:
Posts (Atom)


