Friday, November 3, 2017
Thursday, November 2, 2017
Ok....no bullshit...no easy stuff...on the bootloader
Finding the Encryption Key
Now that we have our traces, we can go ahead and perform the attack. As described in the background theory, we'll have to do two attacks - one to get the 14th round key, and another (using the first result) to get the 13th round key. Then, we'll do some post-processing to finally get the 256 bit encryption key.
14th Round Key
We can attack the 14th round key with a standard, no-frills CPA attack:
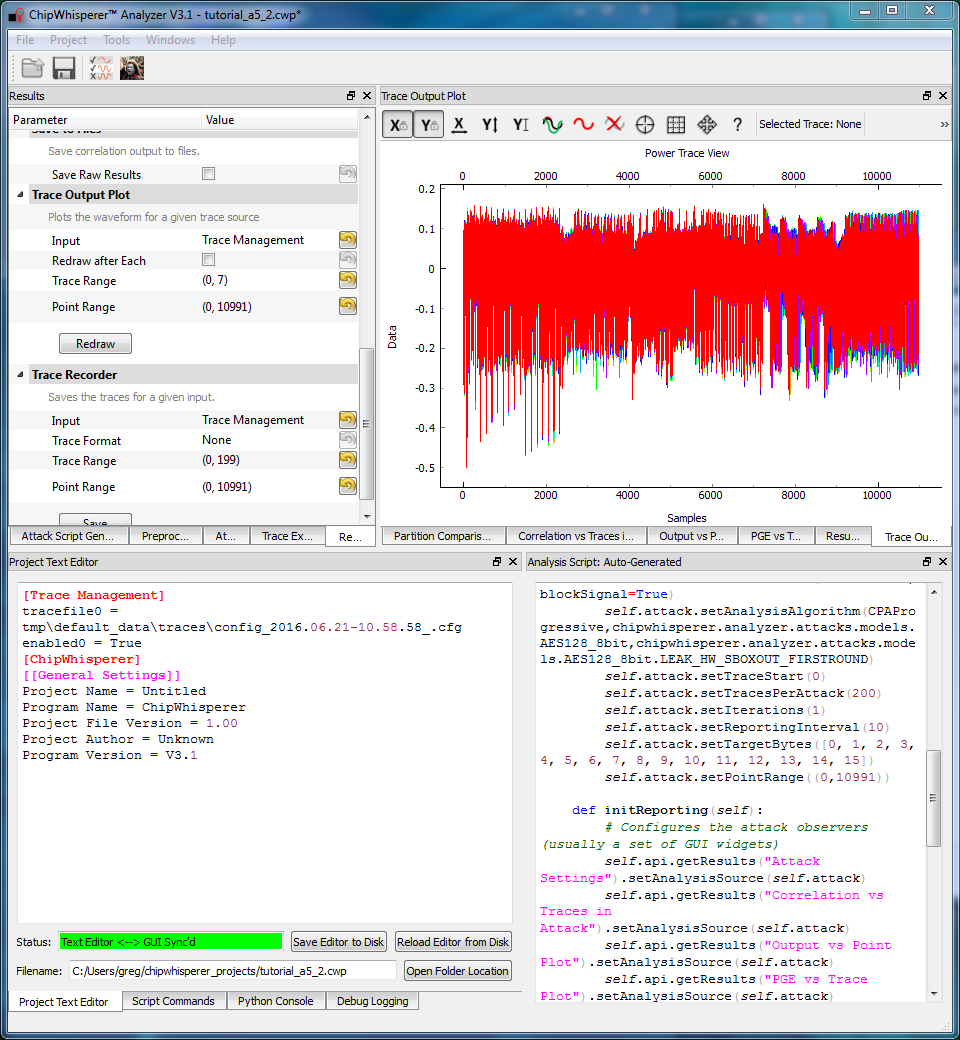
- Open the ChipWhisperer Analyzer program and load the
.cwpfile with the 13th and 14th round traces. This can be either theaes256_round1413_key0_100.cwpfile downloaded or the capture you performed. - View and manipulate the trace data with the following steps:
- Switch to the Trace Output Plot tab
- Switch to the Results parameter setting tab
- Choose the traces to be plotted and press the Redraw button to draw them
- Right-click on the waveform to change options, or left-click and drag to zoom
- Use the toolbar to quickly reset the zoom back to original
- Set up the attack in the Attack settings tab:
- Leave the Crypto Algorithm set to AES-128. (Remember that we're applying the AES-128 attack to half of the AES-256 key!)
- Change the Leakage Model to HW: AES Inv SBox Output, First Round (Dec).
- If you're finding the attack very slow, narrow down the attack a bit. Normally, this requires a bit of investigation to determine which ranges of the trace are important. Here, you can use the range from 2900 for 4200. The default settings will also work fine!
- Note that we do not know the secret encryption key, so we cannot highlight the correct key automatically. If you want to fix this, the Results settings tab has a Highlighted Key setting. Change this to Override mode and enter the key
ea 79 79 20 c8 71 44 7d 46 62 5f 51 85 c1 3b cb. - Finally, run the attack by switching to the Results Table tab and then hitting the Attack button.
the closest i can get is for software is...silentbreaksec/Throwback...HTTP/S Beaconing Implant
Throwback
HTTP/S Beaconing Implant
- Run the python script to encode strings. python tbManger.py encode http://mydomain.com/index.php
http://mydomain.com/index.php -> {57,37,37,33,107,126,126,60,40,53,62,60,48,56,63,127,50,62,60,126,56,63,53,52,41,127,33,57,33}
Note: Don't forget to add ,-1 to end of the integer array for an LP. So the above would become.
{57,37,37,33,107,126,126,60,40,53,62,60,48,56,63,127,50,62,60,126,56,63,53,52,41,127,33,57,33,-1}
- Update DNSARRAY to reflect the number of LPs listed in DNSCODE array.
- Compile!
- Setup ThrowbackLP.
Wednesday, November 1, 2017
and about the rubber ducky, from yesterday (?) .
ARD Stick One is available from:
- Adafruit (US)
- Hacker Warehouse (US)
- HakShop (US)
- iSource Asia (CN)
- Maes Electronics (BE)
- ML&S Martin Lynch & Sons (UK)
- NooElec (US/CA)
- Store4Geeks (SE)
- OFC / Ouverture Fine (FR)
- Oz Hack (AU)
- Passion Radio Shop (FR)
- Passion Radio Shop UK (UK)
- RFIDIOt.org (UK)
- Rysc Corp. (US)
- Seeed Studio (CN)
- VCTEC (KR)
- Wall of Sheep (US)
YARD Stick One (Yet Another Radio Dongle) can transmit or receive digital wireless signals at frequencies below 1 GHz. It uses the same radio circuit as the popular IM-Me. The radio functions that are possible by customizing IM-Me firmware are now at your fingertips when you attach YARD Stick One to a computer via USB.
Capabilities:
- half-duplex transmit and receive
- official operating frequencies: 300-348 MHz, 391-464 MHz, and 782-928 MHz
- unofficial operating frequencies: 281-361 MHz, 378-481 MHz, and 749-962 MHz
- modulations: ASK, OOK, GFSK, 2-FSK, 4-FSK, MSK
- data rates up to 500 kbps
- Full-Speed USB 2.0
(Official operating frequencies are guaranteed to work. Unofficial operating frequencies work in our experience.)
YARD Stick One comes with RfCat firmware installed, courtesy of atlas. RfCat allows you to control the wireless transceiver from an interactive Python shell or your own program running on your computer. YARD Stick One also has CC Bootloader installed, so you can upgrade RFCat or install your own firmware without any additional programming hardware. An antenna is not included. ANT500 is recommended as a starter antenna for YARD Stick One.
Originally based on the ToorCon 14 Badge design, YARD Stick One has several featured not previously seen in CC1111 platforms:
- SMA connector for external antennas such as ANT500
- receive amplifier for improved sensitivity
- transmit amplifier for higher output power
- strong RF performance across the entire operating frequency range
- low pass filter for elimination of harmonics when operating in the 800 and 900 MHz bands
- antenna port power control for compatibility with antenna port accessories designed for HackRF One
- GoodFET-compatible expansion and programming header
- GIMME-compatible programming test points
technical information
For documentation and open source design files, visit the project wiki.
getting help
For assistance with YARD Stick One and RfCat usage or development, please subscribe to the YARDStick mailing list. This is the preferred place to ask questions so that others may locate the answer to your question in the list archives in the future. Additionally, you may want to join us in the #rfcat IRC channel on freenod
which is an App PandwaRF is a RF analysis tool with a sub-1 GHz wireless transceiver controlled by a smartphone or a PC. Its purpose is to capture, display & transmit RF data very easily. It can be connected to an Android smartphone using BLE or USB, and to Linux using USB. It is based on the well-known RfCat & Yard Stick One tools with the Texas Instruments CC1111 RF transceiver, but with a lot of new features, making PandwaRF the perfect portable RF analysis tool.
Subscribe to:
Comments (Atom)
Intel André Ventura " portugueses não querem trabalhar " Emigrantes
https://cheganos.com/andre-ventura-os-portugueses-nao-querem-trabalhar-nisto-video/


