Saturday, May 6, 2017

of course the "system" pays trillions expertize for surviving...so this goes much more tricky

Upspin Security

Introduction

The security design of Upspin has been sketched in the accompanying Upspin overview document. Here we dive into the deeper security issues. Some of the discussion may be of interest only to experts, but the general design should be understandable by anyone given background provided in the referenced links.
When running the directory and storage servers on public cloud infrastructure Upspin attempts to provide:
  1. confidentiality and integrity protection of content even against advanced attackers, and
  2. protection of metadata against network attackers, but not against due legal process upon the cloud provider. Concerned users would run their directory server in a private cloud.
Upspin’s security model assumes that the Client endpoint platform is secure. Additional trust discussion is in the Server Management section below.

Upspin-specific Storage

In our design, Alice (which is to say, Upspin client software run by Alice) shares a file with Bob by picking a new random symmetric key, encrypting a file, wrapping the symmetric encryption key with Bob’s public keysigningthe file using her  own elliptic curve private key, and sending the ciphertext to a storage server and metadata to a directory server.
The specific ciphersuite used is selectable and defaults to P-256 for the elliptic curve algorithm, AES-256 for data encryption, and SHA-256 for checksums. The entire system is written in Go, is open-source, and uses Go’s standard cryptographic packages.
The basic idea is to choose a random number as an encryption key K, use AES to encrypt the data, and store the encrypted data in the storage server. Then, we encrypt K again, repeatedly using the public key of each potential reader of the file. We store those encrypted keys in the DirEntry for the item along with a digital signature of the data. To read the data, the reader looks in the DirEntry for the reader’s encryption of K, decrypts K, and uses that to decrypt the data.
The next few paragraphs explain this process in detail for security experts and can be skipped by less dedicated readers.
To store a file “pathname”, Alice obtains a fresh 256 bit random “dkey” and XORs the file with an AES-CTR bitstream with IV=0. The ciphertext is sent to the storage server. The storage server returns a cryptographic location string, called a reference, that we assume may safely be given to anyone and used to retrieve the ciphertext.
A username list {U} is assembled including Bob, Alice, and any others granted read access to items in the path name’s directory. Alice looks up each of the username’s public key P(U) from (a local cache of) a centralized KeyServer running at key.upspin.io. Alice wraps dkey for each reader, annotated with a hash of that user’s public key. (Alice shares with others using ciphersuites she considers adequate, say {p256,p384,p521}, though her own key may be p384. If Bob picks an RSA 1024 key, she’ll decline to wrap for him.)
Keys are wrapped as in NIST 800-56A rev2 and RFC6637 §8 using ECDH. Specifically, Alice creates an ephemeral key pair v, V=vG based on the agreed elliptic curve point G and random v. Using Bob’s public key R, Alice computes the shared point S = vR. A shared secret “strong” is constructed by HKDF of S and a string composed of the ciphersuite, the hash of Bob’s public key, and a nonce. Next, dkey is encrypted by AES-GCM using the key strong. This yields a wrapping
W(dkey,U) = {sha256(P(U)), nonce, V, aes(dkey,strong)}
which Bob can unwrap by looking through the list for his public key hash, then computing S = rV using his private key r, then reconstructing the strong shared secret via HKDF, and finally AES-GCM decrypting to recover dkey.
Using her private key, Alice signs
sha256("ciphersuite:pathname:time:dkey:ciphertext")
By signing, Alice ensures that even a reader colluding with upspin servers cannot change the file contents undetected. Alice is only claiming that she intended to save those contents with that path name, not that she necessarily is the original author or even that the contents are harmless; in this regard, we’re adopting the same semantics as “owner” in a classic Unix filesystem.
We do not insist that Alice bind her name inside the file contents, only inside the directory entry. It is cryptographically possible that two authors of a file could each have their own equally valid directory entries pointing to the same storage blob. However, unlike with some content-addressable storage systems, if two individuals write the same cleartext, it will almost certainly be encrypted with different keys and thus be stored twice, once for each encryption.
The list of readers for key wrapping is taken from the read access list described in the Access Controldocument. When that list changes, wrapped keys should be removed for the dropped readers  and extra wrapped keys made for the added readers. The directory server assists with this work queue, but needs cooperation of the owner’s Client to do the actual wrapping for new readers. This lazy update process can also handle readers’ public keys changing over time, which helps users who have lost old keys. It is inherent in the notion of a file archive that there is no perfect forward secrecy. However, a somewhat similar effect is achieved by this update process.
The path name, revision number, encrypted content location, signature, and wrapped keys are the primary metadata about a file stored by the directory server. Thus Alice reveals information to the directory server, particularly the cleartext path names and the (public keys of the) people she is sharing with. Also, to the extent that elliptic curves might be cryptographically weaker over time than AES, Alice also depends on the directory server being unwilling to distribute data to unauthorized people.
The random bit generation, file encryption, and signing/key-wrapping all are done on the Client, not on any of the servers. We intend that this system provides end-to-end encryption verifiably under the exclusive control of the end users.
This discussion is about a data-encrypting method, or in Upspin terminology, a packing, that is called ee. It uses NIST elliptic curves for end-to-end encryption, and is the default. There are other packings available, notably eeintegrity which is useful when one is willing to store signed cleartext in order to make the content available to everyone, not just to an explicit list of readers.
The directory server needs to store its hierarchy of directory entries somewhere. (It is represented as a Merkle tree, a tree of hash values.) The server uses the encryption scheme described above to store its data in the storage server.

Key Management

An Upspin user joins the system by publishing a key to a central key server. We believe a global collection of public key bindings is the best way to promote easy sharing between strangers, and we think this need extends beyond Upspin. We’re running our own key server for the moment but anticipate converting to Key Transparency or whatever other strong system becomes most popular.
Our key server enables detection of tampering by publishing a full, incrementally hashed transaction log athttps://key.upspin.io/log. If you can confirm a friend’s public key some other way, compare it to what is stored at key.upspin.io and report to us and the public if you ever find a mismatch. Compare the key.upspin.io/log hash you see with what your friend sees, and report any discrepancy. Watch for your own key in the log and report if there’s ever a change, even momentary, that you did not iniitate yourself. You’ll be giving the rest of our users herd immunity.
As far as Upspin is concerned, a user is an email address, authenticated by an elliptic curve key pair used for signing and encrypting. We anticipate that the user will rotate keys over time, but we also assume that they will retain all old key pairs for use in decrypting old content, and will accept losing that access to that content if they lose all copies of their keys.
To generate a new key pair, a user executes keygen and copies on paper the 128 bit seed as backup. This seed is expressed as a proquint. The keygen program saves the elliptic curve public and private keys, as decimal integers in plain text files in the user’s home .ssh directory. A user may “restore” keys to multiple devices including smartphones.
The public part of the key pair is stored in a file public.upspinkey, conventionally in the directory $HOME/.ssh/ along with the user’s other keys. The SHA-256 hash of that file is called the keyHash and is used to identify which readers have cryptographic access to data contents via encryption key wrapping. This file can safely be given to anyone, and is the material registered at the key server. The private part of the key pair is stored in a file secret.upspinkey, also in ~/.ssh/, and is read-protected to the user by normal file permissions (but no extra passphrase). Eventually, we envision that such secrets will be protected by hardware but we’re starting with local file as more portable for initial deployment. If you want some amount of hardware protection, use an encrypted filesystem or Ironkey for ~/.ssh. Older key pairs, both public and private parts, are stored in a file secret2.upspinkey. Based on past experience with PGP, our choice of filenames is intended to help the average user avoid the common mistake of confusing which information can be freely shared and which needs to be carefully protected. Key rotation happens in the following sequence of operations:
upspin cmd operationpublic,secret.upspinkeysecret2.upspinkeykeyserversignatureswraps
initial keyk1-k1k1, -k1
new keyk2k1k1k1, -k1
countersignk2k1k1k2, k1k1
rotatek2k1k2k2, k1k1
share -fixk2k1k2k2, k1k2
We do not anticipate that the keys used here will be used for any other purpose, and we’ve chosen proquint as an obscure technology to promote that independence. We therefore do not think there are any viable protocol interleaving attacks.
With secret.upspinkey,we follow Chrome’s password-manager reasoning that if the user does not have encrypted disk storage or is not in exclusive control of their home directory, they have lost the security game anyway and there is nothing meaningful we can do to protect them. As with Chrome, we realize this will be a controversial position. We look forward to adopting some Security Key or other hardware-protected private key storage. There are no passwords in our system and we don’t intend to have any.
Key pairs have three representations: 1. string, used for storage and between programs like User.Lookup 2. ecdsa, internal binary format for computation 3. a secret seed sufficient to reconstruct the key pair In form 1, the first bytes describe the packing name, e.g. “p256”. In form 2, there is a Curve field in the struct that plays that role. Form 3, used only in cmd/upspin/keygen.go, is simply 128 bits of entropy expressed as proquints.
Although we’re using AES 256 for bulk encryption to promote long-term interoperability, the default client uses only 128 bits of entropy in generating the elliptic curve key pair. That bit length was chosen to make the secret seed small enough for ordinary people to be willing to write down. Safe backup of the key is a long-term risk of all archival encryption. We’ll see if the mental model of protecting a secret on paper works in real life.
It seems 128 bits of entropy is good enough, at least until practical implementations of Grover’s algorithm come along, and by then we’ll have to replace elliptic curves anyway.
By collecting all the private key operations into the factotum package, we are providing for an isolated implementation, as in qubes-split-gpg or ssh-agent.

Server Management

We’re currently running our storage server (for encrypted bulk file content), directory server (for metadata), and key server (for keys and location of directory server) on Google Cloud Platform at domain name upspin.io.
A user connects to these servers by HTTPS, implicitly using TLS 1.2. To identify the user accessing any Upspin server, the RPC framework presents an authentication request signed with the user’s private key. This protocol guarantees that only registered Upspin users can access Upspin services. (Reads from the key server do not require authentication.)
Administrators of storage and directory servers can use the authenticated user name to restrict write access to a subset of all Upspin users. An instance of the default storage server maintains a list of users permitted to store blocks on the server.
The upspin.io servers use certificates from LetsEncrypt. You may use the default system Root CA list, or specify tlscerts in your ~/upspin/config pointing to a directory with just DST_Root_CA_X3.pem.
Implicit in the cryptographic discussion earlier is the fact that a directory server administrator can read any file name, the writer, and the list of readers. This is roughly equivalent to using PGP inside an email system like Gmail: very few attackers can reach the metadata, but a rogue insider or law enforcement with judicial oversight would be able to. As mentioned in the introduction, a concerned user could choose to run the directory server on their own machine.
For brevity, let us say a “bad directory server” is one that has been compromised or is malicious or is compelled under legal process or simply has bugs.
Besides observing metadata, a bad directory server can cause harm by returning an incorrrect Access file to the client. Access files are signed by the owner, but replay is possible; this might yield a stale list of readers or other permissions. (Similarly, the directory server could serve a stale signed DirEntry.) In addition to checking signatures, the client confirms an Access file is in the path from the current directory up to the root to limit the damage of a malicious directory server returning the wrong result from a call to WhichAccess. A cautious owner should not place private directories inside public directories.
To prevent a bad directory server from returning fraudulent directory entries that would be undetectable by upspinfs, all the packings at a minimum include a signature by the writer of the path name, packing, and timestamp. Plain packing does only this minimum, with no signature or encryption on the content, to simplify implementation of lightweight dynamic file systems as might be associated with devices such as cameras.
Finally, while the backup properties of Upspin improve on most people’s file systems today, a bad directory or storage server can certainly wreak havoc through deletion.
Writing a file to a storage server reveals the creation time and the file size, but nothing else. Thus we expect even very cautious users can enjoy the availability advantages of public cloud storage. If they prefer, they can run the Upspin storage server code off their own local disk.

Alternative Designs

The design space has many choices, offering different protections.
Some ask why the directory server has access to cleartext filenames. It looked complicated to provide the API we do while somehow wrapping encryption keys for filenames that could be extracted by each client that needed them. Glob then has to then be implemented on the client, which adds even more complexity when done not by the file tree owner but by a client with permission only to parts of the tree. Homomorphic encryption approaches either don’t support full glob or are very complicated themselves. In practice, the user can pick obscure filenames for special cases. The more challenging information leak from a bad directory server is the list of reader accounts that you’ve shared your file with. There are also some things that could be done about that, adding cost and complexity. Google Cloud has decent security and also pushes back against overly broad warrants, so we believe running the directory server in the cloud is an acceptable risk. If you worry about this, run the directory server on your own well-protected system.
Others ask why we depend on a central key server rather than some distributed or federated system. As mentioned before, we are not adamant about using our current key server forever; if a better solution comes along we would consider switching. Any better system has to have at least the resistance our current one does to undetected tampering or inconsistent responses.
Most of all, we welcome suggestions for how to make our system simpler. For us, complexity bugs are a bigger fear than warrants.

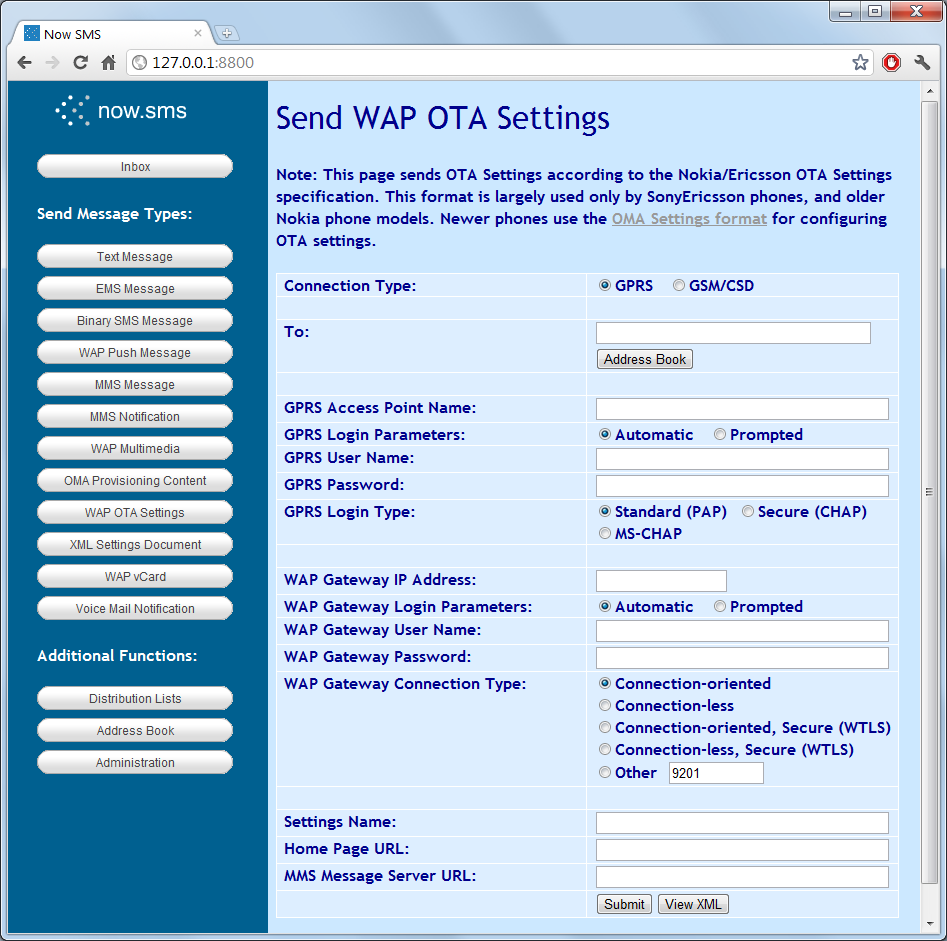
WELCOME BACK TO WAR GENTLEMEN! So, the NSA, uses a japonese technology for forecnsics from Cellebrit technology; Cellbrit is basicly over the air programming, changing settings from SIM cards, without us "terrorists" don't know about it; So, what can we do to protect ourselfs from the "system"

NowSMS supports sending OTA (Over-the-Air) configuration information to mobile devices in order to configure some phone settings, such as internet browser, MMS, SyncML, and instant messaging settings.
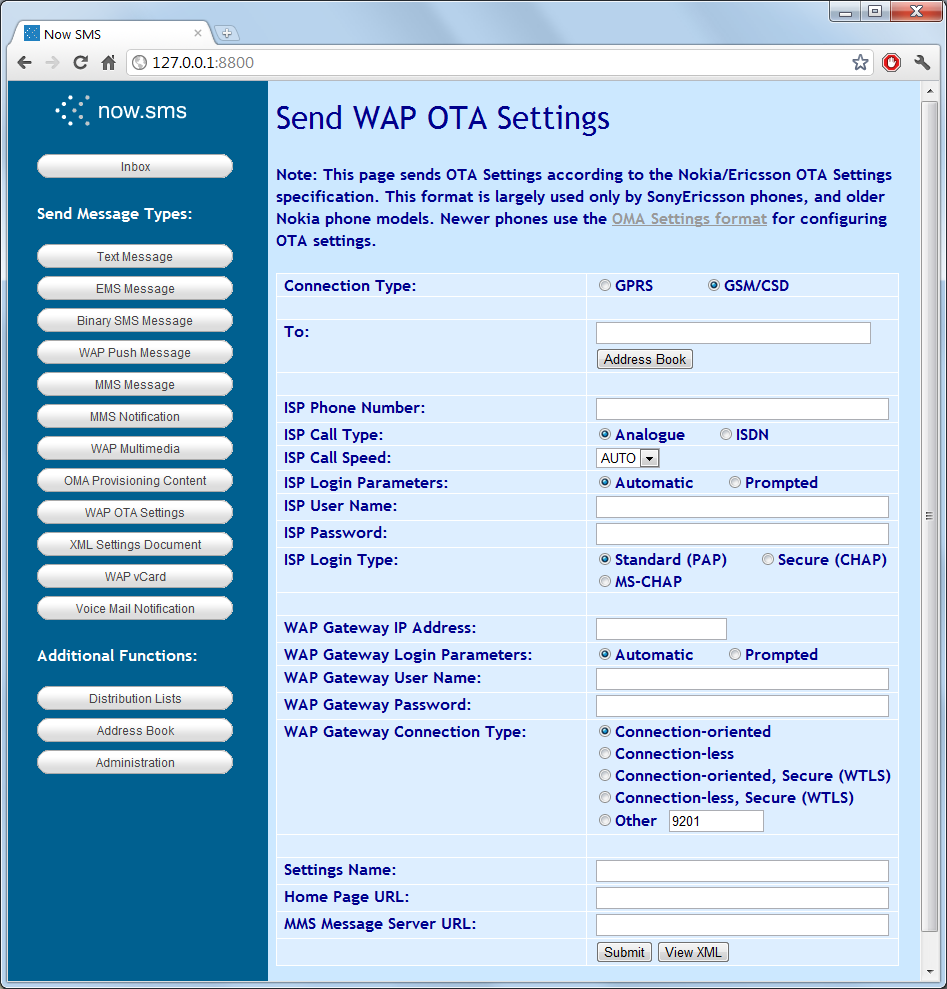
The “Send WAP OTA Settings” option sends configuration settings in a format that is compatible with the Nokia/Ericsson OTA Specification (up to and including v7.1). This specification is mostly used by older devices, while most newer devices use the OMA (Open Mobile Alliance) OTA Provisioning Content, which is accessible via the Send OMA OTA Settings menu.
There are four different types of WAP OTA settings.
  1. Connection (and MMS Settings) – This sends configuration settings for the WAP/internet browser and/or MMS client.
  2. Bookmark – This sends a single bookmark for a web site to the mobile device (mostly supported only by older Nokia phones)
  3. SyncML Settings – This sends configuration settings for the SyncML client
  4. Wireless Village/IMPS Settings – This sends configuration settings for the Instant Messaging client.
Additional information regarding WAP OTA settings can be found in Sending WAP OTA Settings.
Note that beginning with NowSMS 2007, there is now a “View XML” button on all of the WAP and OMA OTA Settings forms. This button will display the XML document that NowSMS has generated for the current web form. This allows for easier customisation of settings to meet different requirements.
The OTA web forms supported by NowSMS are displayed on the following pages.

WAP OTA: Browser/MMS Client – GPRS/EDGE/Packet Data Settings

“Connection Type” specifies whether to use GPRS/EDGE/Packet Data, or GSM/CSD (Circuit-Switched Data). The web form is different depending on this selection, here we will describe the settings relevant for GPRS/EDGE/Packet Data.
“Phone Number to Receive Settings” is a comma delimited list of one or more phone numbers to receive the settings via SMS.
“GPRS Access Point Name” is the Access Point Name (APN) that should be used for these connection settings.
If “GPRS Login Parameters” is set to “Prompted”, then the browser will prompt for a user name and password every time a connection is attempt, and the “GPRS User Name” and “GPRS Password” settings will be ignored. If it is set to “Automatic”, the user will not be prompted for login information, and the “GPRS User Name” and “GPRS Password” fields will be used automatically. (Note that many access points do not require a user name and password to be specified.)
“GPRS Login Type” specifies the authentication protocol to be used for sending the user name and password for connecting to the access point. The standard choice is “PAP”, however “CHAP” and “MS-CHAP” can also be selected.
“WAP Gateway IP Address” specifies the IP address of a WAP gateway to be used for this connection profile.
If “WAP Gateway Login Parameters” is set to “Prompted”, then the browser will prompt for a user name and password every time a connection is attempt, and the “WAP Gateway User Name” and “WAP Gateway Password” settings will be ignored. If it is set to “Automatic”, the user will not be prompted for login information, and the “WAP Gateway User Name” and “WAP Gateway Password” fields will be used automatically. (Note that most gateways do not require a user name and password to be specified, and many phones also do not support sending a user name and password to the WAP Gateway.)
“WAP Gateway Connection Type” specifies which of the WAP protocols to use when connecting to the WAP Gateway. For most mobile operator gateways, you would use “Connection-oriented” for a standard non-secure connection (port 9201), or “Connection-oriented, Secure (WTLS)” for a secure connection (port 9203). The “Connection-less” protocols provide limited functionality. For a WAP2/HTTP Proxy, the port number is installation dependent. Frequently port 8080 is used, but it can be any port value.
“Settings Name” provides a descriptive name for the connection settings, which may be displayed on the mobile phone.
“Home Page URL” specifies the home page to be configured for the settings, if these settings are to be used to configure WAP/internet browser settings.
“MMS Message Server URL” specifies the URL for the MMSC server, if these settings are to be used to configure the MMS client.
Note that some phones support both the “Home Page URL” and “MMS Message Server URL” elements being present, and will configure both the WAP/internet browser and the MMS client. Other phones will only support one of these settings being present.
Use the “Submit” button to send the settings, or use the “View XML” button to view the XML settings that are generated by this web form.
Note: To define connection settings that do not use a proxy, leave the “WAP Gateway IP Address” field blank, and set the “WAP Gateway Connection Type” to port “80”.

WAP OTA – Browser/MMS Client: GSM/Circuit Switch Data Settings

“Connection Type” specifies whether to use GPRS/EDGE/Packet Data, or GSM/CSD (Circuit-Switched Data). The web form is different depending on this selection, here we will describe the settings relevant for GSM/CSD.
“Phone Number to Receive Settings” is a comma delimited list of one or more phone numbers to receive the settings via SMS.
“ISP Phone Number” is the phone number to be dialed to connect to the access server.
“ISP Call Type” specifies whether the connection type is “Analogue” or “ISDN”.
“ISP Call Speed” specifies the speed of the connection. Normally this would be set to “AUTO”, but it may be necessary to configure a specific speed in special situations.
If “ISP Login Parameters” is set to “Prompted”, then the browser will prompt for a user name and password every time a connection is attempt, and the “ISP User Name” and “ISP Password” settings will be ignored. If it is set to “Automatic”, the user will not be prompted for login information, and the “ISP User Name” and “ISP Password” fields will be used automatically.
“ISP Login Type” specifies the authentication protocol to be used for sending the user name and password for connecting to the access server. The standard choice is “PAP”, however “CHAP” and “MS-CHAP” can also be selected.
“WAP Gateway IP Address” specifies the IP address of a WAP gateway to be used for this connection profile.
If “WAP Gateway Login Parameters” is set to “Prompted”, then the browser will prompt for a user name and password every time a connection is attempt, and the “WAP Gateway User Name” and “WAP Gateway Password” settings will be ignored. If it is set to “Automatic”, the user will not be prompted for login information, and the “WAP Gateway User Name” and “WAP Gateway Password” fields will be used automatically. (Note that most gateways do not require a user name and password to be specified, and many phones also do not support sending a user name and password to the WAP Gateway.)
“WAP Gateway Connection Type” specifies which of the WAP protocols to use when connecting to the WAP Gateway. For most mobile operator gateways, you would use “Connection-oriented” for a standard non-secure connection (port 9201), or “Connection-oriented, Secure (WTLS)” for a secure connection (port 9203). The “Connection-less” protocols provide limited functionality. For a WAP2/HTTP Proxy, the port number is installation dependent. Frequently port 8080 is used, but it can be any port value.
“Settings Name” provides a descriptive name for the connection settings, which may be displayed on the mobile phone.
“Home Page URL” specifies the home page to be configured for the settings, if these settings are to be used to configure WAP/internet browser settings.
“MMS Message Server URL” specifies the URL for the MMSC server, if these settings are to be used to configure the MMS client.
Note that some phones support both the “Home Page URL” and “MMS Message Server URL” elements being present, and will configure both the WAP/internet browser and the MMS client. Other phones will only support one of these settings being present.
Use the “Submit” button to send the settings, or use the “View XML” button to view the XML settings that are generated by this web form.
Note: To define connection settings that do not use a proxy, leave the “WAP Gateway IP Address” field blank, and set the “WAP Gateway Connection Type” to port “80”.
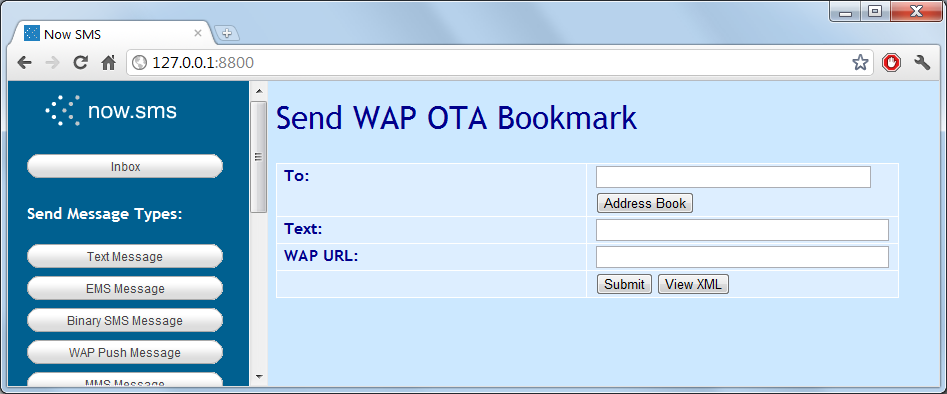
“Phone Number” specifies a comma delimited list of one or more phone numbers to receive the bookmark.
“Text” specifies the descriptive name for the bookmark.
“WAP URL” specifies the HTTP URL for the bookmark.
Use the “Submit” button to send the settings, or use the “View XML” button to view the XML settings that are generated by this web form.
Please note that this functionality is not very widely supported, and is mostly supported only by older Nokia phones.

WAP OTA: SyncML Settings

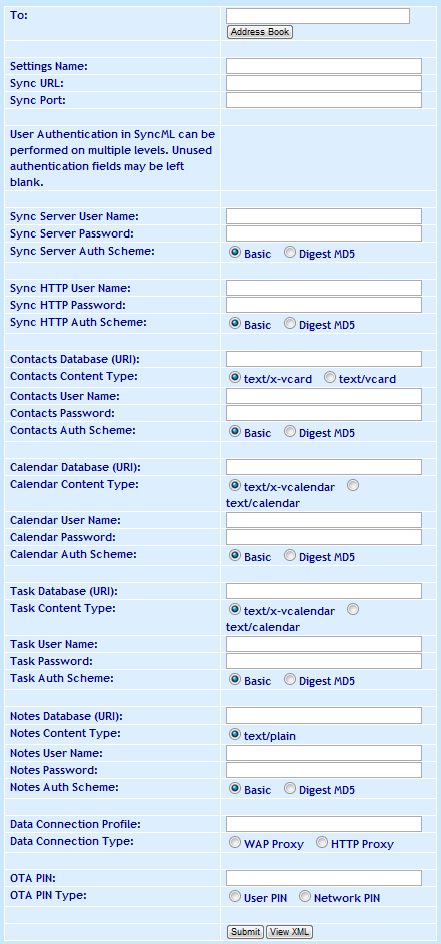
“Phone Number to Receive Settings” is a comma delimited list of one or more phone numbers to receive the settings via SMS.
“Settings Name” is a descriptive name for the settings that may be displayed on the mobile phone.
“Sync URL” is the HTTP URL associated with the SyncML server.
“Sync Port” is the port number associated with the SyncML server. Normally this would be part of the “Sync URL”, but there is some ambiguity in this OTA specification.
User authentication in SyncML can be done on different levels. Therefore this OTA form contains many forms that allow a user name and password to be input. Normally, user authentication will only be performed by the SyncML Server, in which case it is only necessary to use the “Sync Server User Name”“Sync Server Password” and “Sync Server Auth Scheme” settings for specifying a user name and password.
If HTTP Authentication is needed (Authorization: header), then the “Sync HTTP User Name”“Sync HTTP Password” and “Sync HTTP Auth Scheme” settings can be used.
“Database URI” is required for each SyncML database that is supported by the server. This is a relative URI, and not a complete URL specification. (It is common to see values such as “Calendar” or “./Calendar” for the “Calendar Database URI”, for example.)
The “Data Connection Profile” setting refers to an existing data connection profile that should exist on the device (e.g., the “Settings Name” associated with OTA settings for a browser connection settings message that was previously sent to the device). The “Data Connection Type” specifies whether the “Data Connection Profile” uses a “WAP Proxy” or an “HTTP Proxy” (although it is unclear why this might be necessary to know in the SyncML settings).
“OTA PIN” and “OTA PIN Type” are optional parameters supported for SyncML settings over WAP OTA, but that are commonly used in OMA OTA requests.
An “OTA PIN” can be associated with an OTA settings message to provide a layer of authentication to the message. Many devices will allow you to send OTA settings without a PIN, but some will require a PIN to be present before the settings will be accepted.
There are three different types of OTA PINs, depending on the “OTA PIN Type” setting.
  1. The simplest “OTA PIN Type” is “User PIN” (USERPIN). This setting indicates that a short PIN code (often 4 digits) is supplied as the “OTA PIN”. When the user receives the OTA settings message, they will need to supply this PIN code in order to be able to open the message and apply the settings.
  2. “Network PIN” (NETWPIN) indicates the PIN is a network PIN code. In the GSM environment, this is the IMSI number associated with the SIM card in the device. (Hint, if you want to experiment with determining the PIN card associated with a SIM, you can put the SIM into a GSM modem and the AT+CIMI command to return the IMSI. However, not all GSM modems support the AT+CIMI command.) When the device receives the settings, if the NETWPIN does not match the IMSI, the settings will be discarded.
  3. An additional type of PIN, known as “USERNETWPIN” also exists, which indicates a combination of the USERPIN and NETWPIN types. To use this OTA PIN type, select “Network PIN”, and define the OTA PIN as the IMSI number associated with the SIM card in the device, followed by a “:” character, followed by a USERPIN (e.g., 1234567889012345:1234). When the device receives the settings, the user will be prompted for a PIN. This user supplied PIN, and the SIM card IMSI, must match in order for the settings to be accepted.
Use the “Submit” button to send the settings, or use the “View XML” button to view the XML settings that are generated by this web form.

WAP OTA: Wireless Village/ IMPS Settings

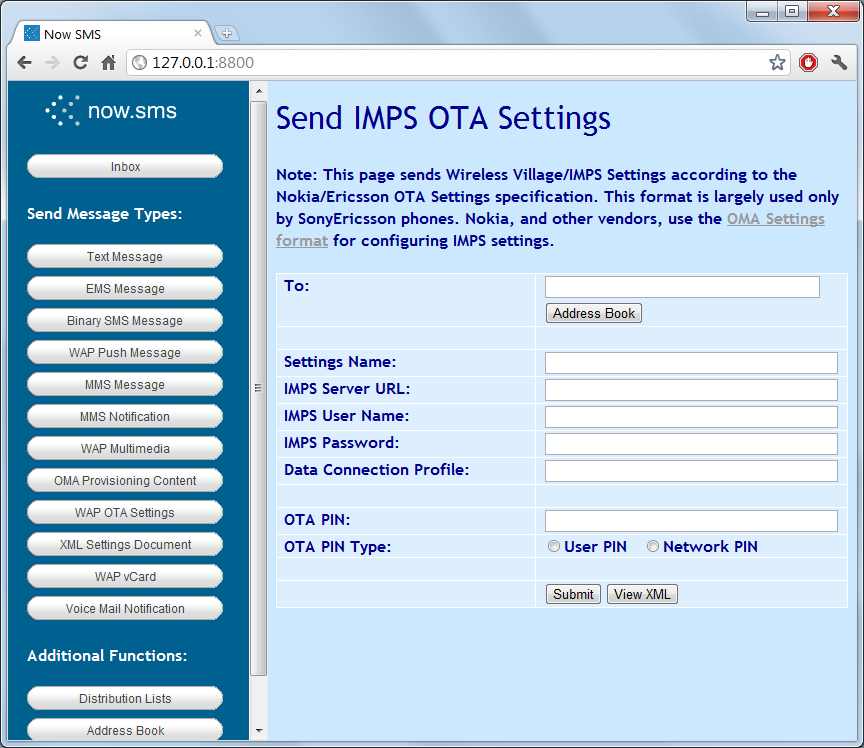
“Phone Number to Receive Settings” is a comma delimited list of one or more phone numbers to receive the settings via SMS.
“Settings Name” is a descriptive name for the settings that may be displayed on the mobile phone.
“IMPS Server URL” is the HTTP URL associated with the Wireless Village/IMPS server.
“IMPS User Name” and “IMPS Password” define the user name and password for logging into the Wireless Village/IMPS Server.

Send WAP OTA Settings


The “Data Connection Profile” setting refers to an existing data connection profile that should exist on the device (e.g., the “Settings Name” associated with OTA settings for a browser connection settings message that was previously sent to the device).
“OTA PIN” and “OTA PIN Type” are optional parameters supported for IMPS settings over WAP OTA, but that are commonly used in OMA OTA requests.
An “OTA PIN” can be associated with an OTA settings message to provide a layer of authentication to the message. Many devices will allow you to send OTA settings without a PIN, but some will require a PIN to be present before the settings will be accepted.
There are three different types of OTA PINs, depending on the “OTA PIN Type” setting.
  1. The simplest “OTA PIN Type” is “User PIN” (USERPIN). This setting indicates that a short PIN code (often 4 digits) is supplied as the “OTA PIN”. When the user receives the OTA settings message, they will need to supply this PIN code in order to be able to open the message and apply the settings.
  2. “Network PIN” (NETWPIN) indicates the PIN is a network PIN code. In the GSM environment, this is the IMSI number associated with the SIM card in the device. (Hint, if you want to experiment with determining the PIN card associated with a SIM, you can put the SIM into a GSM modem and the AT+CIMI command to return the IMSI. However, not all GSM modems support the AT+CIMI command.) When the device receives the settings, if the NETWPIN does not match the IMSI, the settings will be discarded.
  3. An additional type of PIN, known as “USERNETWPIN” also exists, which indicates a combination of the USERPIN and NETWPIN types. To use this OTA PIN type, select “Network PIN”, and define the OTA PIN as the IMSI number associated with the SIM card in the device, followed by a “:” character, followed by a USERPIN (e.g., 1234567889012345:1234). When the device receives the settings, the user will be prompted for a PIN. This user supplied PIN, and the SIM card IMSI, must match in order for the settings to be accepted.
Use the “Submit” button to send the settings, or use the “View XML” button to view the XML settings that are generated by this web form.

Friday, May 5, 2017

So to fuck the "system" today last call, its again sending text messages trought the mobile phone without they be able to cache , made by subconference call request who its undetected Let me start "One of the main features that Volley has is eliminating the need for using AsyncTask for network operations as well as allowing you to avoid using HttpUrlConnection and HttpClient."

The code

One solution I came up with was to create a callback that I will pass to the method that has the call to JsonObjectRequest so that when we call this method we can use the callback to get the request value and process it further.
Let’s start by creating a new Android project and add the following lines to the AndroidManifest.xml file:
 android:name="android.permission.INTERNET"/>


        android:allowBackup="true"
        android:icon="@mipmap/ic_launcher"
        android:theme="@style/AppTheme"
        android:name=".controllers.NetworkController">
We must add INTERNET permission in order to make the HTTP request and we added a Controller that will initialize the request queue. Next let’s add the code for the controller:
public class NetworkController extends Application {

    private static final String TAG = NetworkController.class.getSimpleName();

    private RequestQueue mRequestQueue;

    private static NetworkController mInstance;

    @Override
    public void onCreate() {
        super.onCreate();
        mInstance = this;
    }

    public static synchronized NetworkController getInstance() {
        return mInstance;
    }

    public RequestQueue getRequestQueue() {
        if (mRequestQueue == null) {
            mRequestQueue = Volley.newRequestQueue(getApplicationContext());
        }
        return mRequestQueue;
    }

    public <T> void addToRequestQueue(Request<T> req, String tag) {
        req.setTag(TextUtils.isEmpty(tag) ? TAG : tag);
        getRequestQueue().add(req);
    }

    public <T> void addToRequestQueue(Request<T> req) {
        req.setTag(TAG);
        getRequestQueue().add(req);
    }

    public void cancelPendingRequests(Object tag) {
        if (mRequestQueue != null) {
            mRequestQueue.cancelAll(tag);
        }
    }

}
Next step is to create the method that holds our JsonObjectRequest:
public void fetchData(final DataCallback callback) {
        String url = "your-url-here";

        JsonObjectRequest jsonObjectRequest = new JsonObjectRequest
                (Request.Method.GET, url, null, new Response.Listener<JSONObject>() {
                    @Override
                    public void onResponse(JSONObject response) {
                        Log.d(tag, response.toString());

                        try {
                            callback.onSuccess(response);
                        } catch (JSONException e) {
                            Log.e(tag, e.getMessage(), e);
                        }
                    }
                }, new Response.ErrorListener() {
                    @Override
                    public void onErrorResponse(VolleyError error) {
                        VolleyLog.d(tag, "Error: " + error.getMessage());
                    }
                });

        NetworkController.getInstance().addToRequestQueue(jsonObjectRequest);
    }
As you can see above we added a parameter to the fetchData method representing the callback. Let’s implement it:
public interface DataCallback {
    void onSuccess(JSONObject result);
}
Now let’s call fetchData and use the response that comes from the webservice:
public void useData() {
    fetchData(new DataCallback() {
        @Override
        public void onSuccess(JSONObject result) {
            try {
                data = result.getString("data");
            } catch (JSONException e) {
                Log.e(tag, e.getMessage(), e);
            }
        }
    });
}

http://programminglife.io/android-volley-synchronous-request/