Monday, May 25, 2015


Search Results : nuclear light bulb » The Unwanted Blog

Jul122012
 
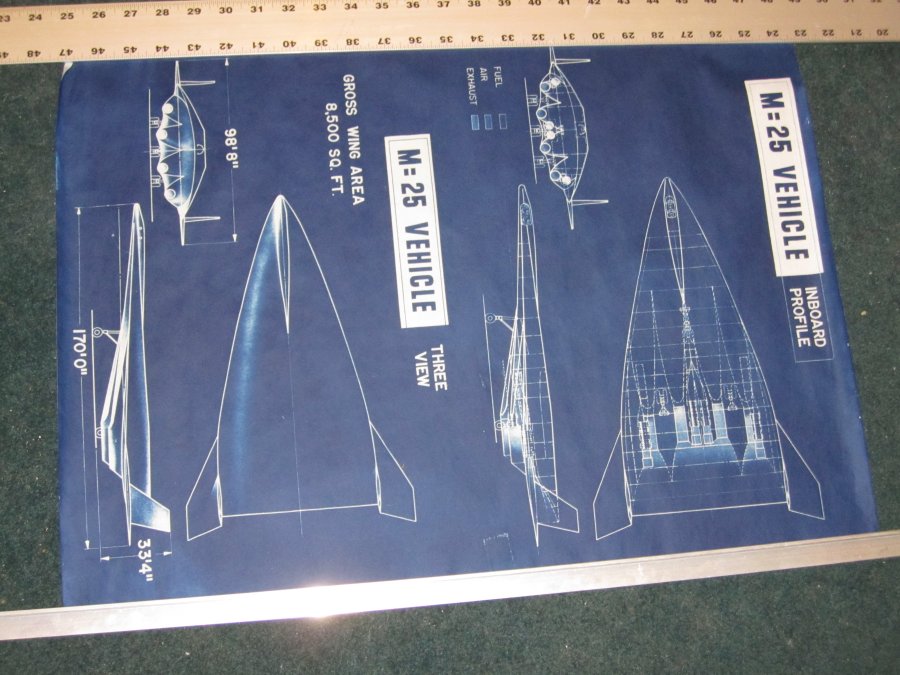
Cyanotype Print 01: Nuclear Light Bulb
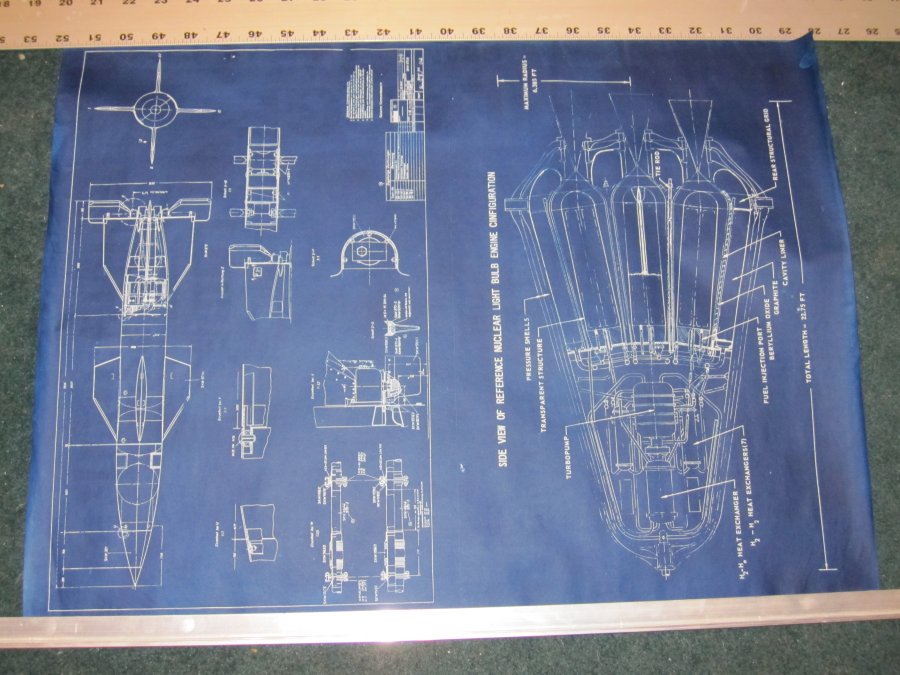
A NASA diagram of a Nuclear Light Bulb, an advanced nuclear rocket that uses incandescent uranium plasma to irradiate hydrogen gas to provide thrust. NOTE: There is a mis-spelled word on the blueprint. It was mis-spelled by NASA way back when… it’s shown as it was published.

A hand made cyanotype blueprint on sturdy 12X18 watercolor paper. Each is unique, and likely to feature small imperfections.The blue will fade if left in the sun. If this happens, it can be darkened by placing it somewhere dark with good air flow to re-oxidize the ink. Alternatively. hydrogen peroxide, available from grocery stores, will instantly oxidize the ink and restore it to its full hue.
 Posted by at 7:50 pm
Jul282010
 
To continue
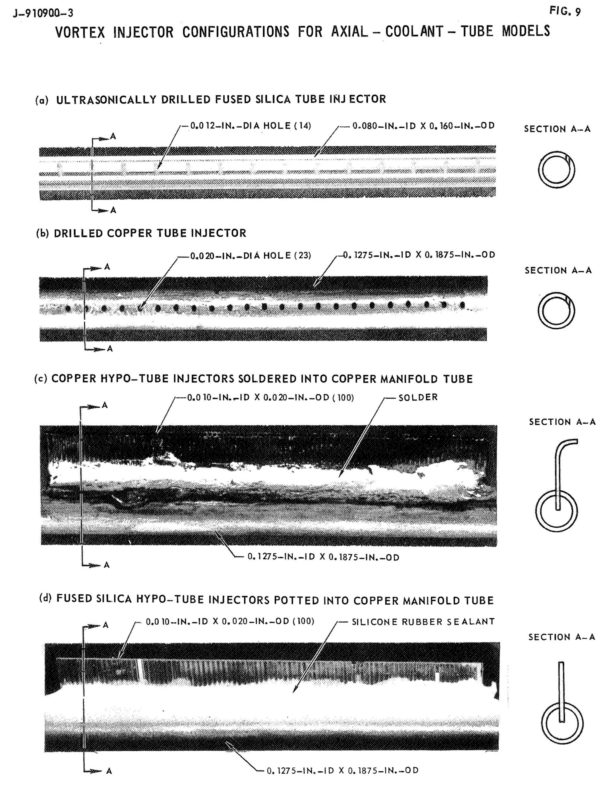
A uranium plasma with a core temperature of 42,000 degrees Rankine (23,333 K) is simply incapable of being held by any solid structure. The highest melting point of any known substance is tantalum hafnium carbide, at 4488 K. The uranium plasma would simply evaporate any material it came into contact with.
So, the trick was to make sure the uranium plasma didn’t come into contact with any solid materials. To do this, a “radial inflow vortex” was to be employed. Within the cylindrical reactor chambers, the uranium plasma would be held within the center, away from direct contact with the walls, by a rapidly rotating sheath of neon gas. Injected tangentially along the walls, the neon gas would travel in a helical pattern up the length of the cylinder and would be extracted at the forward end, to be cooled and recycled back into the system. The rapid rotation of the neon gas would be translated to the uranium plasma, and the whole plug of gas would spin at a high rate. Centrifugal force would keep the system properly distributed… while normally it would seem that a uranium gas would be denser than neon, the fact was that at the fabulously high temperatures involved, the uranium would be lower density than the cooler neon, and thus would be suspended in the core, away from the walls.
While the core temperature of the uranium plasma was 42,000 R, the outer surface would be a comparatively chilly 15,000 R. This is of course still far in excess of what any material structure can handle. But the neon, already a gas, could handle 15,000 R; due to the vortext structure, the innermost surface of the neon layer, where it was in contact with the uranium, would also be at 15,000 R, but a steep temperature gradient dropped the temperature to a modest, and structurally possible, temperature of 2000 R at the walls. The thickness of the neon gas layer was estimated to be under 0.05 feet.
Each of the seven chambers would have a neon flow rate of 2.96 pounds per second, and an axial velocity of 1.95 feet per second and a tangential velocity of 10 feet per second, with a total dwell time of 3.8 seconds. The hot neon would extract energy from the reactor, of course, to the sum of 4,120 BTU/sec. The hot neon would be used, in part, to pre-warm the hydrogen fuel.
—————–
nlb1.jpg
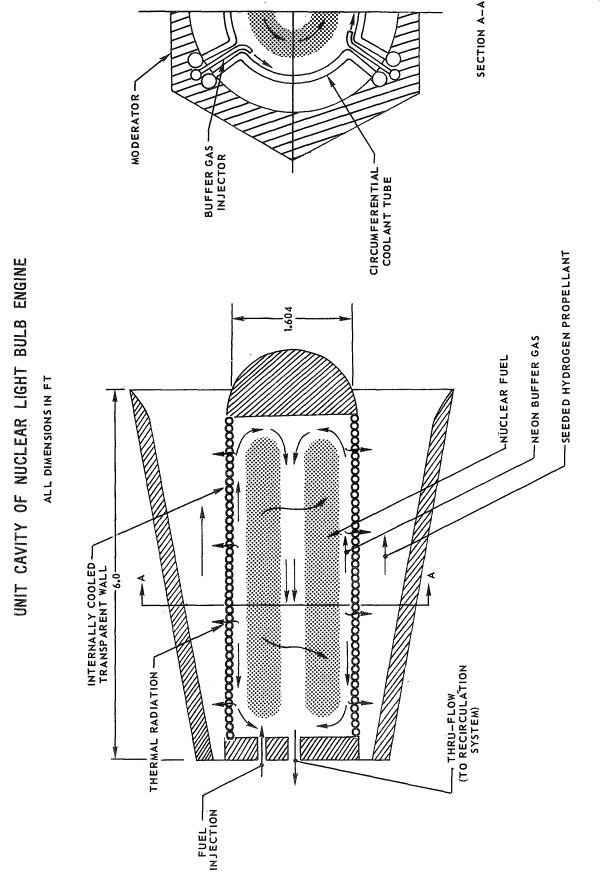
Schematic view of one of the seven chambers in the nuclear lightbulb engine (United Aircraft)
————–
Even with the neon buffer layer, a simple glass wall would not be sufficient to withstand the harsh environment. As well as simply being in contact with 2000 R neon gas, the transparent wall would also have a vast sleet of radiation passing through it… infra-red, gamma rays, neutrons, the whole spectrum. Once again there was the problem that no transparent material would possibly be able to survive the environment. Even the most optically transparent material will absorb some of the radiation passing through it… and this absorbed energy will be converted directly to heat. It would not take very long at all for the clearest substance to get incredibly hot… which, of course, was the goal with the hydrogen propellant. What was desired for the propellant was manifestly not desired for the structure.
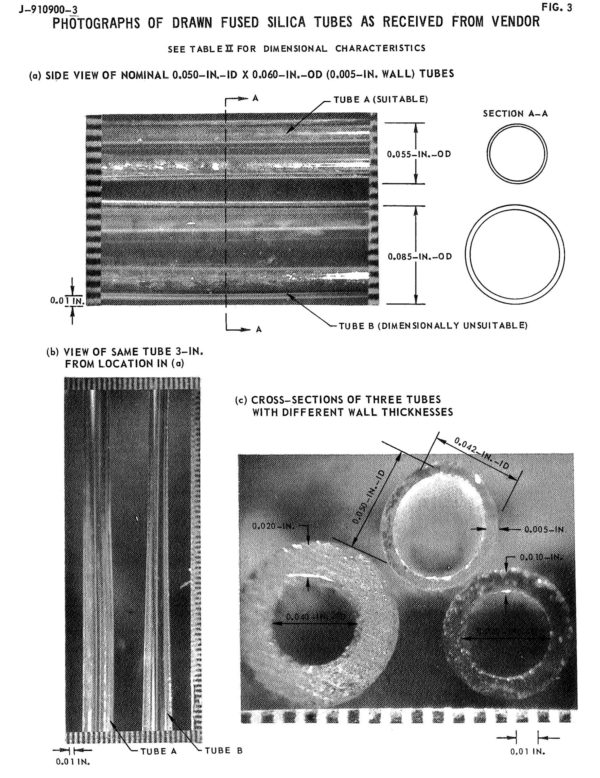
So the transparent walls were to be made not out of monolithic sheets, but thin-walled tubes. High-purity fused silica was the baselined material of choice. Thought was given to single-crystal beryllium oxide and synthetic quartz as materials, as they had better transparency in the ultraviolet, but production of the required tubes using these materials was undemonstrated. To cool the tubes, hydrogen gas would be pumped through.
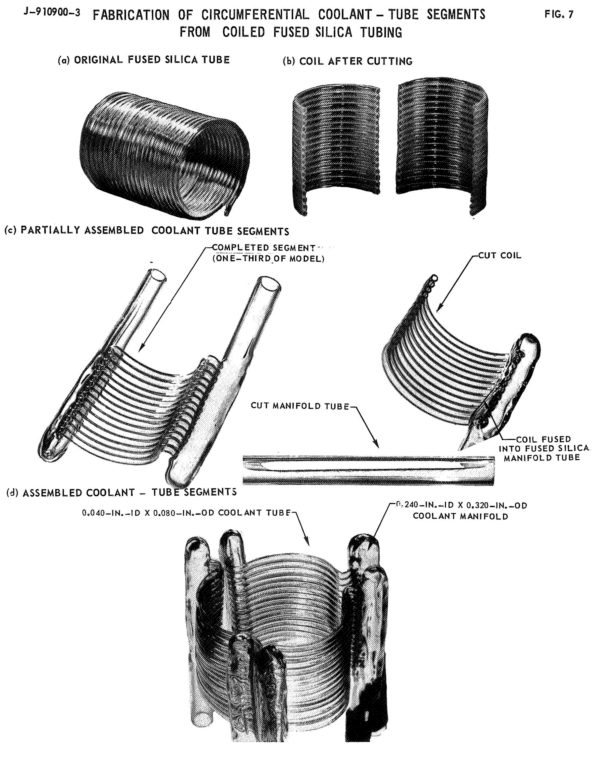
The cylindrical walls were built in three 120-degree radial segments. At the end of each segment was a manifold for injection or extraction of the hydrogen coolant, so the hydrogen did not travel very far around the circumference of the cylinder. This assured that the hydrogen did not have time to heat up to much, and that the silica glass would be maintained at a reasonably constant temperature of between 800 and 1100 Celcius (yes, the reports have units all over the place). Corning Type 7940 and General Electric Type 151 fused silicas typically had a purity of SiO2 of 99.997 percent, with Al2O3 being the primary impurity. Purity was essential… the greater the purity, the greater the transparency.
Since this was the late 1960’s, United Aircraft actually ran a number of physical experiments to demonstrate the feasibility of their designs and materials, rather than a series of colorful computer simulations. As operating a uranium plasma reaction was somewhat beyond the scope and funding of their contract with NASA, they instead used a 1.2 megawatt RF induction heater to generate an argon plasma of about 15,000 R in a subscale “reactor.” The subscale test setup used both axial tubes (with wall thicknesses down to 0.005inches) and circumferential tubes potted into the manifold with RTV silicone.
———–
nlb8.jpg
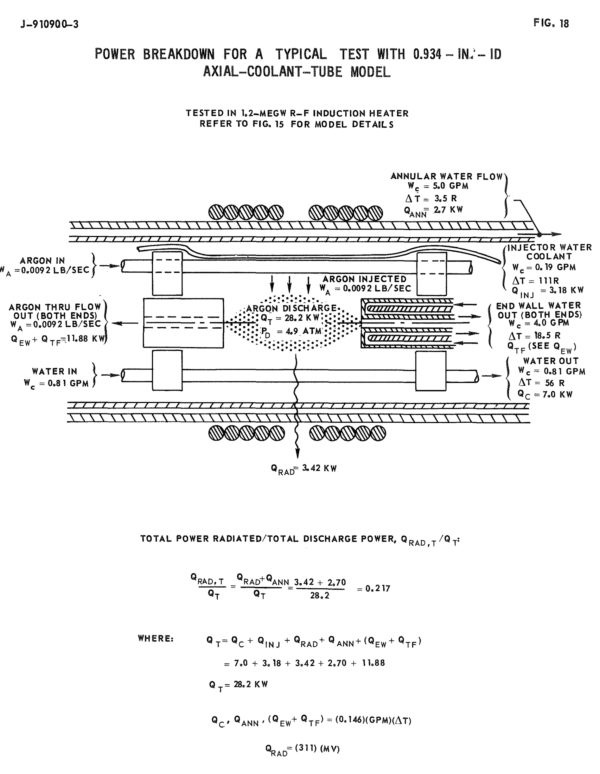
Schematic view of test setup (United Aircraft)
————–
nlb6.jpg
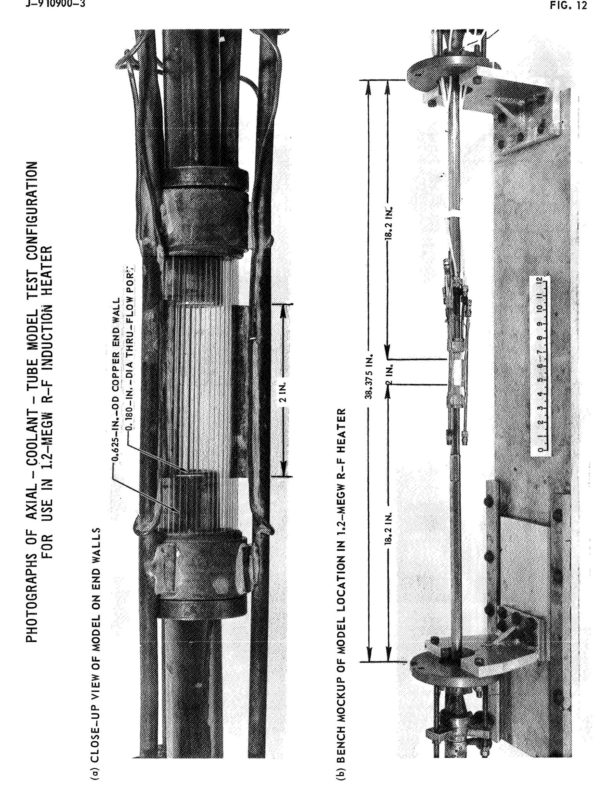
Test setup with annular tubing (United Aircraft)
————
nlb9.jpg
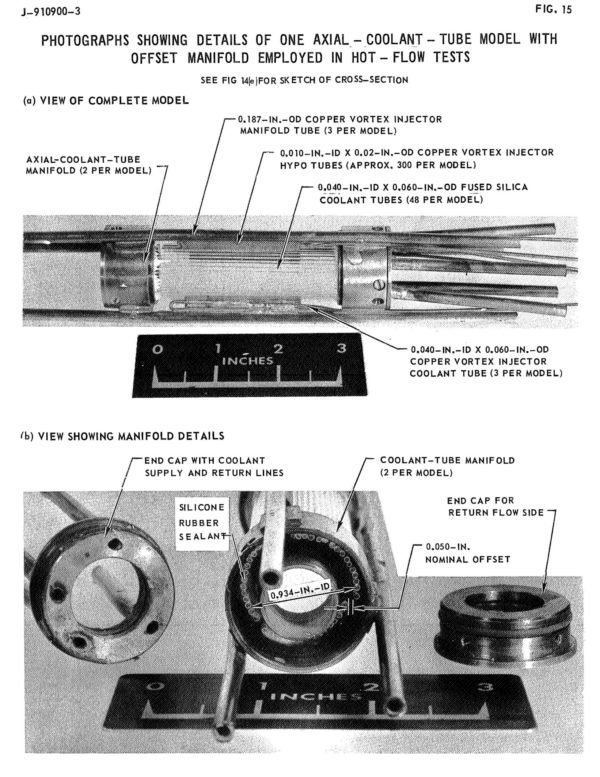
Details of test hardware (United Aircraft)
——————–
In the tests, water rather than hydrogen was used as the coolant.
Test results were generally encouraging, but a number of issues were discovered. One of the more odd things that was noted in this and other testing was that the color of the glass tubes was a variable during the course of nuclear engine operation. Radiation damage to the glass would cause the glass to gradually become blue, then purple, then black. This is, of course, fatal to not only the functioning of the engine, but the survivability of the glass. Any amount of coloring would cause massive increase in radiation absorbtion, resulting in rapid overheating and structural failure. But over 800 Celcius, the  glass would thermally anneal… which would wipe out the coloration and restore transparency. Thus the need to keep the glass operating at a minimum of 800 C. But above 1100 C, devitrification of the glass would occur… it would continue to be perfectly servicable clear glass, but once it began to cool down after engine shutdown the surface of the glass would turn milky white due to a myriad of microscopic surface cracks. This would cause the glass to overheat if the engine was restarted. And thus the need to make sure that the glass did not rise above 1100 C.
————–
nlb2.jpg  nlb3.jpg  nlb4.jpg  nlb5.jpg  nlb7.jpg
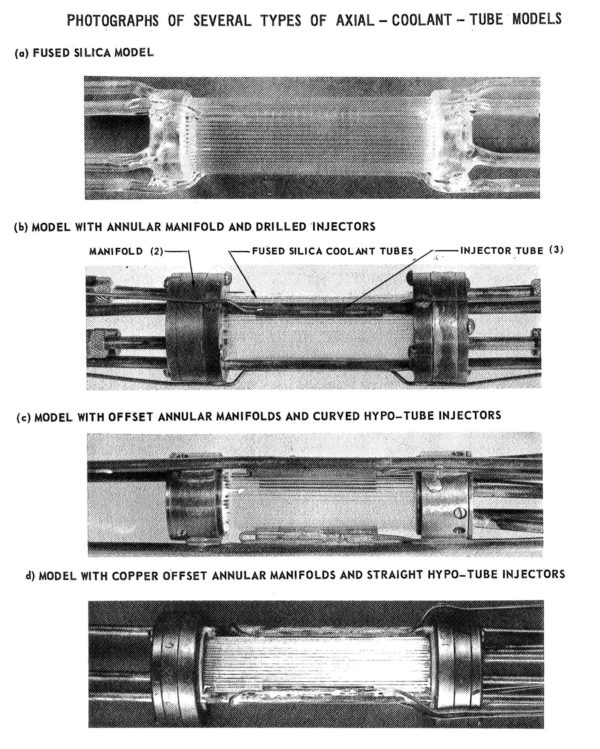
Photos of test hardware (United Aircraft)
______________
To Be Continued…
 Posted by at 5:02 pm
Jul172010
 
The operating principle of the Nuclear Lightbulb is simple: a self-sustaining uranium plasma would be contained within a glass vessel; radiant energy would pass through the “bulb” and heat hydrogen gas surrounding it, which in turn would be contained within a metal chamber. The superheated gas would then pass through a nozzle and generate thrust in the normal fashion.
While simple to describe, almost nothin about this was simple to design. The engineering involved would have been monumental. And while the Nuclear Lightbulb is typically described in simple terms and illustrated with simple sketches, it turns out that a lot of work was done on this engine concept, (seemingly) mostly by the United Aircraft Corporation. The United Tech Research Lab produced a fairly detailed design for a reference engine, and did much more work – including many physical experiments – on the componant designs than is generally known. The reference engine had seven separate “bulbs,” each a cylinder 6 feet long by 2.3 feet in diameter. The engine operated at 500 atmospheres pressure.
First off, the uranium plasma. Generating the plasma would be fairly straightforward… simply get enough of the right fissile material into an enclosed volume of the right size, and nuclear chain reactions will do the job. In this case, a critical mass of 34.7 pounds of Uranium 233 spread between the seven chambers would cause the uranium to melt, vaporize and finally become a plasma.
Step one in the process would be to actually gather that much U233 within the chambers. Obviously it could not be stored as a solid block, but instead scattered and diffuse so that nuclear reactions would not begin until it was in the reactor. In order to accomplish this, three methods were proposed:
1) Store the uranium in the form of uranium hexafluoride (UF6). The UF6 gas would be simply pumped or injected into the reactors like any other gas. Storage of the UF6 was not described, but it probably would have involved very large tanks of very low pressure (and thus low density) filled with a neutron absorbing foam. As the UF6 began to gather under increasing pressure and density, nuclear reactions would begin to take hold and the temperature would increase. At a pressure of 200 psi, the UF6 would totaly dissociate by 13,000 degrees Rankine, allowing the fluorine to be drawn off from the Uranium. The problem, of course, is that the byproduct would be fluorine gas at about 13,000 degrees Rankine. Fluorine is trouble enough at room temperature. While the gas would be cooled prior to contact with any solid structural material, fluorine that can be described in any way as “hot” is a terrifying notion.
2) Inject molten uranium. This, however, would require some means to melt the uranium, as well as inject it. The melting temperature of uranium is 1403 degrees Kelvin; while this is by no means impossibly hot to work with (metals such as tungsten and many ceramics have melting points far higher), it would still be a complication. While the plan was that the molten uranium would be injected into the reactor in the form of an aerosol suspended within a high temperature carrier gas such as neon, it was expected that the uranium would plate on the mechanical portions of the injector system.
3) A third option was similar to the molten uranium aerosol, but with the temperature lowered so that the uranium was still a solid. Here the uranium would be divided into an extremely fine dust… pumpable, injectable, would not plate out onto the structural surfaces. As the dust begins to build up within the reactor, nuclear chain reactions would cause it to heat, eventually becoming a plasma. Once the full critical mass was injected into the reactor and the system reached equilibrium, the plasma would reach an average temperature of 42,000 degrees Rankine (23,333 Kelvin). This superheated plasma would glow fiercely, providing the radiant energy needed to superheat the hydrogen propellant. But there is no material known, certainly no transparent material, that can withstand anything remotely like the temperature of the uranium plasma. A solution to containment, however, was found.
To be continued…
 Posted by at 10:12 am
Jul102010
 
The NERVA nuclear rocket used a sorta-conventional nuclear reactor as its basis. As the reactor was brought up to power, the solid fuel elements would heat up; hydrogen would be sent through coolant channels. The hydrogen would of course heat up, cooling the reactor. When operated properly, the temperature in the reactor would reach a steady state; a temperature limited by the structural capabilities of the solid reactor materials.
The hotter the reactor, the hotter the hydrogen, and the better the rocket performance. However, the hotter it gets, the softer the reactor structural elements get; at some point it fails structurally, and perhaps even melts. So the temperature must be limited. And the temperature limits limit performance. NERVA was quite cool compared to the combustion temperature of a conventional hydrogen/oxygen rocket engine. However, the extremely low molecular weight of the pure hydrogen exhaust compared to the H2O exhaust of the chemical rocket makes up for that, providing about twice the specific impulse.
In order to greatly improve specific impulse, the temperature of the hydrogen must be increased; and to do that the temperature of the reactor must be increased. It quickly becomes impossible to have a solid-core reactor, and one must accept that the uranium will not be a solid. So rocket designers of the early 1960’s came up with the liquid-core nuclear rocket, with molten uranium; and then the gas-core rocket where the uranium is so hot it has actually vaporized. But the problem was containing the uranium. Typically centrifugal force (by spinning the rocket around its central axis) was employed; the uranium liquid or gas would, hopefully, be stuck to the outer wall of the rocket reaction chamber, while lighter hydrogen would migrate to the core, and then out the nozzle. The thickness of the uranium liquid or gas would be less than the distance from the chamber wall inwards to the nozzle, so the hope was that ther uranium wouldn’t be able to flow out the nozzle. A simple idea made extremely difficult in actual practice… massive, extremely hot nuclear reactors being spun at high rate around their central axis, with little to no vibration while being injected with liquid hydrogen? Not exactly the description of a straightforward engineering problem. With all the effort involved, uranium was still expected to leak out the nozzle, making the propulsion system both filthy (a minor concern in deep space) and wasteful of uranium (a serious concern).
Another solution was devised in the mid 1960’s that in principle would combine the best of both worlds… uranium brought up to plasma temperatures, and uranium contained physically so that it could not escape. This concept was known as the Nuclear Light Bulb.
TO BE CONTINUED…

       
 Posted by at 2:44 pm
May152013
 
I’ve made many test runs and made considerable progress. I’ve also run out of supplies and need to improve the mechanical infrastructure. so I’ve decided to sell the “prototypes” I’ve made. These are indeed  prototypes, and more to the point they are prototypes of art, so they are imperfect and variable… but they’re nevertheless pretty spiffy. These are actual cyanotype blueprints on actual vellum, an they not only look right (based on the vintage blueprints I’ve actually gotten my mitts on), they *feel* right.  The failure rate is pretty high compare to the watercolor paper, but the results are much more authentic.
I currently only have a few of each. If you would like one or more of the following, send an email stating which ones to:   On a first come first served basis I’ll pass along a paypal invoice. Postage (tubes) will be $6 US, $12 everywhere else for any number.
I will update this post with revised availability numbers. When more supplies and improved infrastructure is on hand I’ll make new prints for those that requested them.
Here’s what I have (the 12X18’s were mae two at a time on 18X24 sheets an will be sliced apart):
Img_6572
Convair super Hustler~20X36; $70. On hand: 2 1 0

Saturn V, 1/72: messed up by being a mirror-image. D’oh. Would look good at a distance. This mirror image is $35; the final product will be $75. on hand: 1

Saturn Ib, 1/72: $40 On hand: 1
IMG_6557
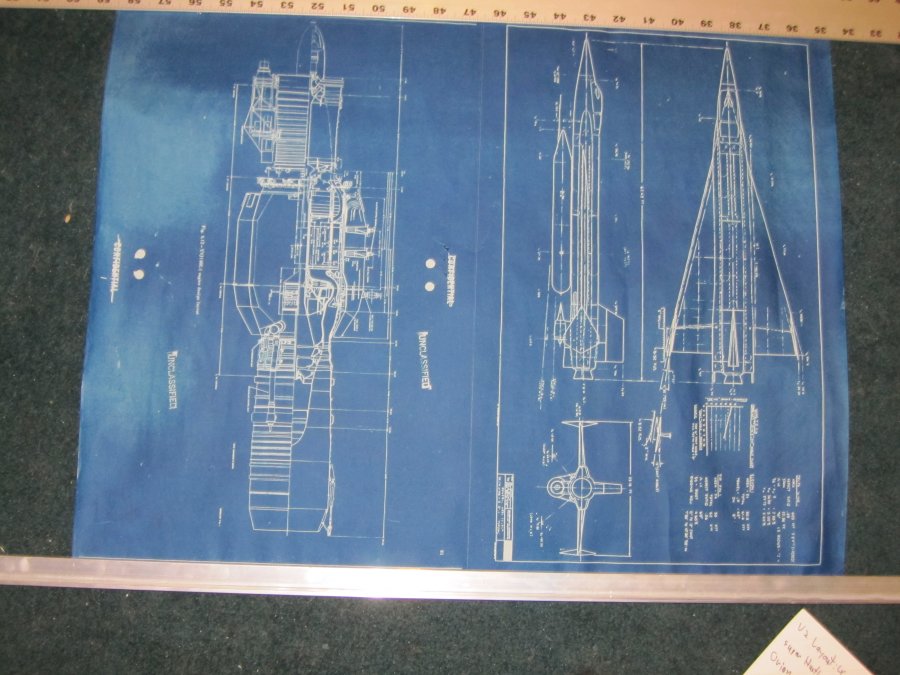
A-4 (V-2) layout drawing, 18X24 inches: $40. On hand: 4 3
AImg_6571
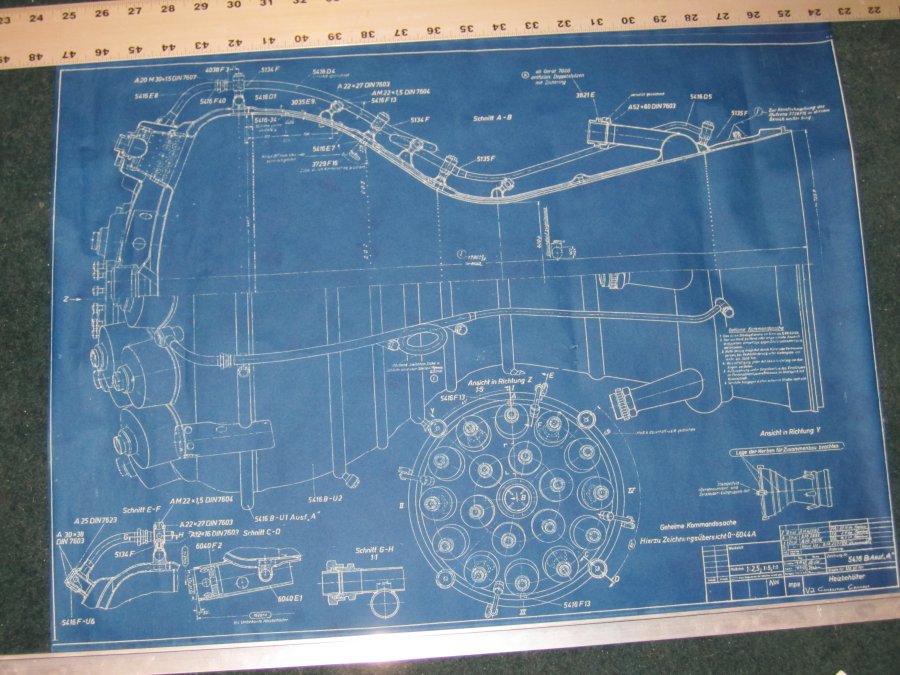
A-4 (V-2) rocket engine, 18X24 inches. $40. On hand: 1
Img_6570
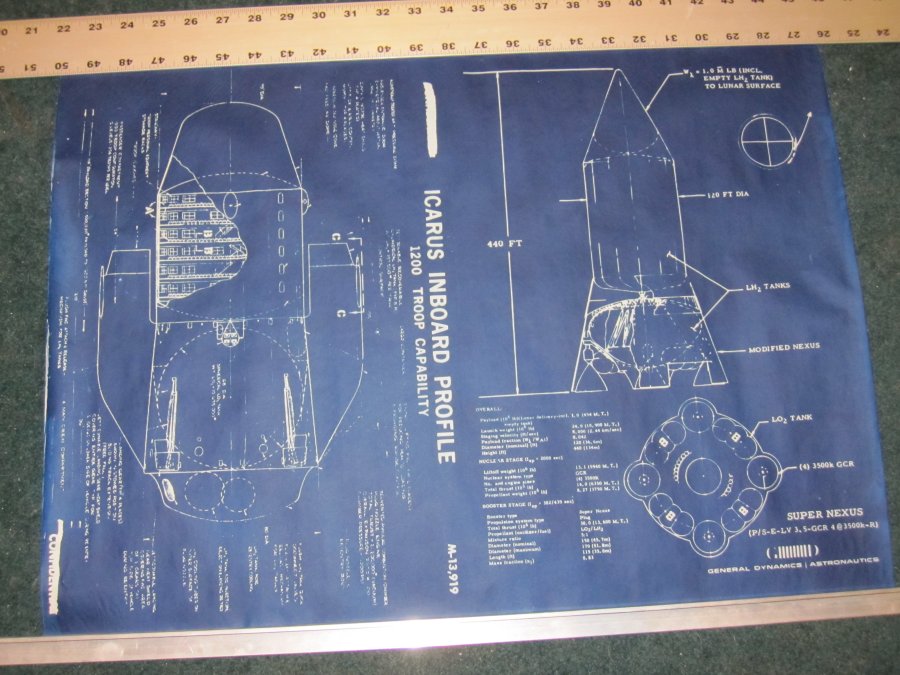
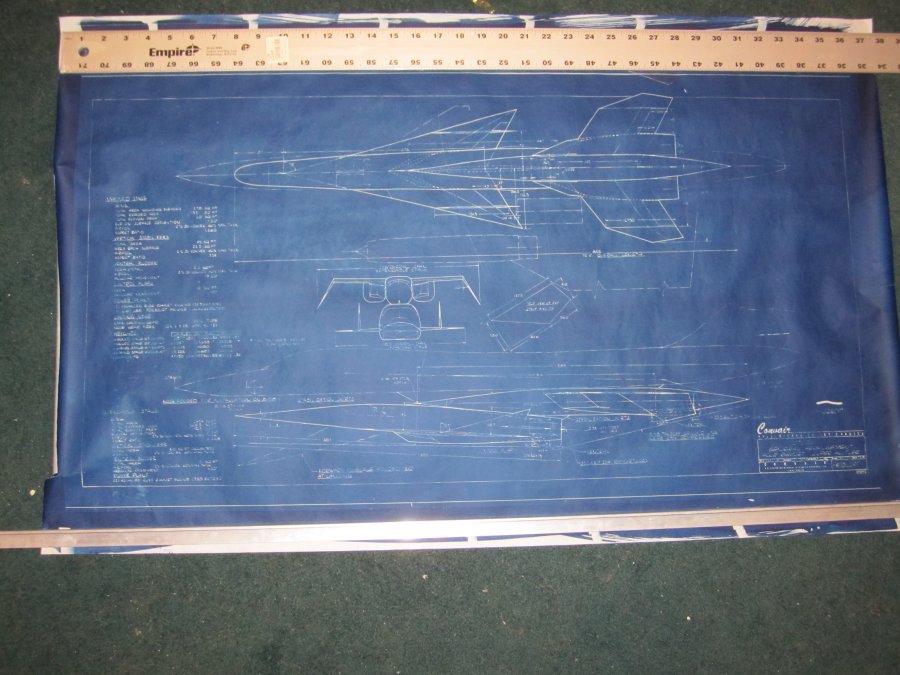
ICARUS, 12×18; $20. On hand: 1
Super NEXUS,12×18; $20. On hand: 0
Img_6569
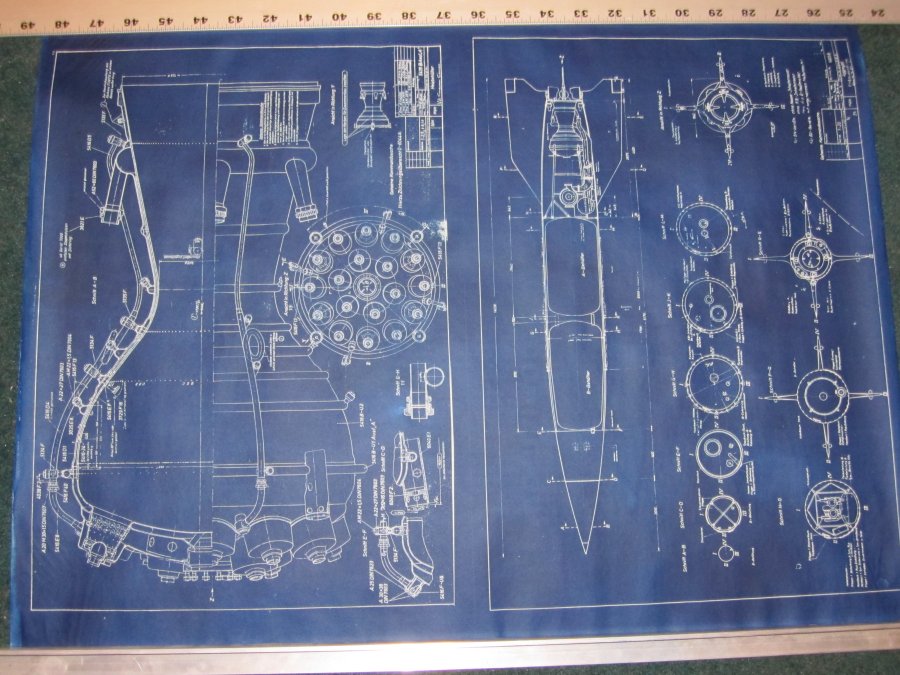
A-4 (V-2) engine,12×18; $20. On hand: 1
A-4 (V-2) layout,12×18; $20. On hand: 1 0
Img_6568
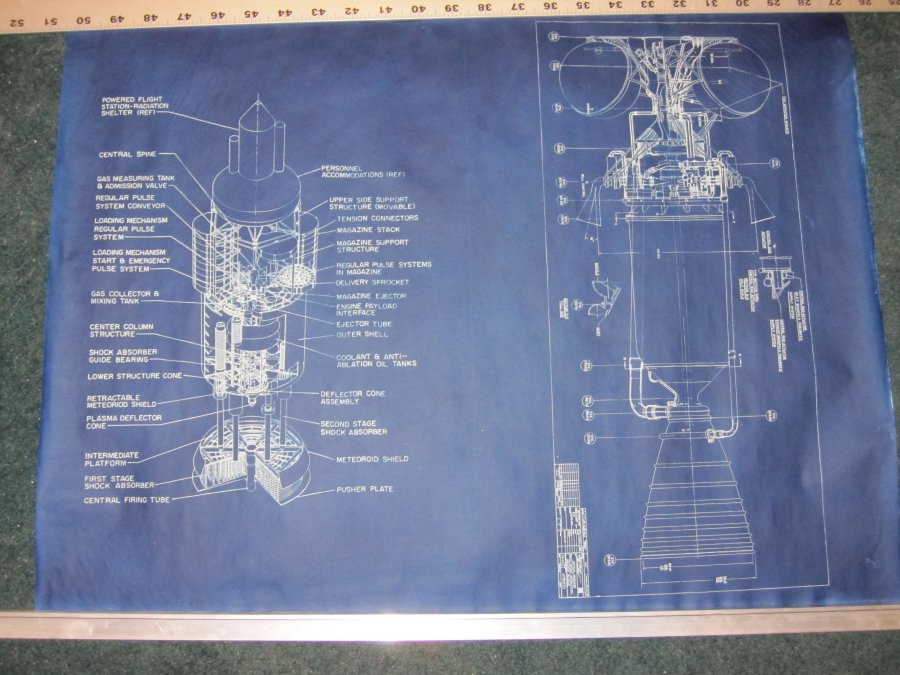
10-meter Orion, 12×18; $20. On hand: 1
NERVA diagram, 12×18; $20. On hand: 1

Img_6567
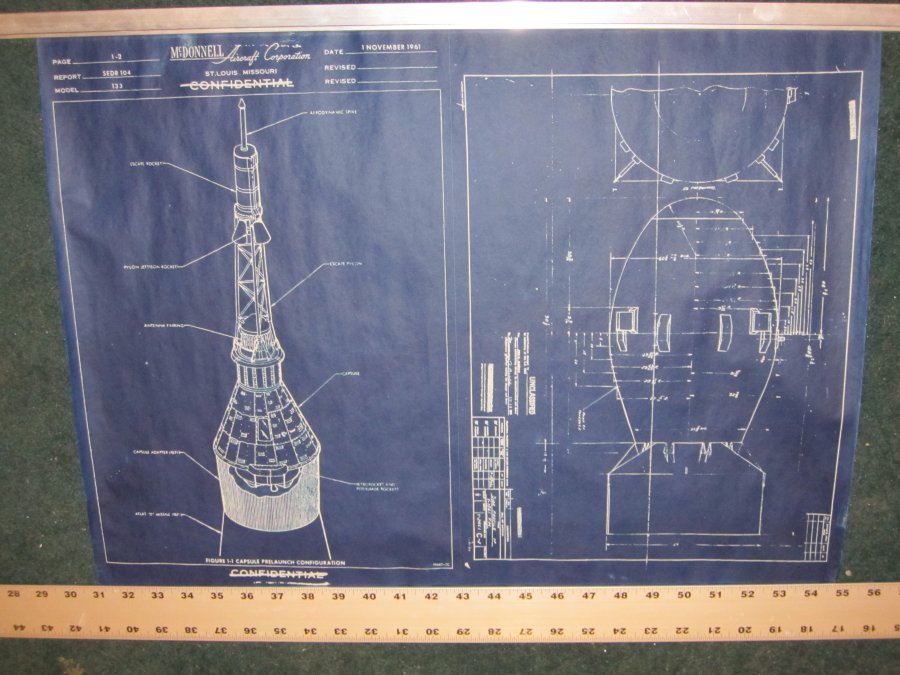
Mercury prelaunch configuration, 12×18; $20. On hand: 2
Fat Man atom bomb, 12×18; $20. On hand: 2

Img_6566
Wasserfall layout, 12×18; $20. On hand: 0
Nuclear Light Bulb, 12×18; $20. On hand: 0
Img_6564
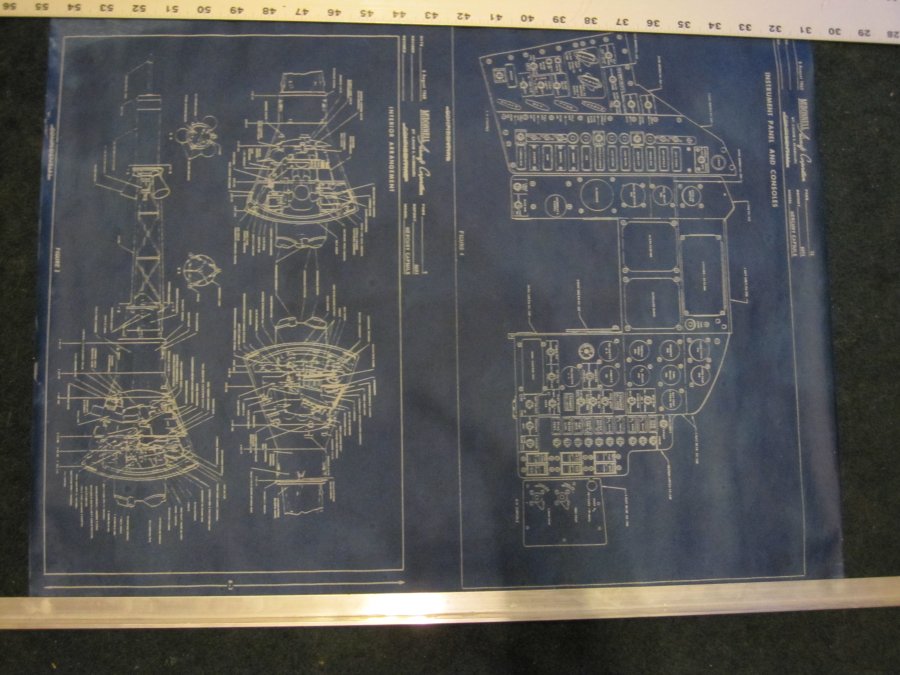
Mercury inboard views,12×18; $20. On hand: 1
Mercury capsule instruments, 12×18; $20. On hand: 0
Img_6563

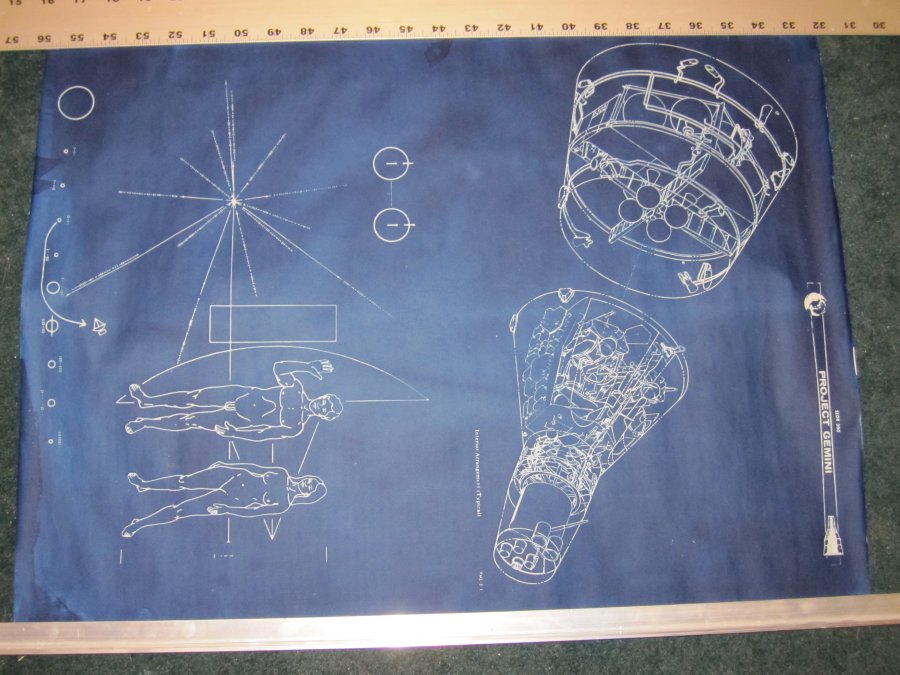
Pioneer plaque, 12×18; $20. On hand: 2
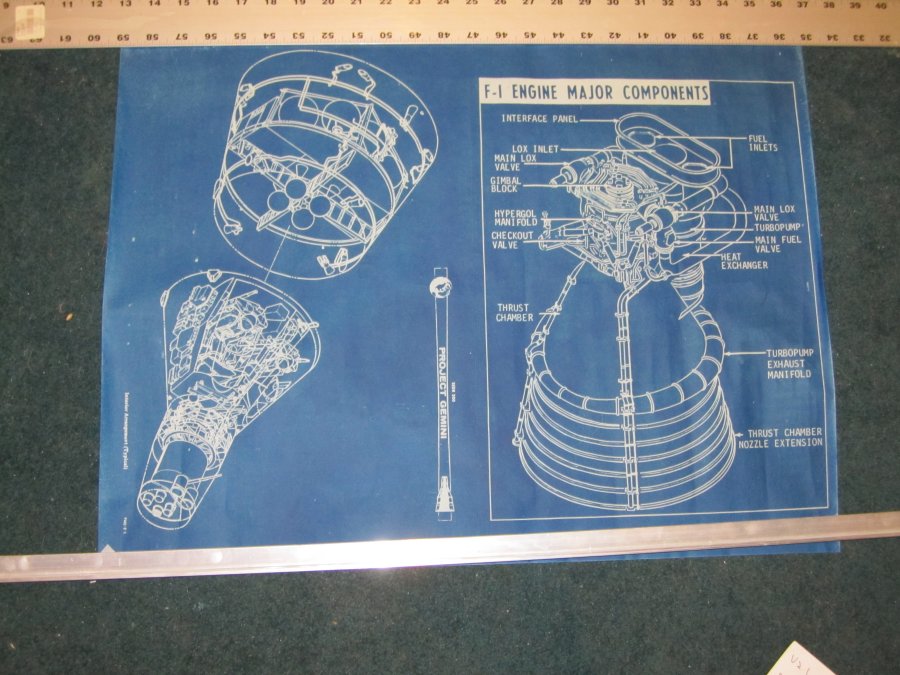
Gemini capsule, 12×18; $20. On hand: 5
Img_6562
NERVA art, 12×18; $20. On hand: 0
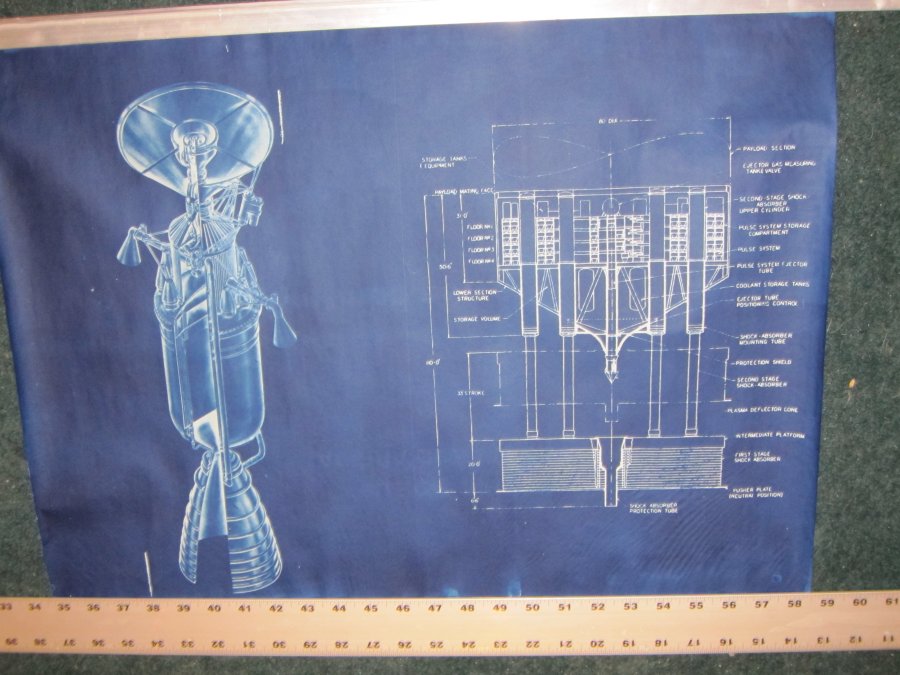
4,000 ton Orion propulsion module, 12×18; $20. On hand: 1
Img_6561

XNJ-1 nuclear turbojet, 12×18; $20. On hand: 3
X-15A-3 delta-wing, 12×18; $20. On hand: 3 2 1
Img_6560
Gemini (see above)
F-1 engine components, 12×18; $20. On hand: 3
Img_6559
Republic ASP exterior, 12×18; $20. On hand: 0
Republic ASP interior, 12×18; $20. On hand: 0
 
 Posted by at 12:03 am
Aug112011
 
For no verifiably useful reason, I decided to take a look at my Blog Stats. Shows stuff like how many visits the blog gets, where people click links to come to it, which posts got how many visits, etc. One set of stats is “search terms” people use to come to the blog. Below is what’s listed for yesterday. Note that people don’t seem to be coming to the blog for fantastic photography of cats or lightning, or unbuilt aircraft & spacecraft projects, or political rants & news: no, people want Hot Redheads.
Every single data point tells me that if I want to make money, I’ve gotta turn The Unwanted Blog into a hardcore pornaterium.
———————–
These are terms people used to find your site.

Yesterday

SearchViews
redhead35
awesome20
unwanted blog15
focke wulf fw 19814
the unwanted blog8
hot redhead8
messerschmitt me-328 3-view7
hot red head6
juno 2 irbm5
natf5
f-111b5
x-245
hot redheads4
are smurfs evil4
nuclear lightbulb4
aircraft cutaway4
world trade center jumpers4
fokker/republic d-xxiv alliance4
chain lightning 1950 film4
plans japanese submarines wwii3
why are smurfs evil3
lhx3
gold ak 47 gun3
terminator hk aerial3
 Posted by at 9:02 pm
Feb112010
 
I’ve been digging out the old files for the book project previously described HERE. By far the largest part of the book was/is going to be on propulsion systems. Now, this may be due to the fact that propulsion systems for spacecraft were my schtick, professionally; but I like to think that it’s actually because compared to the propulsion system, everything else (navigation, life support, power, etc.) is pretty secondary. Think of it this way… if tomorrow Microsoft announced that they had developed a perfect closed-system ecology perfect for long duration spaceflight, the general response would be a collective yawn. But if someone tomorrow announced that they figured out how to make a practical and affordable warp drive that could send you to the stars at ten times the speed of light, people around the world would start slapping together starships the day after. To hell with closed ecologies… just pack an assload of canned Spam.
<>  Anyway, one of the files I’ve got is the outline of the propulsion system section. My idea was to break all technologies into several technological “eras,” as described in the book’s Introduction:
This book will show how to design and use your Spaceship to a level of detail adequate to avoid the usual pitfalls of most science fiction. To do this, the technology levels are divided into the following types:
1) Now
2) Real Soon
3) On the Horizon
4) Beyond The Horizon
5) Magic

The “Now” class of spaceship is what can actually be built today, with equipment more or less off the shelf, or new designs that make no noticeable advancements on existing equipment. This would include such things as conventional staged, expendable launch vehicles (from small to very large), to space capsules, small spaceplanes, Shuttle-type vehicles, basic inter-orbit tugs, lunar landers and the like. All would be powered by such propulsion systems as chemically fueled rockets – liquid, solid and hybrid; some use of low thrust systems like ion engines and resistojets. These technologies, used wisely, allow for the early commercialization of near-Earth space and the limited manned exploration of the Moon, Mars and some nearby asteroids.
The “Real Soon” class of spaceship would include the use of technologies that have received considerable ground testing, but have not been used. These are devices and technologies that the engineers behind them are virtually certain will work, but will require development. Such spaceships would include fully reusable two stage to orbit launchers, early single stage to orbit vehicles, solar sails, Mars landers, and nuclear thermal rockets such as the NERVA. There are a few materials of note in the “Real Soon” category that would be of interest, such as high temperature ceramics and aerogels. The “Real Soon” designs would, somewhat arbitrarily, encompass those available beginning around 2010-2030, and are the sort of technologies that would allow for true commercialization of near-Earth space (including the Moon and, possibly, near-Earth asteroids) and the manned reconnaissance of the inner solar system.
The “On The Horizon” designs would include the use of technologies that have received only very preliminary testing, and are largely “vaporware.” This class would include such things as airbreathing single stage to orbit vehicles, nuclear pulse vehicles, gas-core nuclear vehicles, laser-propelled launchers, early fusion and antimatter drives. These technologies, which may become available around 2030-2060, would allow for the low-cost commercialization of near-Earth space (including the Moon), tourism to Mars, and the manned exploration and exploitation of the entire solar system, with early missions to the Oort Cloud and Kuiper Belt.
The “Beyond The Horizon” vehicles would be where things start to get really interesting. These would include the use of technologies that scientists have only the barest preliminary theories of, and engineers are currently very uncertain as to how to even contemplate their use. However, it is in this area where the first interstellar propulsion systems become available. Pure antimatter “photon” drives, Bussard ramjets, advanced pure fusion drives and the like. “Beyond the horizon” technologies have the potential of making the entire solar system accessible as the steam engine made the world accessible. These technologies may become available in the second half of the 21st Century and beyond.

“Magic” technologies are those for which even a theoretical basis is almost totally lacking, or which current theory does not support. Warp drive, hyperdrive, jump drives, wormholes, time travel, gravity generators, zero-point energy generators all fall into this category. They have the potential of making the entire universe accessible. However, with the highly hypothetical nature of these technologies, putting even a vague handwavy date on them is not reasonable. They may be impossible; they may equally be demonstrated within a few years.
———————-

So, here’s the general outline of what the propulsion system was expected to look like:
———————-
Basics:

Spaceship Physics 101
The rocket equation – Read it, Learn it, Live it
Rocket engine design basics
Basic Rocketry
Thrust Vectoring
Jetevator
Jet tabs
Jet Steering
Secondary Liquid Injectant
Rotating Asymmetric Nozzle Extension
Supersonic Splitline
Differential Throttling

Relativistic Travel & Effects
Types of propulsion:
Available Now:
Siege Engines
Steam Rockets
Compressed Gas
Guns
Chemical Rockets
Solid rockets
Liquid rockets
Monopropellant
Bipropellant
Bimodal

Liquid engine design features
Shock diamonds

Hybrid Rockets
Hypersolids
Pressurant vs. pumps
Electrical Propulsion Systems
Ion engines
Hall Effect Thrusters
Resistojets
Arcjets

Turbojets
Ramjets
Balloons
Available Real Soon:
Advanced Chemical Rockets
Expansion-deflection nozzles
Aerospike nozzles
Plug cluster
Dual bell
Hypersolids

Goddard’s Turbo-Prop Rocket
Rotationally Augmented Thrusters
Nuclear Thermal Rockets
Nuclear ramjet
Solar Sails
Solar Photon Thruster
Laser /Microwave Sails
Solar Thermal engines
VASIMR
Rotary Slings
Rotavators
Slingatron
Pulley Drives

On The Horizon systems:
Scramjets
Ducted Rockets and Ejector Ramjets
Liquid Air Cycle Engines
Pulse detonation engines
Gas core nuclear
Nuclear/MHD “Torch”
LANTR
Nuclear lightbulb
Nuclear pulse (Orion)
Nuclear Pulse (Medusa)
Nuclear Pulse (Helios)
Laser Launch
M2P2
MagSail
Railguns
Mass Drivers
Antimatter: Fuel of the Future.
An Antimatter Primer
Antimatter Steam Rocket
Antimatter ramjets
Antimatter turbojets
Anti-Proton Initiated Fusion
Muon Catalyzed Fusion
Pellet Stream Propulsion
Sail Beam
Light Gas Balloon Tunnels
Hydrogen Balloon Ramjet Tunnels
Advanced Artillery
Scramjet Guns
Light Gas Guns
Compressed Gas
Combustion Driven Piston
Falling piston
Underwater gun
Thermal Bed Gun
Nuclear Reactor Gun
Nuclear Bomb Gun
Electric Discharge Gun

Beyond The Horizon:
Launch Loop
Matter/Antimatter Photon Rocket
Bussard Ramjet
Catalytic Ramjet
Ram Augmented Interstellar Rocket
Exotic Chemicals
Metastable Helium
Monatomic Hydrogen
N20 (Nitrogen-Twenty Buckysphere)

Magic:
Alcubierre Warp Drive
Krasnikov Tunnel
Quantum Teleportation
Vacuum Point Energy systems
Wormholes
Artificial Gravity
Inertialess Drives: General
Inertialess Drive: Negative Matter
Inertialess Drives: Dean Drive and others (i.e. BS)
Forwards’ Spin Drive

If I’ve missed anything, and I almost certainly have, feel free to drop a note.
 Posted by at 1:53 am


How to Make an Atomic Bomb :핵폭탄 만드는 법


Implosion-type weapon
Fat Man, the Nagasaki bomb, used 13.6 lb (6.2 kg, about 12 fluid ounces or 350 ml in volume) of Pu-239, which is only 41% of bare-sphere critical mass. (See Fat Man article for a detailed drawing.)
 
Surrounded by a U-238 reflector/tamper, the pit was brought close to critical mass by the neutron-reflecting properties of the U-238. During detonation, criticality was achieved by implosion.
The plutonium pit was squeezed to increase its density by simultaneous detonation of the conventional explosives placed uniformly around the pit. The explosives were detonated by multiple exploding-bridgewire detonators. It is estimated that only about 20% of the plutonium underwent fission; the rest, about 11 lb (5.0 kg), was scattered.


Implosion Bomb Cross Section (drawn to scale)


Scale drawing of Fat Man


How to Make an Atomic Bomb


Little Boy and Fat Man
 
 
This idea suddenly came in my mind that how does an atom bomb works. I have no all idea that how does it works, but I have a bit idea that somewhere we need uranium or plutonium to do this type of explosions or to make a nuclear bomb. actually, all this happen through chain reaction of atomic energy. I hope this article will help you to understand the nuclear fission or chain reaction of atomic bomb. So, lets start from here, today at what you need in order to make a nuclear fission bomb.
You need some money, as it would really help if you were the prince, sultan or other royalty of a small, but rich state. If not, you need to know on a first name basis some evil leader with lots of cash, oil, diamonds and so on, of a small but ambitious country, with a need for revenge on the world.


Step 1 - What is a nuclear fission bomb?  
Fission bombs derive their power from nuclear fission, where heavy nuclei (uranium or plutonium) are bombarded by neutrons and split into lighter elements, more neutrons and energy.
These newly liberated neutrons then bombard other nuclei, which then split and bombard other nuclei, and so on, creating a nuclear chain reaction which releases large amounts of energy.
These are historically called atomic bombs, atom bombs, or A-bombs, though this name is not precise due to the fact that chemical reactions release energy from atomic bonds (excluding bonds between nuclei) and fusion is no less atomic than fission. Despite this possible confusion, the term atom bomb has still been generally accepted to refer specifically to nuclear weapons and most commonly to pure fission devices.


Step 2 - What do you need?  
a. The fissionable material 핵분열 물질  
Plutonium239 isotope. Around 25 pounds (10 kg) would be enough. If you could find some Uranium235, that would be good, but not great. You would need to refine it using a gas centrifuge.
The uranium hexafluoride gas is piped in a cylinder, which is then spun at high speed. The rotation causes a centrifugal force that leaves the heavier U-238 isotopes(동위원소) at the outside of the cylinder, while the lighter U-235 isotopes are left at the center. The process is repeated many times over through a cascade of centrifuges to create uranium of the desired level of enrichment.
To be used as the fissile core of a nuclear weapon, the uranium has to be enriched to more than 90 per cent and be produced in large quantities.
 
You could try buying it from a former Soviet Republic, or from Iran, since they're trying so hard to produce it. North Korea is not ready yet, and unfortunately, Iraqi dealers retired from the business.  
b. The explosive to start the nuclear chain reaction 핵연쇄반응 일으킬 폭발물   
100 pounds (44 kg) of trinitrotoluene (TNT). Gelignite (an explosive material consisting of collocation-cotton (a type of nitrocellulose or gun cotton) dissolved in nitroglycerin and mixed with wood pulp and sodium or potassium nitrate) would be better. Semtex would be good too, but it's a bit hard to get, these days.  
c. The detonator 기폭장치   
To fabricate a detonator for the device, get a radio controlled (RC) servo mechanism(무선조정제어장치), as found in RC model airplanes and cars. With a modicum of effort, a remote plunger can be made that will strike a detonator cap to effect a small explosion. These detonation caps can be found in the electrical supply section of your local supermarket. If you're an electronics wiz, you should be able to make it using a cellphone.  
d. The pusher  
The explosion shock wave might be of such short duration that only a fraction of the pit is compressed at any instant as it passes through it. A pusher shell made out of low density metal such as aluminium, beryllium, or an alloy of the two metals (aluminium being easier and safer to shape but beryllium reflecting neutrons back into the core) may be needed and is located between the explosive lens and the tamper. It works by reflecting some of the shock wave backwards which has the effect of lengthening it. The tamper or reflector might be designed to work as the pusher too, although a low density material is best for the pusher but a high density one for the tamper. To maximize efficiency of energy transfer, the density difference between layers should be minimized.  


Diagram of a gun-type fission weapon


Step 3 - How to build the nuke?  
You will need to get the fissile material to the critical mass in order to start the chain reaction, which depends upon the size, shape and purity of the material as well as what surrounds the material. Your weapons-grade uranium will have to be in sub-critical configuration(준임계 상태).  
First, you must arrange the uranium into two hemispherical shapes(반구형의 모양), separated by about 4 cm. Since it's highly radioactive, the best way do it is to ask the friend owning the small country to let you use one his facilities. You could use a nuclear plant, a steel factory or even a well equipped pharmaceutical installation as a disguise for your plans.  
It is not sufficient to pack explosive into a spherical shell around the tamper and detonate it simultaneously at several places because the tamper and plutonium pit will simply squeeze out between the gaps in the detonation front. Instead, the shock wave must be carefully shaped into a perfect sphere centered on the pit and traveling inwards. This is achieved by using a spherical shell of closely fitting and accurately shaped bodies of explosives of different propagation speeds to form explosive lenses.  
After a few careful calculations, all you need now is to carefully pack and transport your nuclear bomb to the targeted location. If you happen to be an Al-Qaeda fan, you should try to infiltrate a military facility, for the psychological effect. Watch it, though, they are usually well guarded!


Fission bomb designs.

The three most common fission bomb designs vary considerably in material and arrangement. Encyclopædia Britannica, Inc.


This is a model of a basic Teller-Ulam atomic bomb.


The W88 Warhead / Intermediate yield strategic SLBM MIRV warhead
Yield 475 Kt
Weight <800 lb="" p="">Length 68.9 in RV Base Diameter 21.8 in Nose Half Angle 8.2 degrees Number In Service 400

Trident II SLBM(잠수함발사탄도미사일) MIRV(다탄두미사일) 


Thursday, May 21, 2015

Bank Account Numbers


Identity Finder can search for Bank Account Numbers using AnyFind without requiring you to provide any personal information.  If for any reason you do not want to find any occurrence of all Bank Account Numbers and choose to only find the various formats of a specific one, then you may configure your AnyFind options under Settings.  Bank Account Numbers can be used to gain access to your financial information and conduct transactions on your behalf, so searching for this Identity Type is of critical importance to prevent identity theft.
You can enable or disable AnyFind searching for Bank Account Numbers by clicking the Bank Account button on the Identities ribbon. When the button has an orange highlight, Identity Finder will search for Bank Account Numbers using AnyFind.
Note: If using OnlyFind, when entering a unique Bank Account Number, it must be entered as 5-30 letters, numbers, dashes or spaces but without any other characters.  For example "PB-12345" (without the quotes) is valid.  However "#PB-12345" (without the quotes) is invalid because it contains a number sign (#).

Additional Information

To view or modify AnyFind settings, click the Configuration ribbon, then the Settings button, and then select the AnyFind page.  Alternatively you may click the Identities ribbon and then click the AnyFind option button . For additional information on AnyFind settings please refer to Customize AnyFind Search Behavior.


Friday, May 15, 2015

Jihadi Website Supplies Instructions for Anthrax Production

Publication: Terrorism Focus Volume: 5 Issue: 10
March 11, 2008 05:35 PM Age: 7 yrs
Category: Terrorism Focus, Brief, Middle East
Much has been said about al-Qaeda’s quest to acquire weapons of mass destruction (WMD) as a means of striking at the heart of their number one enemy, the United States. The latest example of these ongoing efforts to acquire WMD capabilities is a recent posting in a jihadi internet forum entitled: “Good News – Anthrax Production Technique” (al-ekhlaas.net, March 3).
 
A forum participant, nicknamed al-Faz, posted a detailed description of anthrax production techniques dedicated to jihadis everywhere: “Long awaited good news for you, God’s soldiers. It’s time to use biological weapons against God’s enemies.” Al-Faz commences his posting with an introduction to anthrax and the pathology of the disease, including symptoms, parts of human body infected when exposed to anthrax and fatality percentages. Al-Faz notes that anthrax bacteria can be found in Africa, Asia and in some parts of Europe where the soil contains 10 anthrax bacteria per gram.
 
According to the jihadi forum, the following factors make anthrax the weapon of choice:
 
• Anthrax is powerful, lethal, cheap and easy to prepare.
• 50 grams of anthrax, when dispersed in a 2-kilometer line, forms a deadly cloud that can cover 20 kilometers.
• One kilogram of anthrax can be produced in a small laboratory in 96 hours.
• Anthrax bacteria spores are available worldwide and can be easily extracted.
• Production costs are low; one kilogram of anthrax bacteria costs about $50 even though a lethal dose can be as little as one millionth of a gram.
• Colorless and odorless anthrax is easily concealed.
• Anthrax is a stable and dry substance that can be easily transported and used.
 
Before proceeding to anthrax production, al-Faz includes in his posting a picture of one of the anthrax-contaminated letters used in the 2001 U.S. anthrax attacks that killed five and infected 17 others. Undoubtedly included in an effort to encourage jihadis to try anthrax as a weapon, the letter reads: “You cannot stop us. We have this anthrax. You die now. Are you afraid? Death to America. Death to Israel. Allah is great.” The photo of the letter in no way establishes a jihadi connection to the still unsolved anthrax attacks—it is one of several released by the FBI and is easily available on the internet. Nevertheless, anthrax continues to be a feared weapon—only last week an Albany, Oregon courthouse was closed and the National Guard called in to deal with threats of anthrax contamination, which later proved to be a hoax (Albany Democrat Herald, March 4).
 
The second part of al-Faz’s posting elaborates on two methods of anthrax production. Photos are included of the microscopic phases of the process, including the extraction of anthrax bacteria from a sample of dirt that contains the infected remains of dead goats or other grazing animals’ remnants. A sample of a dead animal’s blood or tissue can also be used by cultivating it in a blood agar substance containing 0.7% sodium bicarbonate.
 
The attached pictures illustrate bacilli bacteria, spirochetes and bacteria clusters. The posting further includes precautionary instructions for the different phases of production. “Agar is a nutrient environment for cultivation that can be bought without drawing any suspicions from research centers for 70 Riyals or $20 per one kilogram,” says al-Faz.
 
The second method of producing anthrax involves cultivating the anthrax in horse
blood and bentonite clay for five hours. Bentonite clay, an absorbent form of clay with multiple industrial uses, can be found in Iraq and two other countries in the region.
 
In conclusion, al-Faz says, “I wanted to contribute in the preparations against enemies of God. Consider me the servant of the mujahideen. I closely follow your news. May God reward you for your sacrifices. It would make me very happy to see you use biological weapons against God’s enemies. Wait for my next detailed posting on how to build a Cessna 128 aircraft,” which is an easily maintained agricultural aircraft designed to carry and spread a chemical load of 200 to 280 gallons.
 
Although there is no tangible evidence to confirm that jihadis have produced or procured mass quantities of biological weapons, the use of anthrax spores in bioterrorism has been discussed by jihadis for some time now. In theory, at least, cultivating anthrax spores can be achieved with minimum know-how and equipment, suggesting it is only a matter of time until jihadis succeed in producing some kind of biological weapon. There are, however, many dangers involved in the process and the development of a weaponized aerosol version of the bacterium requires scientific skills and equipment unavailable to most jihadis.


http://www.jamestown.org/single/?tx_ttnews%5Btt_news%5D=4778&no_cache=1#.VVXdupXbLtQ

Wednesday, April 29, 2015

How to Build a Radio/Drone Jammer


sparkgap-motorRadiohax
Spark gap transmitters are the oldest type of radio transmitter made by man. They were first used around 1888 and remained legal until the 1920s when their use became greatly restricted. World War II delayed their complete ban outside of emergency communications for a few years. Now the only way to use them legally is inside a faraday cage. They operate as jammers for the same reason they were banned, they take up a lot of the radio spectrum.
A spark gap transmitter is fairly simple. Send a high voltage current through an air gap, when the resistance of the air breaks down a spark will cross the gap. When this happens electromagnetic radiation is emitted. You can test this in your house fairly easily. Turn on some speakers so they are powered but nothing is coming out of them. Computer speakers that are on will work as will a stereo set to CD or tape with no CD or tape playing. Flip your room lights on and off in rapid succession, you should hear a clicking from the speakers. The clicking is RF energy that is being picked up from the light switch.

Effective Range

The range of this type of jammer is based on a few properties.
  • Antenna resonance
  • Field strength
  • Modulation
  • Terrain
The antenna of this particular device will be more resonant on one frequency than others. As a result there will be more RF energy on that frequency, and harmonics or multiples of that frequency. The range for this frequency will be further than others. Using multiple antennas will cause the transmissions to be greater on more frequencies.
The field strength, or amount of RF energy given off, is directly related to the difference in voltage between the two states. With the type of transmitter we are making one state will be totally off or 0 volts while the other will be on or the full voltage. It is not required to switch between an off and on state you may switch between a lower and higher voltage as well. The higher the input voltage the stronger the RF, the more range you will have. You have normal free space losses that all radio transmissions have which means that in order to double the effective range you will have to apply 4 times more power.
Another consideration is the modulation that is being utilized. Modulation also includes some of the data that is carried over that mode such as digital data. FM signals for example will lock onto the strongest relative signal from the receivers point of view, a weaker but closer signal will appear stronger than a further but more powerful signal due to free space losses. FM can flip back and forth quickly between two stations that have a nearly equal signal strength at the receivers antenna and make it appear like it is mixing the two stations, the reality is that it is not. SSB will mix the two signals, while you may hear noise in with the desired audio you can still hear the desired audio. Spread spectrum will tolerate the most noise.
Digital systems can be jammed even if the underlying modulation is not by introducing noise the decoding circuitry in the radio may not be able to decipher the bits correctly and reconstruct the message. This can result in heavy packet loss on that system rendering it unusable. Many digital systems are more sensitive to noise than their less sophisticated counterparts. Many digital systems are either FM or spread spectrum. FM is more often used for longer range applications.
The specific type of system that you are trying to jam is important to know as it will tell you how much power you have to have and at what distance. The best way to determine what is suitable is to get a similar system and see how far it will work from the spark gap transmitter at a given power.
Terrain includes buildings, trees and other objects that the radio signals will interact with. If you stash the spark gap transmitter in a metal box the signal will be attenuated compared to that same transmitter being placed in an open field. Elevation can also influence the distance the signal may go.

Construction

The construction of this type of spark gap generator is fairly simple. You should be able to get everything for under $50 new, used items may be even less expensive. You will need the following items:
  • high voltage source
  • batteries
  • small bit of wood to mount things on
  • small motor
  • a few nails or screws
  • wire
The high voltage source could be an automotive ignition coil. This takes the battery or alternator output and makes the voltage much higher so that it will jump across the electrodes of a spark plug igniting the fuel. A spark plug is a spark gap, although it is not suitable in its current form as a radio jammer, it could be made into one.
The battery should be suitable to run your high voltage source and the small motor. A motorcycle battery is smaller but will go dead faster than a larger car battery.
The wood should be large enough to let you mount the ignition coil, motor and screws on. This can be any scrap wood or similar non-conductive material that you can find. It should be rigid enough that the components will not just fall apart although it does not have to be that strong. It’s purpose is just to hold everything together. A block of cheese or dried mud would work if that is all you have available.
The small motor can be anything from a vibrator out of an old pager or mobile phone, an electric fan or one you may find at an electronics or hobby store. It just has to have a shaft that allows mounting of a cross member onto.
The first step will be to assemble the motor so that it will function the way you want. When mounting the cross member you should make sure that it is insulated from the rest of the motor either by a plastic shaft or a plastic mounting block. The rod can be a nail although you will want it equidistant from the center.
sparkgap-motor-block.jpg
You can see how the metal rod goes all the way through the plastic insulating block. You may install either one rod all the way through or two rods forming an X. If you install two rods you will have twice the sparks and thus the transmission cycle will be twice as great.
sparkgap-motor.jpg
Once the insulating block is mounted on the motor you should affix two other nails or screws on either side so that they almost touch the cross members you installed in the previous step. You do not want them touching but you do want them as close as possible. The closer the better. You should connect the motor to your battery and ensure that it can spin correctly with no problems and that it does not vibrate itself off of the wood.
Now prepare your antenna. This is a length of wire cut to 1/4 wavelength of the desired target frequency. If you do not know the target frequency you can just make some guesses. You can also connect multiple antennas together to cover various frequencies. Remember you will have RF emitted on all frequencies it will just be more powerful on the frequencies that the antenna is resonant for. Mobile phones are about 0.5 inch antennas and older police radios are 2.86 inches. For a good spectrum coverage if you make antennas of 0.5, 1.0, 1.5, 2.0, 2.5 and 3.0 inches most of the usable spectrum will be covered.
Connect the antenna(s) that you made to one of the stationary side rods. To the other end you will need to connect a ground. This can be to a metal water pipe in your house or to a rod driven into the ground. If you do not have a ground the radio will still transmit although it will be at a slightly lower power.
Now connect the output of the ignition coil to the stationary rods on either side of the motor. Connect the negative terminal to the ground side and the positive terminal to the side with the antenna(s). The idea here is that when the motor spins current will pass from one rod to the other and out the antenna. The motor will switch the output of the coil on and off in rapid succession.
The last and final step is to connect the battery to the motor and the coil. You may optionally install a switch to turn the device on or off or you may just disconnect the battery.
Remember building this is not illegal (in most places) but using it is. You will be causing harmful interference and probably upsetting people.
http://radiohax.wikispaces.com/Spark+gap+transmitter

Sunday, April 12, 2015

:) :) :) :) :)

Security features maintained in the enhanced Federal Reserve Notes include a portrait watermark visible when held up to a light, two numeric watermarks on the $5s, an enhanced security thread that glows under an ultraviolet light, micro printing, improved color shifting ink that changes color when the note is tilted, and on the newly redesigned $100 notes, a 3-D security ribbon and enhanced, raised printing...
is primarily made of wood pulp; however, United States currency paper is composed of 75% cotton and 25% linen...
and watermark are already built into the paper when it is received.
All bills, regardless of denomination, utilize green ink on the backs.  Faces, on the other hand, use black ink, color-shifting ink in the lower right hand corner for the $10 denominations and higher, and metallic ink for the freedom icons on redesigned $10, $20, and $50 bills.  
details such as outlines, tone, and shading will "translate" when engraved and printed on an intaglio press.
Then using a high-resolution film recorder, each color separation is imaged onto a sheet of sensitive film in negative form.  A thin sheet of steel, coated with a light-sensitive polymer, is exposed to ultraviolet light while covered by the film negative which contains the imagery.  The areas on the film that allow light to pass onto the plate are transferred or exposed. The unexposed areas around the images are washed away with water and soft scrubbing brushes.  This process is called "burning a plate."
One plate contains the background pattern that will be printed in green and peach. The second plate contains the images that will be printed in blue — an eagle and the words TWENTY USA. The photoengraver takes great care to make sure the images are perfectly aligned on both plates, or else the images will not line up properly when printed on the bills
The blank sheet of paper passes in-between the face and back blankets and simultaneously prints the complete image on the paper. The press has eight print units, four on the face and four on the back, with two comprehensive computer control consoles.  Many of the press settings can be controlled from these consoles and their status displayed on the computer screens
next section, Intaglio printing
Paper is then laid atop the plate, and the two are pressed together under great pressure.  As a result, the ink from the recessed areas is pulled onto paper, creating a finished image
Sharp tools (commonly called gravers) and acids are used to cut the fine lines, dots and dashes that uniquely describe the subject the engraver is creating.  Additionally, the engraver must cut the image in reverse to how it will actually print on a highly polished steel die. 
individual plastic molds are made from the master die and are assembled into one plate containing 32 exact duplicates of the master die.  Plate makers will then process this plate to create the metal printing plates that go on the presses
signatures into the plates using a pantograph machine.  A pantograph copies the die engraving onto the plate.  As one part of the machine traces the original engraving another part engraves the image onto the new plate.
Electroplating is how this is done. The plastic master, which is called the "basso", is sprayed with silver nitrate to act as an electrical conductor. The plate is then placed into a tank filled with a nickel salt solution, and an electric current is generated. Nickel ions leave the solution and deposit themselves on the electrically charged surface of the master. After about 22 hours, a nickel plate, called an "alto" has literally grown. The alto is separated from the plastic master, trimmed, and inspected by the engravers.  The plate contains the mirror image of the master in all its intricate detail and is an exact replica of the original engraved die.
That final printing plate is coated with a thin layer of chrome to make it hard and slick. It contains the Intaglio image in recessed grooves only 2/1000 (0.002) of an inch deep — but that is deep enough to hold ink for intaglio printing.
High-speed, sheet-fed rotary I-10 Intaglio printing presses are used to print the green engraving on the back of U.S. currency
Paper is applied directly to the plate and under tremendous pressure (approximately 20,000 lbs. per sq. inch), the paper is forced into the engraved plate, thereby removing the ink and printing the image. 
Sheets that were printed from the Back Intaglio process require 72 hours to dry and cure. During this drying process, the sheets bond and stick together. Therefore the sheets must be separated and neatly jogged before they can be printed on the Face Intaglio press.  To do this the BEP employs automated joggers shaped much like the letter "C."  Support personnel retrieve the load and place it into the jogger.  The load is turned on its side and, through the combination of vibration and forced air, the sheets are separated.  The process takes approximately 10 minutes.  Once jogged, the load is moved to the designated Face Intaglio press.
Special cut-out ink rollers transfer the different inks to a specific portion of the engraving, thus allowing three distinct colors to be printed on the face of the note; the black for the border, portrait engraving, and signatures of the Secretary of the Treasury, and the Treasurer of the United States; the color-shifting ink in the lower right hand corner for the $10 denominations and higher; and the metallic ink for the freedom icons on redesigned $10, $20, and $50 bills or color shifting ink on the redesigned $100 notes' freedom icons.  Bills printed in Fort Worth, Texas, will also have a small "FW" printed in black ink.  The loads of these freshly printed sheets will still require 72 hours to dry and cure before they can continue to the next operation.
To recap, the subtle background colors are printed first using Offset print technology, then the green engraving on the back is printed second using the Intaglio printing process. The third printing operation is the Face Intaglio printing process
 transmissive camera is used to inspect the paper by looking through the sheets to ensure the thread and portrait watermark are in the correct position.  In addition, two separate cameras take a digital picture of both the front and back of the sheets, breaking the images down into four million tiny pixels.  After the sheets are trimmed, a trim camera takes measurements of the sheets.  All data is gathered from the sheets and compared to what is considered a perfect "golden image," and within three tenths of a second, the computer decides if the sheet is acceptable or a reject, looking for defects such as ink spots, ink deficiencies, or smears.
The new serial numbers consist of two prefix letters, eight numerals, and a one-letter suffix.  The first letter of the prefix designates the series (for example, Series 1996 is designated by the letter A, and Series 1999 is designated by the letter B).  The second letter of the prefix designates the Federal Reserve Bank to which the note was issued. The serial numbers are overprinted in sequential order and remain in order until the 16-subject sheets are cut.  
inspected by the COPE Vision Inspection System (CVIS)

Wednesday, April 8, 2015


Supplying the science hobbyist, industry, government, schools & universities since 1998.
"We specialize in small orders"
Uranium Extract
from bulk Carnotite/Gummite Uranium Ore

The Uranium contained in bulk Carnotite and associated Uranium ores can be easily extracted to form various Uranium compounds.
Typical Carnotite/Gummite Uranium ore.
Use a hammer or rock crusher to smash the rock into a granular form.
Wear proper safety equipment (gloves, dust mask, eye protection) when breaking the rock so you don't get rock fragments in your eye, or inhale piles of ore dust.
Sift the crushed rock through a screen (a window screen or a spaghetti strainer will do).
This will separate the large chunks from the fine, granular material.

Weigh out 300 grams of the fine granular ore.
Pour the 300 grams of fine ore into the barrel of your Ball Mill.
A hard milling media is required, such as steel balls which are used here.
Place the barrel on the mill and let it run for approximately 2 hours.
This will reduce the ore into a very fine dust.
This is necessary so the extraction chemicals will be able to react with the ore material.
If Ball Milling is not done, very little Uranium will be extracted.

After 2 hours of milling, the ore is as fine as Talcum powder.
Separate the steel balls from the powdered ore by using either a magnet to pull out the balls,
or dumping the barrel contents through a strainer.
Certain types of Uranium ore (Pitchblende, Uraninite) can be simply extracted with Nitric Acid. However, Carnotite and its associated matrix minerals are far too alkaline for Acid extraction and many of the minor Uranium ores will not dissolve in acid. Alkaline extraction is called for when dealing with Carnotite ore.
To begin, you'll need 200 grams of powdered Uranium ore, 50 grams of Sodium Carbonate,
25 grams of Sodium Bicarbonate (use Arm & Hammer Baking Soda) and 1000 ml of water.
Place a large flask with the 1000 ml of water in it on a magnetic stirrer/hot plate,
drop in a spinbar and heat to about 70-80ьз╕ C.
Set the stir speed to maximum and slowly add each ingredient into the water while it is being stirred & heated. Let the mixture heat & stir overnight. 
The next day, turn off the hot plate/stirrer and set the flask aside to cool and settle for 1 hour.
After an hour, the heavy sediment will sink to the bottom leaving the cloudy extracted Uranium in a carbonate solution floating on top.


Pour the cloudy Uranium solution through a fine filter being careful not to let the bottom sediment to stir up or get into the filter. 
The finished product will be a bright, clear yellow liquid: Uranyl Tricarbonate.
In our next experiment, we'll use Kerosene and thttp://www.unitednuclear.com/extract.htmhe Solvent Extraction method to remove the carbonate from the Uranium.

Wednesday, February 4, 2015

How to Launder Stolen Bitcoins

Bitcoin’s main problem is that every transaction is public. Such a feature makes it difficult to launder stolen bitcoins. Take this $5m thief as the example. The person controlling 19,000 of Bitstamp’s coins has a problem. Anyone can follow the coins as they move between addresses. Lucky for them (or not as we’ll see), there exist tools to assist in hiding, disguising, and making it difficult to prove where your bitcoins originate.
Mixers combine your coins with the coins of others. Everyone sends coins to a central address. The mixer sends a transaction back to each user from the key controlling the central address. When stolen coins mix with ‘clean’ coins, they become difficult to track.
Coin Tumblers swap coins between users.  A Tumbler will mix coins, send transactions with various amounts to keys it controls; attempting to simulate other network transactions.  Sending a tumbler 1BTC may result in you receiving multiple, smaller, transactions in return over a short time. The bitcoins returned to you will have been combined, split and transacted many, many times. Taint is the probability of tracing coins back to any given address after mixing and tumbling.
CCN
A Google search will turn up half a dozen of these coin washing services. Many are a combination of the preceding concepts. The majority offer themselves to consumers as anonymizers protecting privacy. Whether they are tools for crime or a defense against tyrants remains in the hand of the user. As Cody Wilson, co-founder of the anonymous Bitcoin wallet ‘Dark Wallet’, has said “Liberty is a dangerous thing.”
Also read: Cody Wilson: I Will Wrestle the Bitcoin Foundation to its Suicide
Regardless of their deployment, these methods are not without weaknesses. Further, still, there are other ways to launder stolen bitcoins that may not require any extra services at all. Bitcoin mixes coins in transactions all the time. You’ve probably already done it dozens of times and never noticed.

How Tumblers Launder Stolen Bitcoins

Heap of moneyA Bitcoin Transaction contains inputs and outputs. Inputs reference previous payments made to you. Outputs spend the coins by transferring ownership to a new address. A tumbler can launder stolen bitcoins by mixing and distributing them to other people and back to you.
Alice has previously received three payments.
1 BTC she bought on Coinbase,
2 BTC from her online store, and
3 BTC for selling weaponized wormhole technology to North Korea.
Alice controls 6 BTC with the keys in her wallet. If Alice sent all 6BTC in one transaction it’s not only reasonable, it’s likely, that someone analyzing the block chain will assume the same individual controls those keys. The transaction would join the Coinbase BTC and North Korea BTC in the same transaction with her online store proceeds as the inputs. Worse, still, if they are a government organization or Coinbase, they will be able to trace back the 1 BTC from Coinbase included in Alice’s transaction. Effectively, Alice is no longer anonymous, and her last transaction ties her to arms dealing with North Korea. Poor Alice.
Even if Alice were not laundering stolen bitcoins (or her North Korean coins), sending her coins through a tumbling service as she received them, she could have a higher chance of maintaining her anonymity.
launder stolen bitcoins tumblers
The expertly made graphic demonstrates. Multiple users send their coins to the tumbler. The coins will be mixed, then split to many addresses, mixed to small groups, mixed to large groups, sent out again, etc. Over time, Alice will receive a number of payments totaling close to her original amount (minus the tumbler fees). Then, Alice could check blockchain.info’s taint analysis for her addresses and see the chances of being connected to her pre-tumbled coins.

Coin Mixing to Launder Stolen Bitcoins

If you’re planning to steal from an exchange and planning to launder stolen bitcoins through mixing here is how that works. In the section on tumbling stolen coins, Alice could potentially dox herself anytime she mixes coins she purchased from an exchange with other coins she controls.
Bitcoin Core developer Gregory Maxwell first described a new style of transaction, CoinJoin, that uses the same principle that connected Alice’s bitcoin keys. It was not developed to launder stolen bitcoins but protect privacy. The concept takes things many steps further. Transaction inputs are completely independent of each other. If a transaction contains one input from Alice and one input from Bob, they both must sign the transaction for it to be valid. Instead of a transaction containing only Alice’s inputs and outputs, a CoinJoin transaction contains inputs and outputs from many groups of people.
A group using CoinJoin agrees on a transaction ahead of time. Until everyone in the group signs the transaction, it is invalid. Including multiple people in a transaction makes it much more difficult to link other keys together based on the transaction alone. If Alice includes Bob in a CoinJoin transaction, it becomes more difficult to chip away at the walls of anonymity.

More Ways to Launder Stolen Bitcoins

These two principles to launder stolen bitcoins rely on the fact that bitcoins do not exist. The balance of bitcoins anyone controls are just numbers recorded in the block chain. When combined with a transaction, it is akin to adding “2 + 2″ and breaking apart the resulting “4” into “1;1;1;1″ There is no way of proving “Each ‘1’ is an equal quarter of each ‘2’ added to get ‘4’” or any other denomination.
The current Alpha release of Dark Wallet supports Stealth Addresses, in addition to CoinJoin and Multisig. A Stealth Address is another privacy-related feature in the works for Bitcoin. They don’t launder funds, so much as break the usual chain of custody the block chain provides for tracking bitcoins. Also, exchanges that implement hot/cold wallets can function as tumblers and mixers if users deposit and withdrawal from the same hot wallet
It’s important to end with the weaknesses. Both of these systems relies on a foundation of “legitimate” users to effectively launder stolen bitcoins. If the hacker, who stole BitStamp’s coins, were to offload all 18,000 bitcoins on the same tumbler or mixer at the same time, their volume would overwhelm the obfuscation they hope to attain. Similarly, including 18,000 stolen bitcoins in a CoinJoin with 100 other bitcoins would just give everyone highly tainted coins. It would take some time and effort to launder so many.
Disclaimer: If your goal is to launder stolen bitcoins and you rely on this article as your sole source you will fail.
Images from the author and Shutterstock
https://www.cryptocoinsnews.com/launder-stolen-bitcoins/