Thursday, July 7, 2016

hey guys...pay attention to NSA here proibiting chit and how the fellow works it out with java excepction "Thanks a lot! I encountered a weird java.security.ProviderException: sun.security.pkcs11.wrapper.PKCS11Exception: CKR_DOMAIN_PARAMS_INVALID error when using Webscarab (SSL MITM proxy). Explicitly specifying these cipher suites makes it work again"

http://stackoverflow.com/questions/10687200/java-7-and-could-not-generate-dh-keypair 

Passing Android Traffic through Burp


I wanted to take a look at all HTTP(S) traffic coming from an Android device, even if applications made direct connections without a proxy, so I set up a transparent Burp proxy. I decided to put the Proxy on my Kali VM on my laptop, but didn’t want to run an AP on there, so I needed to get the traffic to there.

Network Setup

Network Topology Diagram
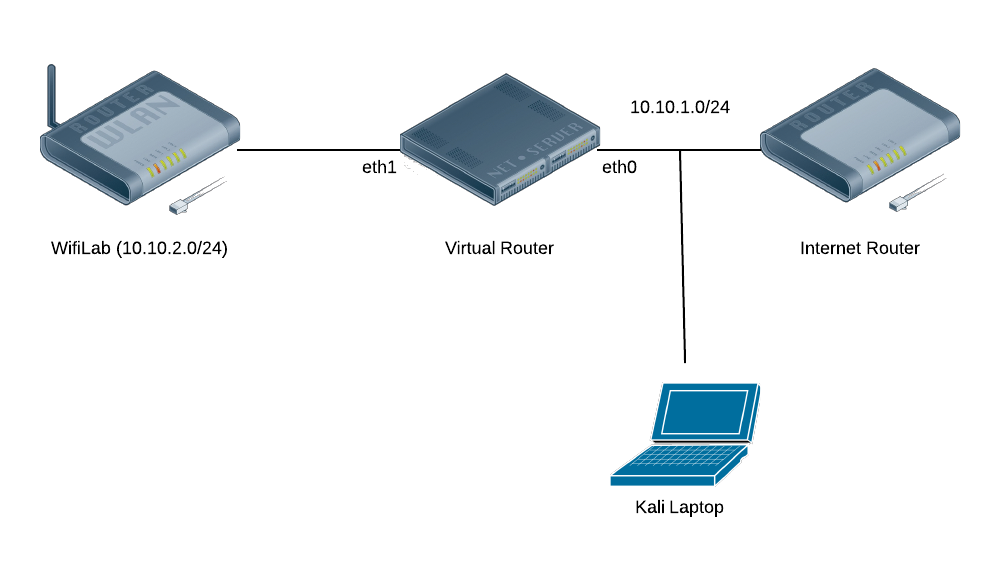
The diagram shows that my wireless lab is on a separate subnet from the rest of my network, including my laptop. The lab network is a NAT run by IPTables on the Virtual Router. While I certainly could’ve ARP poisoned the connection between the Internet Router and the Virtual Router, or even added a static route, I wanted a cleaner solution that would be easier to enable/disable.

Setting up the Redirect

I decided to use IPTables on the virtual router to redirect the traffic to my Kali Laptop. Furthermore, I decided to enable/disable the redirect based on logging in/out via SSH, but I needed to make sure the redirect would get torn down even if there’s not a clean logout: i.e., the VM crashes, the SSH connection gets interrupted, etc. Enter pam_exec. By using the pam_exec module, we can have an arbitrary command run on log in/out, which can setup and reset the IPTables REDIRECT via an SSH tunnel to my Burp Proxy.
In order to get the command executed on any login/logout, I added the following line to /etc/pam.d/common-session:
session optional pam_exec.so log=/var/log/burp.log /opt/burp.sh
This launches the following script, that checks if its being invoked for the right user, for SSH sessions, and then inserts or deletes the relevant IPTables rules.
#!/bin/bash

BURP_PORT=8080
BURP_USER=tap
LAN_IF=eth1

set -o nounset

function ipt_command {
 ACTION=$1
 echo iptables -t nat $ACTION PREROUTING -i $LAN_IF -p tcp -m multiport --dports 80,443 -j REDIRECT --to-ports $BURP_PORT\;
 echo iptables $ACTION INPUT -i $LAN_IF -p tcp --dport $BURP_PORT -j ACCEPT\;
}

if [ $PAM_USER != $BURP_USER ] ; then
 exit 0
fi

if [ $PAM_TTY != "ssh" ] ; then
 exit 0
fi

if [ $PAM_TYPE == "open_session" ] ; then
 CMD=`ipt_command -I`
elif [ $PAM_TYPE == "close_session" ] ; then
 CMD=`ipt_command -D`
fi

date
echo $CMD

eval $CMD
This redirects all traffic incoming from $LAN_IF destined for ports 80 and 443 to local port 8080. This does have the downside of missing traffic on other ports, but this will get nearly all HTTP(S) traffic.
Of course, since the IPTables REDIRECT target still maintains the same interface as the original incoming connection, we need to allow our SSH Port Forward to bind to all interfaces. Add this line to /etc/ssh/sshd_config and restart SSH:
GatewayPorts clientspecified

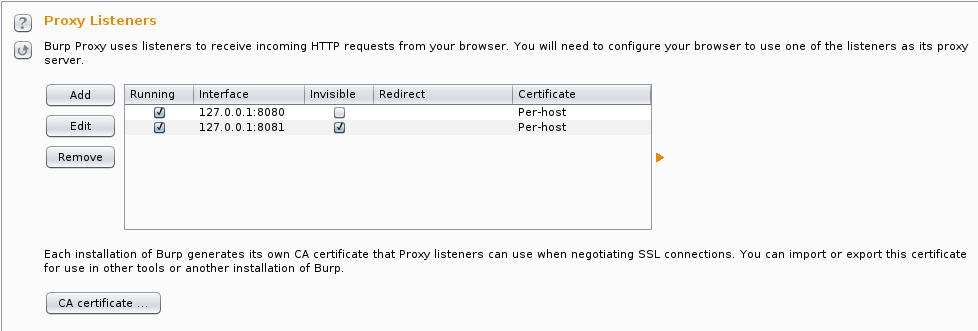
Setting up Burp and SSH

Burp’s setup is pretty straightforward, but since we’re not configuring a proxy in our client application, we’ll need to use invisible proxying mode. I actually put invisible proxying on a separate port (8081) so I have 8080 setup as a regular proxy. I also use the per-host certificate setting to get the “best” SSL experience.
Burp Setup
It turns out that there’s an issue with OpenJDK 6 and SSL certificates. Apparently it will advertise algorithms not actually available, and then libnss will throw an exception, causing the connection to fail, and the client will retry with SSLv3 without SNI, preventing Burp from creating proper certificates. It can be worked around by disabling NSS in Java. In /etc/java-6-openjdk/security/java.security, comment out the line with security.provider.9=sun.security.pkcs11.SunPKCS11 ${java.home}/lib/security/nss.cfg.
Forwarding the port over to the wifilab server is pretty straightforward. You can either use the -R command-line option, or better, set things up in ~/.ssh/config.
Host wifitap
  User tap
  Hostname wifilab
  RemoteForward *:8080 localhost:8081
This logs in as user tap on host wifilab, forwarding local port 8081 to port 8080 on the wifilab machine. The * for a hostname is to ensure it binds to all interfaces (0.0.0.0), not just localhost.

Setting up Android

At this point, you should have a good setup for intercepting traffic from any client of the WiFi lab, but since I started off wanting to intercept Android traffic, let’s optimize for that by installing our certificate. You can install it as a user certificate, but I’d rather do it as a system cert, and my testing tablet is already rooted, so it’s easy enough.
You’ll want to start by exporting the certificate from Burp and saving it to a file, say burp.der.
Android’s system certificate store is in /system/etc/security/cacerts, and expects OpenSSL-hashed naming, like a0b1c2d3.0 for the certificate names. Another complication is that it’s looking for PEM-formatted certificates, and the export from Burp is DER-formatted. We’ll fix all that up in one chain of OpenSSL commands:
(openssl x509 -inform DER -outform PEM -in burp.der;
 openssl x509 -inform DER -in burp.der -text -fingerprint -noout
 ) > /tmp/`openssl x509 -inform DER -in burp.der -subject_hash -noout`.0
Android before ICS (4.0) uses OpenSSL versions below 1.0.0, so you’ll need to use -subject_hash_old if you’re using an older version of Android. Installing is a pretty simple task (replace HASH.0 with the filename produced by the command above):
$ adb push HASH.0 /tmp/HASH.0
$ adb shell
android$ su
android# mount -o remount,rw /system
android# cp /tmp/HASH.0 /system/etc/security/cacerts/
android# chmod 644 /system/etc/security/cacerts/HASH.0
android# reboot
Connect your Android device to your WiFi lab, ssh wifitap from your Kali install running Burp, and you should see your HTTP(S) traffic in Burp (excepting apps that use pinned certificates, that’s another matter entirely). You can check your installed certificate from the Android Security Settings.
Good luck with your Android auditing!

https://systemoverlord.com/2014/07/13/passing-android-traffic-through-burp/ 

mitmproxy

An interactive console program that allows traffic flows to be intercepted, inspected, modified and replayed.

mitmdump

Think tcpdump for HTTP - the same functionality as mitmproxy without the frills.

install

pip install mitmproxy
See the installation instructions for more.

releases

See the latest release on Github for source, OSX and Windows builds.

RFID password authentication

http://www.techno-holics.com

So.... I finally got hold of a couple of the Parallax serial RFID readers from Radioshack. I had the Northwest depot send a couple to my local store. $9 each is quite a steal. I set to work repurposing my Arduino to interpret the signal and output the RS232 into the virtual com port that the Arduino driver installs.

I'm running Windows 7 and there used to be a super awesome option called serial keys in Windows XP. This option no longer exists. I had to find a way to get the input from the com port to dump into the keyboard buffer. After some searching, I located a program called AAC Keys, which is an alternative to the Windows serial keys application. It's lightweight, runs in the tray, and can be configured to any com port you wish. 

My original goal was to do a sort of Windows login authentication using my RFID implant's unique tag.... But i'm not going to get into what a headache that was to try to do using an Arduino to interpret the signal. So I have put that project aside and decided to have some fun logging into various sites and applications using my tag as the password. For demonstrative purposes, I changed my Guild Wars password as well as the password to the RFIDtoys forums to match that of my tag. Since the sketch I uploaded for my Arduino automatically sends a 'return' at the end of the tag, it was a simple matter of scanning my tag when my cursor was in an active text box.

This is a video of it in action.

The programs I used for this were:

Arduino FTDI drivers:

http://www.ftdichip.com/Drivers/VCP.htm

AAC Keys:

http://www.aacinstitute.org/downloads/aackeys/AACKeys.html

Notable mentions:

Guild Wars

Google Chrome

All in all, it's a fairly simple little project. I am quite happy with how it turned out. And it gave me a nice little break from fighting with Windows to get my station login system working. 
 
 
http://usabuzz.net/page/watch/vid2016W6FRRaWo60w 

Tuesday, July 5, 2016

Processor microcode manipulation to change opcodes?

I had recently thought of an extreme way of implementing security by obscurity and wanted to ask you guys if it's possible.
Would a person with no access to special processor documentation be able to change the CPU's microcode in order to obfuscate the machine's instruction set?
What else would need to be changed for a machine to boot with such a processor - would BIOS manipulation be enough?


You're very much getting into the realm of "Here be dragons" when you look into hardware manipulation like this. I don't know of any research or in-the-wild attack that has done any practical experimentation with this, so my answer will be purely academic.
First, it's probably best if I explain a bit about how microcode works. If you're already clued up on this stuff, feel free to skip ahead, but I'd rather include the details for those who don't know. A microprocessor consists of a huge array of transistors on a silicon die that interconnect in a way that provides a set of useful basic functions. These transistors alter their states based on internal changes in voltage, or on transitions between voltage levels. These transitions are triggered by a clock signal, which is actually a square wave that switches between high and low voltage at a high frequency - this is where we get "speed" measurements for CPUs, e.g. 2GHz. Every time a clock cycle switches between low and high voltage a single internal change is made. This is called a clock tick. In the simplest devices a single clock tick might constitute a whole programmed operation, but these devices are extremely limited in terms of what they're capable of doing.
As processors have gotten more complex, the amount of work that needs to be done at the hardware level to provide even the most basic operations (e.g. an addition of two 32-bit integers) has increased. A single native assembly instruction (e.g. add eax, ebx) might involve quite a lot of internal work, and microcode is what defines that work. Each clock tick performs a single microcode instruction, and a single native instruction might involve hundreds of microcode instructions.
Let's look at an extremely simplistic version of a memory read, for the instruction mov eax, [01234000], i.e. move a 32-bit integer from memory at address 01234000 into an internal register. First, the processor has to read the instruction from its internal instruction cache, which is a complicated task in itself. Let's ignore this for now, but it involves a lot of various operations inside the control unit (CU) that parse the instruction and prime various other internal units. Once the control unit has parsed the instruction, it then has to execute a group of microinstructions to perform the operation. First, it needs to check that the system memory pipeline is ready for a new instruction (remember that memory chips take commands too) so that it can do a read. Next, it needs to send a read command to the pipeline and wait for it to be serviced. DDR is asynchronous, so it must wait for an interrupt to say that the operation has completed. Once the interrupt is raised, the CPU continues with the instruction. The next operation is to move the new value from memory into an internal register. This isn't as simple as it sounds - the registers you would normally recognise (eax, ebx, ecx, edx, ebp, etc.) aren't fixed to a particular physical set of transistors in the chip. In fact, a CPU has a lot more physical internal registers than it exposes, and it uses a technique called register renaming to optimise the translation of incoming, outgoing and processed data. So the actual data from the memory bus has to be moved into a physical register, then that register has to be mapped to an exposed register name. In this case we'd be mapping it to eax.
All of the above is a simplification - the real operation might involve a lot more work, or might be handled by a dedicated internal device. As such, you might be looking at a large sequence of microinstructions that do very little on their own but add up to a single instruction. In some cases special microinstructions are used to trigger asynchronous internal hardware operations that handle a particular operation, designed to improve performance.
As you can see, microcode is immensely complicated. Not only would it wildly vary between CPU types, but also between release versions and revisions. This makes it a difficult thing to target - you can't really tell what microcode is programmed into the device. Not only that, but the way the microcode is programmed into the chip is also specific to each processor. On top of that, it's undocumented and checksummed, and potentially requires some signature checks too. You'd need some serious hardware to reverse engineer the mechanisms and checks.
Let's assume for a moment that you could overwrite microcode in a useful way. How would you make it do anything useful? Keep in mind that each code simply shifts some values around in the internals of the hardware, rather than a real operation. Obfuscating opcodes by juggling microcode around would require a complete custom OS and bootloader, but the BIOS would (likely) still work. Unfortunately more modern systems use UEFI rather than the old BIOS spec, which involves some execution of code on the CPU in real mode. This means you'd need an entirely new BIOS and OS, all written from scratch. Hardly a useful obfuscation method. On top of that, you may not even be able to remap instructions, because the seemingly arbitrary byte values aren't so arbitrary - the individual bits map to codes that select different areas of the CPU internals. Changing them might break the CPU's ability to even parse the instruction data.
A more interesting exercise would be to implement a new instruction that transitions you from ring3 to ring0 and another that switches back, all without performing any checks. This would allow you to do some fun stuff with privilege escalation without ever needing OS-specific backdoors.

http://security.stackexchange.com/questions/29730/processor-microcode-manipulation-to-change-opcodes

Ambient Computer Noise Leaks Your Encryption Keys

RSA Key extraction
[Daniel, Adi, and Eran], students researchers at Tel Aviv University and the Weizmann Institute of Science have successfully extracted 4096-bit RSA encryption keys using only the sound produced by the target computer. It may sound a bit like magic, but this is a real attack – although it’s practicality may be questionable. The group first described this attack vector at Eurocrypt 2004. The sound used to decode the encryption keys is produced not by the processor itself, but by the processor’s power supply, mainly the capacitors and coils. The target machine in this case runs a copy of GNU Privacy Guard (GnuPG).
During most of their testing, the team used some very high-end audio equipment, including Brüel & Kjær laboratory grade microphones and a parabolic reflector. By directing the microphone at the processor air vents, they were able to extract enough sound to proceed with their attack. [Daniel, Adi, and Eran] started from the source of GnuPG. They worked from there all the way down to the individual opcodes running on the x86 processor in the target PC. As each opcode is run, a sound signature is produced. The signature changes slightly depending on the data the processor is operating on. By using this information, and some very detailed spectral analysis, the team was able to extract encryption keys. The complete technical details of the attack vector are available in their final paper (pdf link).
Once  they had the basic methods down, [Daniel, Adi, and Eran] explored other attack vectors. They were able to extract data using ground fluctuations on the computers chassis. They even were able to use a cell phone to perform the audio attack. Due to the cell phone’s lower quality microphone, a much longer (on the order of several hours) time is needed to extract the necessary data.
Thankfully [Daniel, Adi, and Eran] are white hat hackers, and sent their data to the GnuPG team. Several countermeasures to this attack are already included in the current version of GnuPG.

http://hackaday.com/2013/12/20/ambient-computer-noise-leaks-your-encryption-keys/

Monday, July 4, 2016

emvlab.org
converting from to Please use the automated test vector button above to generate sample data, or if you prefer, you can fill out the form below and click the individual action buttons to decrypt, convert and encrypt the PIN block. You can copy ready to use test data from the bottom.


to


http://www.emvlab.org – the one stop site for banking techies – © 2009–2012
This site is run by members of the Security Group at the University of Cambridge Computer Laboratory.
EMV® is a registered trademark of EMVCo LLC. This site and its operators are not affiliated or associated with or endorsed by EMVCo. All other trademarks and registered trademarks are the property of their respective owners.