Setting up your Hacking Playground - Hyper-V Quick Setup [Part 2]
By Tony Lee.
In first part of this series, we did a high-level comparison between free versions of VMWare ESXi and Microsoft’s Hyper-V. In this part, we will explore the insane (and absurd) challenge that exists when setting up Hyper-V to be a remotely managed, headless server. Finally, in the last part of the series, we will give you the essentials needed to start using Hyper-V and present the winner of our Geek Playground comparison.
Here comes the ugly so hold on to your knickers!
Caveat: “**Remote Server Administration Tools for Windows 7 with SP1 can be installed ONLY on computers that are running the Enterprise, Professional, or Ultimate editions of Windows 7 or Windows 7 with SP1.*” -- So no Home Edition… Sorry folks.
Ironically, the Remote Server Administration Tools (RSAT) client took longer to install than the Hyper-V server. Crazy!
Microsoft’s obfuscation skills increase by 10
“An error occurred while attempting to connect to server [HOSTNAME]. Check that the Virtual Machine Management service is running and that you are authorized to connect to the server. You do not have the required permission to complete this task. Contact the administrator of the authorization policy for the computer [HOSTNAME].”
Huh?
After Googling around, I found a series of posts by John Howard, a Senior Program Manager in the Hyper-V team. This series of posts included a very detailed, but lengthy, explanation on how to fix this issue. Not placing fault on John here, but in my opinion, maybe Microsoft should just fix the issue? It is hard to imagine that the product would be released with this frustrating limitation. When using VMWare vSphere client, you just enter the IP/Hostname and some credentials--what is so difficult about that?
Fortunately, John Howard was nice enough to also create a tool to do all of this configuration magic for us, the "Hyper-V Remote Management Configuration Utility". However, this is not just any tool, I was amazed to see that it is a 6,300 line VB script! John must be a wizard or something. :)
Copy the
Server Side
Add user syntax:
Grant user access syntax:
Client Side
Select #4: Configure Remote Management -> #3 Configure Server Response to Ping
Reboot server!
You should now be able to bring up Hyper-V Manager and connect to the server
To list the logical drive letters, we can use:
We have two extra hard drives (2x2TB) that do not show up as usable. We will fix that with Diskpart.
So, we have confirmed that my two DVD burners are D and E… I wanted to change that to F and G and then assign drive letters D and E to my other hard drives.
Now, for the other one:
Now, to partition, format and assign drive letters to the other disks:
Now, for the last drive:
Finally! We can use all of the hard drives:
http://blog.opensecurityresearch.com/2013/04/setting-up-your-hacking-playground_30.html
In first part of this series, we did a high-level comparison between free versions of VMWare ESXi and Microsoft’s Hyper-V. In this part, we will explore the insane (and absurd) challenge that exists when setting up Hyper-V to be a remotely managed, headless server. Finally, in the last part of the series, we will give you the essentials needed to start using Hyper-V and present the winner of our Geek Playground comparison.
Hyper-V manager installation
Hyper-V Server 2012 installation was smooth--maybe a little too smooth… There has to be a catch, right? Of course there is! The remote management setup is extremely frustrating and unpolished. In fact, I am a little surprised Microsoft released a product that has so many issues. All I want to do is connect to the server from my laptop and manage the VMs! Fortunately, since I had to struggle through the setup, I figured I would document the process to hopefully save you some sleepless nights.Here comes the ugly so hold on to your knickers!
Downloading and installing the client
Windows 7 Hyper-V Manager can be downloaded as part of Remote Server Administration Tools for Windows 7Caveat: “**Remote Server Administration Tools for Windows 7 with SP1 can be installed ONLY on computers that are running the Enterprise, Professional, or Ultimate editions of Windows 7 or Windows 7 with SP1.*” -- So no Home Edition… Sorry folks.
Ironically, the Remote Server Administration Tools (RSAT) client took longer to install than the Hyper-V server. Crazy!
Enabling Hyper-V tools
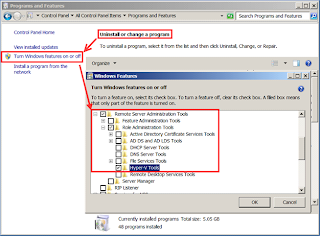
After install, if you are like me, you are wondering why you cannot locate Hyper-V Manager in the start menu. Then it dawns on you that you have to enable that as a Windows feature shown in the screenshot below:
Microsoft’s obfuscation skills increase by 10
Enabling Remote Management
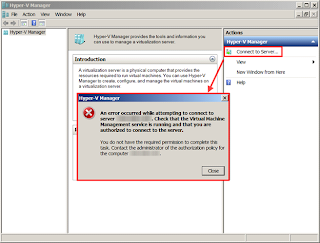
Whew! So, all is good right? We can open Hyper-V manager client and click "Connect" to Server… But when we enter the IP of the remote server we get an error message:“An error occurred while attempting to connect to server [HOSTNAME]. Check that the Virtual Machine Management service is running and that you are authorized to connect to the server. You do not have the required permission to complete this task. Contact the administrator of the authorization policy for the computer [HOSTNAME].”
Huh?

After Googling around, I found a series of posts by John Howard, a Senior Program Manager in the Hyper-V team. This series of posts included a very detailed, but lengthy, explanation on how to fix this issue. Not placing fault on John here, but in my opinion, maybe Microsoft should just fix the issue? It is hard to imagine that the product would be released with this frustrating limitation. When using VMWare vSphere client, you just enter the IP/Hostname and some credentials--what is so difficult about that?
Fortunately, John Howard was nice enough to also create a tool to do all of this configuration magic for us, the "Hyper-V Remote Management Configuration Utility". However, this is not just any tool, I was amazed to see that it is a 6,300 line VB script! John must be a wizard or something. :)
Hyper-V Remote Management Configuration Utility
Download from:Copy the
hvremote.wsf script to the server - From the server, map the C drive of your client laptop: net use * \\laptop\C$ “password” /U:local\[user]
copy z:\users\[user]\Desktop\hvremote.wsd c:\
Setting up Accounts
Since my laptop was already a member of a domain and the server is a member of a workgroup, I used the provided “10 second guide” instructions:Server Side
Add user syntax:
 net user [username] “[password]” /add

ex:
net user tony “SecretPassword” /add
Grant user access syntax:
 cscript hvremote.wsf /add:[username]

ex:
cscript hvremote.wsf /add:tony
Client Side
 cmdkey /add:[servername] /user:[servername]\[accountname] /pass

ex:
cmdkey /add:VMServer /user:VMServer\tony /pass
Enabling Ping on Hyper-V
On your Hyper-V host, in the blue configuration command prompt (sconfig.cmd):Select #4: Configure Remote Management -> #3 Configure Server Response to Ping
Added server name to client’s hosts file
From elevated command prompt on client (start -> cmd -> right click -> Run as Administrator): write c:\windows\system32\drivers\etc\hosts
[IP address] [Hostname]
ex:
192.168.2.130 VMServer
Reboot server!
Verify proper functionality
Run the following command on both computers: cscript hvremote.wsf /show /target:othercomputername
ex from laptop:
cscript hvremote.wsf /show /target:VMServer
ex from server:
cscript hvremote.wsf /show /target:laptop
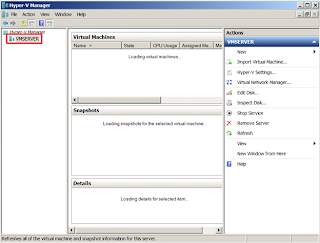
You should now be able to bring up Hyper-V Manager and connect to the server

Disk management
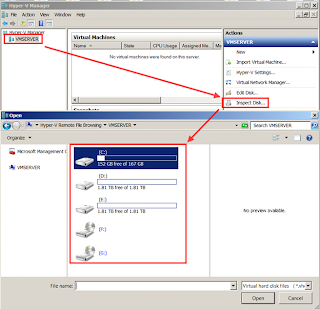
Now that we can access the Hyper-V server through Hyper-V Manager, we may need to make our extra disk drives in the server usable. Most people point and click via the GUI, but you can also manage the disks via the command line interface as well. CLI knowledge is critical for the free version of Hyper-V.To list the logical drive letters, we can use:
 wmic logicaldisk get name,description
Description       Name
Local Fixed Disk  C:
CD-ROM Disc       D:
CD-ROM Disc       E:
We have two extra hard drives (2x2TB) that do not show up as usable. We will fix that with Diskpart.
Diskpart foo
 C:\Users\Administrator>diskpart

Microsoft DiskPart version 6.2.9200

Copyright (C) 1999-2012 Microsoft Corporation.
On computer: VMSERVER

DISKPART> list letter

Microsoft DiskPart version 6.2.9200

DISK        - Display a list of disks. For example, LIST DISK.
PARTITION   - Display a list of partitions on the selected disk.
              For example, LIST PARTITION.
VOLUME      - Display a list of volumes. For example, LIST VOLUME.
VDISK       - Displays a list of virtual disks.

DISKPART> list volume

  Volume ###  Ltr  Label        Fs     Type        Size     Status     Info
  ----------  ---  -----------  -----  ----------  -------  ---------  --------
  Volume 0     D                       DVD-ROM         0 B  No Media
  Volume 1     E                       DVD-ROM         0 B  No Media
  Volume 2         System Rese  NTFS   Partition    350 MB  Healthy    System
  Volume 3                      NTFS   Partition   1862 GB  Healthy
  Volume 4     C                NTFS   Partition    167 GB  Healthy    Boot
So, we have confirmed that my two DVD burners are D and E… I wanted to change that to F and G and then assign drive letters D and E to my other hard drives.
 DISKPART> select volume 0

Volume 0 is the selected volume.

DISKPART> assign letter=F

DiskPart successfully assigned the drive letter or mount point.

DISKPART> list volume

  Volume ###  Ltr  Label        Fs     Type        Size     Status     Info
  ----------  ---  -----------  -----  ----------  -------  ---------  --------
* Volume 0     F                       DVD-ROM         0 B  No Media
  Volume 1     E                       DVD-ROM         0 B  No Media
  Volume 2         System Rese  NTFS   Partition    350 MB  Healthy    System
  Volume 4     C                NTFS   Partition    167 GB  Healthy    Boot
Now, for the other one:
 DISKPART> select volume 1

Volume 1 is the selected volume.

DISKPART> assign letter=G

DiskPart successfully assigned the drive letter or mount point.

DISKPART> list volume

  Volume ###  Ltr  Label        Fs     Type        Size     Status     Info
  ----------  ---  -----------  -----  ----------  -------  ---------  --------
  Volume 0     F                       DVD-ROM         0 B  No Media
* Volume 1     G                       DVD-ROM         0 B  No Media
  Volume 2         System Rese  NTFS   Partition    350 MB  Healthy    System
  Volume 4     C                NTFS   Partition    167 GB  Healthy    Boot
Now, to partition, format and assign drive letters to the other disks:
 DISKPART> list disk

  Disk ###  Status         Size     Free     Dyn  Gpt
  --------  -------------  -------  -------  ---  ---
  Disk 0    Online         1863 GB  1862 GB
  Disk 1    Online         1863 GB  1863 GB        *
* Disk 2    Online          167 GB      0 B

DISKPART> select disk 0

Disk 0 is now the selected disk.

DISKPART> list partition

  Partition ###  Type              Size     Offset
  -------------  ----------------  -------  -------
  Partition 1    Primary            350 MB  1024 KB

DISKPART> create partition primary

DiskPart succeeded in creating the specified partition.

DISKPART> list partition

  Partition ###  Type              Size     Offset
  -------------  ----------------  -------  -------
  Partition 1    Primary            350 MB  1024 KB
* Partition 2    Primary           1862 GB   351 MB

DISKPART> format fs=ntfs quick

  100 percent completed

DiskPart successfully formatted the volume.

DISKPART> assign letter=D

DiskPart successfully assigned the drive letter or mount point.

DISKPART> list volume

  Volume ###  Ltr  Label        Fs     Type        Size     Status     Info
  ----------  ---  -----------  -----  ----------  -------  ---------  --------
  Volume 0     F                       DVD-ROM         0 B  No Media
  Volume 1     G                       DVD-ROM         0 B  No Media
  Volume 2         System Rese  NTFS   Partition    350 MB  Healthy    System
* Volume 3     D                NTFS   Partition   1862 GB  Healthy
  Volume 4     C                NTFS   Partition    167 GB  Healthy    Boot
Now, for the last drive:
 DISKPART> list disk

  Disk ###  Status         Size     Free     Dyn  Gpt
  --------  -------------  -------  -------  ---  ---
* Disk 0    Online         1863 GB      0 B
  Disk 1    Online         1863 GB  1863 GB        *
  Disk 2    Online          167 GB      0 B

DISKPART> select disk 1

Disk 1 is now the selected disk.

DISKPART> list partition

There are no partitions on this disk to show.

DISKPART> create partition primary

DiskPart succeeded in creating the specified partition.

DISKPART> list partition

  Partition ###  Type              Size     Offset
  -------------  ----------------  -------  -------
* Partition 1    Primary           1863 GB  1024 KB

DISKPART> format fs=ntfs quick

  100 percent completed

DiskPart successfully formatted the volume.

DISKPART> assign letter=E

DiskPart successfully assigned the drive letter or mount point.

DISKPART> list volume

  Volume ###  Ltr  Label        Fs     Type        Size     Status     Info
  ----------  ---  -----------  -----  ----------  -------  ---------  --------
  Volume 0     F                       DVD-ROM         0 B  No Media
  Volume 1     G                       DVD-ROM         0 B  No Media
  Volume 2         System Rese  NTFS   Partition    350 MB  Healthy    System
  Volume 3     D                NTFS   Partition   1862 GB  Healthy
  Volume 4     C                NTFS   Partition    167 GB  Healthy    Boot
* Volume 5     E                NTFS   Partition   1863 GB  Healthy

DISKPART> exit

Leaving DiskPart...

C:\Users\Administrator>e:

E:\>dir
 Volume in drive E has no label.
 Volume Serial Number is 2015-54E4

 Directory of E:\

File Not Found

E:\>d:

D:\>dir
 Volume in drive D has no label.
 Volume Serial Number is 5CC4-3887

 Directory of D:\

File Not Found
Finally! We can use all of the hard drives:


No comments:
Post a Comment