Passing Android Traffic through Burp
I wanted to take a look at all HTTP(S) traffic coming from an
Android device, even if applications made direct connections without a
proxy, so I set up a transparent Burp proxy. I decided to put the Proxy
on my Kali VM on my laptop, but didn’t want to run an AP on there, so I
needed to get the traffic to there.
Network Setup

The diagram shows that my wireless lab is on a separate subnet from
the rest of my network, including my laptop. The lab network is a NAT
run by IPTables on the Virtual Router. While I certainly could’ve ARP
poisoned the connection between the Internet Router and the Virtual
Router, or even added a static route, I wanted a cleaner solution that
would be easier to enable/disable.
Setting up the Redirect
I decided to use IPTables on the virtual router to redirect the
traffic to my Kali Laptop. Furthermore, I decided to enable/disable the
redirect based on logging in/out via SSH, but I needed to make sure the
redirect would get torn down even if there’s not a clean logout: i.e.,
the VM crashes, the SSH connection gets interrupted, etc. Enter
pam_exec. By using the
pam_exec module, we can have an arbitrary command run on log in/out, which can setup and reset the IPTables
REDIRECT via an SSH tunnel to my Burp Proxy.
In order to get the command executed on any login/logout, I added the following line to
/etc/pam.d/common-session:
session optional pam_exec.so log=/var/log/burp.log /opt/burp.sh
This launches the following script, that checks if its being invoked
for the right user, for SSH sessions, and then inserts or deletes the
relevant IPTables rules.
#!/bin/bash

BURP_PORT=8080
BURP_USER=tap
LAN_IF=eth1

set -o nounset

function ipt_command {
 ACTION=$1
 echo iptables -t nat $ACTION PREROUTING -i $LAN_IF -p tcp -m multiport --dports 80,443 -j REDIRECT --to-ports $BURP_PORT\;
 echo iptables $ACTION INPUT -i $LAN_IF -p tcp --dport $BURP_PORT -j ACCEPT\;
}

if [ $PAM_USER != $BURP_USER ] ; then
 exit 0
fi

if [ $PAM_TTY != "ssh" ] ; then
 exit 0
fi

if [ $PAM_TYPE == "open_session" ] ; then
 CMD=`ipt_command -I`
elif [ $PAM_TYPE == "close_session" ] ; then
 CMD=`ipt_command -D`
fi

date
echo $CMD

eval $CMD
This redirects all traffic incoming from
$LAN_IF
destined for ports 80 and 443 to local port 8080. This does have the
downside of missing traffic on other ports, but this will get nearly all
HTTP(S) traffic.
Of course, since the IPTables
REDIRECT
target still maintains the same interface as the original incoming
connection, we need to allow our SSH Port Forward to bind to all
interfaces. Add this line to
/etc/ssh/sshd_config and restart SSH:
GatewayPorts clientspecified
Setting up Burp and SSH
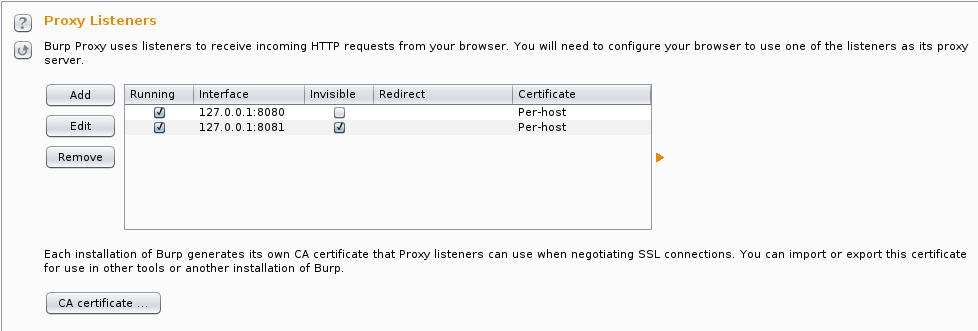
Burp’s setup is pretty straightforward, but since we’re not configuring a proxy in our client application, we’ll need to use
invisible proxying
mode. I actually put invisible proxying on a separate port (8081) so I
have 8080 setup as a regular proxy. I also use the per-host
certificate setting to get the “best” SSL experience.

It turns out that there’s an
issue with
OpenJDK 6
and SSL certificates. Apparently it will advertise algorithms not
actually available, and then libnss will throw an exception, causing the
connection to fail, and the client will retry with SSLv3 without SNI,
preventing Burp from creating proper certificates. It can be worked
around by disabling NSS in Java. In
/etc/java-6-openjdk/security/java.security, comment out the line with
security.provider.9=sun.security.pkcs11.SunPKCS11 ${java.home}/lib/security/nss.cfg.
Forwarding the port over to the
wifilab server is pretty straightforward. You can either use the
-R command-line option, or better, set things up in
~/.ssh/config.
Host wifitap
  User tap
  Hostname wifilab
  RemoteForward *:8080 localhost:8081
This logs in as user
tap on host
wifilab, forwarding local port 8081 to port 8080 on the
wifilab machine. The * for a hostname is to ensure it binds to all interfaces (0.0.0.0), not just localhost.
Setting up Android
At this point, you should have a good setup for intercepting traffic
from any client of the WiFi lab, but since I started off wanting to
intercept Android traffic, let’s optimize for that by installing our
certificate. You can install it as a user certificate, but I’d rather
do it as a system cert, and my testing tablet is already rooted, so it’s
easy enough.
You’ll want to start by exporting the certificate from Burp and saving it to a file, say
burp.der.
Android’s system certificate store is in
/system/etc/security/cacerts, and expects OpenSSL-hashed naming, like
a0b1c2d3.0
for the certificate names. Another complication is that it’s looking
for PEM-formatted certificates, and the export from Burp is
DER-formatted. We’ll fix all that up in one chain of OpenSSL commands:
(openssl x509 -inform DER -outform PEM -in burp.der;
 openssl x509 -inform DER -in burp.der -text -fingerprint -noout
 ) > /tmp/`openssl x509 -inform DER -in burp.der -subject_hash -noout`.0
Android before ICS (4.0) uses OpenSSL versions below 1.0.0, so you’ll need to use
-subject_hash_old
if you’re using an older version of Android. Installing is a pretty
simple task (replace HASH.0 with the filename produced by the command
above):
$ adb push HASH.0 /tmp/HASH.0
$ adb shell
android$ su
android# mount -o remount,rw /system
android# cp /tmp/HASH.0 /system/etc/security/cacerts/
android# chmod 644 /system/etc/security/cacerts/HASH.0
android# reboot
Connect your Android device to your WiFi lab,
ssh wifitap
from your Kali install running Burp, and you should see your HTTP(S)
traffic in Burp (excepting apps that use pinned certificates, that’s
another matter entirely). You can check your installed certificate from
the Android Security Settings.
Good luck with your Android auditing!
https://systemoverlord.com/2014/07/13/passing-android-traffic-through-burp/


