February 20, 2008
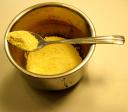 Uranium and its pure compounds are just not readily available to the amateur scientist, element collector, or student in 2008. So what is one to do? Make these materials oneself, of course. (At left is a quantity of home-baked yellowcake.)

 Uranium ore is easy to find on the abandoned uranium mine dumps and mine roads of the American Southwest. In fact, this is among the easiest kinds of rock to obtain by the bucketload, provided one has a car and is willing to spend a day or two in sunny Southeast Utah. You don’t need to know anything about geology, mining, or the privations of life in the backcountry as the “U-boomers” of the ’50s did (although some appreciation in these areas will enrich the experience). A high-clearance, 4WD vehicle is unnecessary; a Toyota Echo will get you to most dumps as surely as an H2 Hummer, and without branding you as an Earth-raping jackass. Summer weather is usually amenable to camping in the field. For those into luxury, there’s the Lazy Lizard Hostel in Moab.
 The only critical equipment to this venture is a durable scintillation detector to indicate which rocks are hot (or where to dig to retrieve a hot rock). Unless you can see gamma rays, you just can’t look at the ground and discern a good piece of ore from a non-piece of ore. At left is an image of my homemade bismuth germanate scintillation detector, built in a section of water pipe and attached to a Ludlum 12 ratemeter. (Construction info here.) There are many little tricks to building and using scintillation detectors for this purpose, but a most important one is this: don’t hit the dumps with a new $1000 NaI(Tl) detector–you’ll kill it! I recommend plastic or BGO. I use high-resistance dynode chains, 10MΩ+ per dynode. This prolongs the life of the ratemeter batteries. Before departing on a trip, I set my high voltage so that the scintillometer pegs full scale on a nice piece of ore kept at home as a standard. In the field, I can roughly gauge the quality of a rock against my standard.
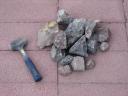
 Where are the best mines? Good question. I’m not sure I’ve figured that out (and should I really share my favorite spots)? But I can tell you a good mine to visit first. Here are instructions to the famous Mi Vida Mine, pictured left. From Moab, UT, head south about 30 mi. on US 191. Turn east at the junction of Steen’s Rd. (CR-114) and US 191. Follow Steen’s Rd. past CR-111, past the hairpin turn, and up a gently rising gulch until you see the big ore bins in the photo. This
  is the Mi Vida Mine. It’s on BLM land, so feel free to fill your backpack with screaming hot rock. Focus on the road, and on the conspicuous dumps for the Standard Mine, slightly SW of the Mi Vida itself. If you continue east on Steen’s Rd. past the Mi Vida, the road gets rougher and you come out on the western wall of Big Indian Valley with impressive views of the La Sal Mountains to the north. This western escarpment is dotted with dozens of uranium mines. Get busy!
_______________________________________________________________
is the Mi Vida Mine. It’s on BLM land, so feel free to fill your backpack with screaming hot rock. Focus on the road, and on the conspicuous dumps for the Standard Mine, slightly SW of the Mi Vida itself. If you continue east on Steen’s Rd. past the Mi Vida, the road gets rougher and you come out on the western wall of Big Indian Valley with impressive views of the La Sal Mountains to the north. This western escarpment is dotted with dozens of uranium mines. Get busy!
_______________________________________________________________
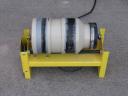 My ball mill was purchased on eBay from the seller Hobfir. This is his 15-lb model, entirely adequate for the quantity of rock I process and a very good deal. To give the mill drum better traction on the rollers, I apply duct tape around the circumference of the drum and a few drops of honey on the rollers. Works wonders at keeping that puppy rollin’. The milling media is a mixture of 1/2″ and 3/4″ chrome steel balls purchased from McMaster-Carr. I tend to put in about 5 lb of balls to 5 lb of crushed ore. A day’s worth of milling turns most of the charge into powder that passes my kitchen sieve.
 Leaching uranium can be done with acids, or with carbonates. In industry, the choice depends on ore chemistry. Acid is uneconomical if the ore has lots of carbonates in it, but acid is more aggressive. Bob Lazar of UnitedNuclear.com describes a carbonate leach process here. I like an acid process with this Utah ore—-acid reacts very quickly and completely, even though it is not at all selective for uranium. My acid leachate goes on to feed a secondary carbonate leach, so in a sense I am only using the acid to break down / pulverize the ore further than the ball mill. The acid used here is “muriatic acid” (20° Baume HCl solution sold at Lowes and Home Depot), straight out of the jug. The ore is first wet with water to make a fluid slurry in the bottom of a 5-gallon bucket, and then HCl is added. A large quantity of CO2 is evolved as the acid reacts with calcite and dolomite in the sandstone. I periodically stir the leaching bucket to resuspend the solids, and I add HCl to keep pH < 0.
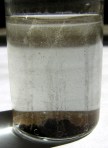
 Finished leachate is siphoned off after several days of sitting / stirring. It is apple-green, and very turbid despite efforts to give it several days to settle out. I gravity-filter it using coffee filters, coffee strainers, and plastic funnels. Then I vacuum-filter it through fine qualitative filter paper. The result is shown at left.

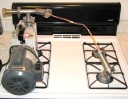
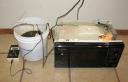 The leaching itself is fun: I made a leaching system comprising a small microwave oven, a length of PE tubing, a pail, and a submersible aquarium pump, see photo left. Two small holes are drilled in the wall of the oven cavity (they are too small to radiate microwaves). A length of 1/4″ PE tubing is loosely coiled inside the oven and brought out through the holes. The submersible pump sits in the leach pail and drives solution through the coil and back into the pail. Discharge temperature of this coil is close to 80 °C after the system has been running awhile. Obviously, some care went into determining the right length of tubing; you don’t ever want to boil its contents! The pail is charged about half full with
 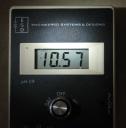 carbonate solution, and the ammonia precipitate produced by neutralization of 2 l of acid leachate is added. After starting the pump and oven, a uranium yellow color is evident in the carbonate solution almost immediately. I typically operate this system for a few hours in the evening over 2-3 days. The consumption of CO32- by uranium drives the pH up noticably, so baking soda must be occasionally added to keep the pH around 10.5. Pregnant leachate is extracted when needed by directing the heater coil discharge into a funnel with a coffee filter in it. A receptacle under the funnel collects the clear yellow solution shown at the top. I subsequently vacuum-filter
  the solution through fine qualitative filter paper to remove all traces of turbidity. Oh, and I should mention the fluorescence! The uranyl ion glows a brilliant green color under long- and short-wave UV.
_______________________________________________________________
the solution through fine qualitative filter paper to remove all traces of turbidity. Oh, and I should mention the fluorescence! The uranyl ion glows a brilliant green color under long- and short-wave UV.
_______________________________________________________________
First of all, “yellowcake” is a not a specific chemical compound. In industry, the word simply refers to uranium mill concentrates, regardless of their chemistry. Yellowcakes may consist of alkali or ammonium uranates or diuranates and / or uranium oxides. In most processes today, the mill concentrate is U3O8, which is not even yellow! Here we precipitate a yellowcake of uranyl peroxide (UO4·nH2O) that is indeed a very satisfying shade of yellow. More importantly, this precipitation is highly selective for uranium. Uranium peroxide is one of few inorganic peroxides that are insoluble in water. In fact, the only known naturally-occurring peroxide mineral is studtite — uranyl peroxide.
 Uranium as the peroxide from Step IV can be purified further by converting it to UO3 or U3O8.Fiesta-orange UO3 is the final product of my purification routine, and the gateway to other uranium compounds. It is produced by heating dry UO4·nH2O in an open-air container at about 300 °C. During the process of heating, volatile contaminants (water, oxygen, ammonia, halogens, hydrogen peroxide) are driven off. During preparation, keep stirring the yellow peroxide as it turns orange. If the temperature is managed properly, the product will be a clean orange color. If allowed to overheat, U3O8begins forming and the orange color fades to darker shades of brown-green. What I like about UO3 as an endpoint is that this oxide is readily acid-soluble, has definite stoichiometry, and does not require a lot of heat to form. I store my “stock” of uranium as UO3.
 Thin layers of UO2 can be electroplated onto metal cathodes in a uranyl salt bath. The technique is not efficient from an electrochemical standpoint (the vast majority of input energy goes toward production of H2and O2 and heat), but potentially very handy for production of UO2 semiconductor components or fabrication of experimental fission chambers.
 The electrolysis setup is assembled by arranging the anode on the vertical axis of the cylindrical cell and clipping the cathode to the wall. See photo at left. I have had best results in my experiments when the cathode presents no more than about 15 cm2 of area in the direction of the anode. (The “back” of the cathode will be minimally plated except around the periphery.) The power supply is turned on and electrolysis begins with heavy evolution of gas at both electrodes. During electrolysis, the solution becomes hot and current may rise or fall. I move the cell to bring the anode closer to or farther from the cathode to help hold current to about 10 A. The finished plating is an adherent, velvety black layer. I plated my cathodes for about 5 min. apiece; longer plating tends to make a less adherent layer that can crack off, although more UO2 is present. Between platings, electrolyte level can be restored with distilled water.
 Plated cathodes read about 2000-3000 CPM on a pancake GM tube, indicating that the black deposit is indeed the intended UO2. If the cathodes are dirtied with precipitated uranyl salts, they can be washed by a quick dunk in dilute HCl and the UO2 layer will be unaffected. I have successfully used a UO2-plated copper strip in a “crystal radio” with the diode junction formed between it and a tuft of steel wool. The radio works, but poorly. I need to continue experimenting with junction materials and bias to better understand the semiconductor properties of UO2.
 Uranium tetrafluoride (UF4), known as “green salt” in the uranium processing business, is an important intermediate in the production of both uranium metal and the uranium hexafluoride needed for gaseous diffusion enrichment. It is insoluble in water and one of the most well-behaved U(IV) compounds. The procedures described here produce a hemipentahydrate adduct, UF4·2.5H2O.
 This procedure starts with a trip to the grocery store to pick up a bottle of Whink Rust Stain Remover (“as advertised on Dr. Laura”) and a bottle of plain 1000 mg Vitamin C tablets. I caution the reader (and Dr. Laura’s braindead Republican audience) that Whink is hardly a benign household chemical—-it is 2-3M HF, and in this procedure, a solution containing it gets heated to boiling! Plan on being careful and do not breathe any fumes. In this process, I reduce uranium from U(VI) to U(IV) in solution with ascorbic acid and a Cu(II) catalyst, and simultaneously precipitate the U(IV) so formed with HF. Cl– ions are necessary also, so the solvent here is dilute HCl prepared from muriatic acid. In the image at left, I have the reactants laid out. They are as follows:
 acid. The uranyl solution immediately turns a bluish-green hue, with a flash of yellowish right where the ascorbic acid enters, and a precipitate forms. Return to microwave, boil, add ascorbic acid, and repeat until the latter is consumed. At this point the flask contains Cu+ and Cu++ in solution and a fine UF4precipitate. Let flask sit an hour to cool down and settle precipitate (picture at left). Decant the supernatant solution. Wash and settle the precipitate twice in boiling water. Dry in microwave. The product should appear as at the top of this section. My yield was 12.6 g, nearly quantitative.

First off, I should point out that certain aspects of this high-temperature metallothermic reduction are not exactly “kitchen chemistry.” I am reducing anhydrous UF4 with finely-divided calcium metal in a special MgO crucible. The bill of materials is as follows:
 The UF4 used in a metallothermic reduction must be anhydrous. If it’s not, the water of hydration may consume the fuel metal, and steam may cause the reaction to erupt or splatter dangerously. UF4·2.5H2O cannot be dehydrated in air (it will react with oxygen to give uranium oxides), so a vacuum system is called for.
  I use a 2.75″ ConFlat nipple linked by a long run of 1/4″ copper tubing to a two-stage mechanical vacuum pump. A quantity of UF4·2.5H2O is sealed into the chamber, the pump is started, and the chamber is directly heated on “high” on a gas stovetop. Progress may be checked via a simple electrodeless discharge tube mounted at the pump inlet and excited by a “leak tester” Tesla coil. When the grey-purple water discharge disappears, she’s done. My job took almost three hours.
 Mixing and igniting the charge: The anhydrous UF4was cooled, removed from the vacuum pump, and mixed with granular calcium. I prepared 67 g of UF4, and in a tightly-capped plastic bottle I shook this with 21 g calcium (about 25% stoichiometric excess). The mixture was then packed into the 100-ml MgO crucible, filling it about 2/3 full. Packability is
  very poor with this fluffy powder. A short piece of Mg ribbon was inserted into the center of the charge. Finally, a layer composed of about 5 g crushed iodine mixed with a pinch more of Ca metal was sprinkled atop the charge to help initiate the reaction, and provide CaI2to lower the melting point of the slag. The crucible was surrounded with dry MgO powder in a paint can; this in turn was placed in a container of sand. Ignition is straightforward: light the Mg ribbon. Avoiding the smoke is probably a very good idea! Click here to watch the video (AVI format, 10.0 MB).
 After sitting about three hours, the crucible was cool enough to recover the slag. In this experiment, the nature of the slag varied with depth in the crucible: at the top was some unconsolidated granular material that was minimally radioactive, followed by dense, brownish-black, consolidated slag at the bottom that was quite radioactive. (The crucible itself was destroyed by the reaction, breaking into several pieces). I retained the black bottom-slag, and found it to have the following properties:

I crushed the slag and attempted to wash it in ice-cold vinegar (a technique for dissolving calcium oxide / nitride / iodide, hopefully breaking up the slag and allowing isolation of the entrapped uranium metal). The slag as a whole was very resistant to vinegar, but some calcium salts evidently did dissolve because mixing acetone with the decanted vinegar resulted in a characteristic “Sterno” precipitate. Of course, vinegar will not dissolve the main expected byproduct, CaF2.
Conclusions and summary:
UF4(s) + 2Ca(s) → U(l) + 2CaF2(l)
My metallothermic reduction in a 100-ml crucible did indeed produce some uranium metal. I can infer as much from the slag’s flammability, electrical conductivity, radioactivity, and displacement of H2 gas from HCl. However, the uranium is bound up in a hard and chemically intractable CaF2 slag, along with other impurities that probably include uranium oxides. When these reactions are done on a large scale, they apparently work quite well, generating and storing enough heat to separate out molten uranium metal as a derby that settles to the bottom of the vessel. If one can’t isolate the metal in relatively pure form, then there is really no practical point to the exercise! In the future, I will probably explore the electrolytic synthesis of the metal described by Shiokawa et al. (J. Alloys and Compounds 255 (1997) p. 98-101). This ain’t exactly kitchen chemistry, either: it involves amalgamation of the product on a mercury cathode, which then must be distilled to isolate the U.
https://carlwillis.wordpress.com/2008/02/20/uranium-chemistry/
 Uranium and its pure compounds are just not readily available to the amateur scientist, element collector, or student in 2008. So what is one to do? Make these materials oneself, of course. (At left is a quantity of home-baked yellowcake.)
This is the inaugural post in what will become a short series, detailing how uranium and various pure compounds can be refined from the brute earth to serve personal needs. There are differences between what is done in industrial mining / milling operations and what can be realistically accomplished in a typical American domicile. There are also differences in the raw materials that could be obtained back in the good old days when our favorite applied inorganic chemistry texts were written (“Borrow a gallon of fuming nitric acid and some glycerin from your science-teacher…”), versus what can be obtained in the paranoid, restrictive world of today. Thus, my approach to uranium chemistry emphasizes practical techniques and materials that are available to today’s home-dweller. The foregoing discussion assumes a decent background in chemistry and mature attention to safety.
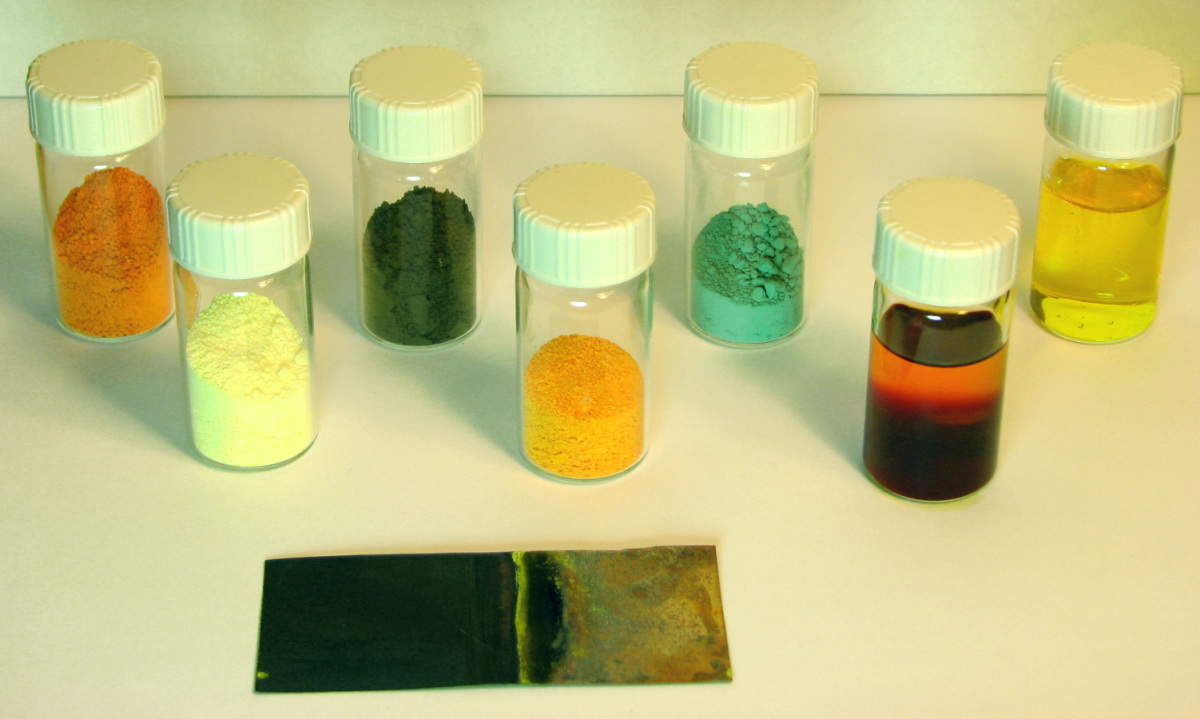
Uranium compounds that can be easily prepared at home are shown in this photo. In vials, left to right: uranyl oxide (UO3); uranyl peroxide (UO4·nH2O); triuranium octoxide, U3O8; sodium diuranate (Na2U2O7·6H2O); uranium tetrafluoride (UF4·2.5H2O); “sodium peruranate” in solution; uranyl chloride (UO2Cl2) in solution. In front is an electroplated layer of uranium dioxide (UO2). Click “more” below for content (I will upload it as time permits).
_______________________________________________________________
- Part I: Collecting uranium ore
- Part II: Crushing, milling; acid leaching
- Part III: Ammonia precipitation and carbonate extraction
- Part IV: Producing uranyl peroxide yellowcake
- Part V: Uranyl oxide (UO3); U3O8; uranyl salts
- Part VI: Producing uranium dioxide (UO2) by electrolysis
- Part VII: Producing uranium tetrafluoride (UF4)
- Part VIII: Odd stuff: “Sodium peruranate”
- Part IX: Producing uranium metal
 Uranium ore is easy to find on the abandoned uranium mine dumps and mine roads of the American Southwest. In fact, this is among the easiest kinds of rock to obtain by the bucketload, provided one has a car and is willing to spend a day or two in sunny Southeast Utah. You don’t need to know anything about geology, mining, or the privations of life in the backcountry as the “U-boomers” of the ’50s did (although some appreciation in these areas will enrich the experience). A high-clearance, 4WD vehicle is unnecessary; a Toyota Echo will get you to most dumps as surely as an H2 Hummer, and without branding you as an Earth-raping jackass. Summer weather is usually amenable to camping in the field. For those into luxury, there’s the Lazy Lizard Hostel in Moab.
 The only critical equipment to this venture is a durable scintillation detector to indicate which rocks are hot (or where to dig to retrieve a hot rock). Unless you can see gamma rays, you just can’t look at the ground and discern a good piece of ore from a non-piece of ore. At left is an image of my homemade bismuth germanate scintillation detector, built in a section of water pipe and attached to a Ludlum 12 ratemeter. (Construction info here.) There are many little tricks to building and using scintillation detectors for this purpose, but a most important one is this: don’t hit the dumps with a new $1000 NaI(Tl) detector–you’ll kill it! I recommend plastic or BGO. I use high-resistance dynode chains, 10MΩ+ per dynode. This prolongs the life of the ratemeter batteries. Before departing on a trip, I set my high voltage so that the scintillometer pegs full scale on a nice piece of ore kept at home as a standard. In the field, I can roughly gauge the quality of a rock against my standard.
Some other handy equipment should be common-sense to rockhounds:
- Bucket or backpack
- Geologist’s hammer (occasionally a mattock is useful)
- Topo maps, handheld GPS receiver
Collecting procedure will depend on individual style and equipment. I’m particularly fond of sweeping my scintillator probe by its coaxial cable over the ground as I pace slowly down mine roads or over the dumps. I probably ruin an average of one cheap BNC cable per trip by this method, so I always pack some spares. I collect specimens of ultra-high-grade ore to keep in a mineral collection, as well as low-grade ore from which I produce uranium for experiments. The difference is that ultra-high-grade stuff will drive a CDV-700 Geiger counter off the high scale easily, whereas low-grade stuff will run 5000-10000 CPM on the CDV-700. A 5-gallon bucket can be filled with good low-grade material in a single afternoon, but I might only come home with two or three pieces of ultra material. Under no circumstances should one ever enter underground mine workings. Not only are mine adits full of poisonous gases and other hazards, but radiation background is so high that it is nigh impossible to get scintillator hits on rocks.
 Where are the best mines? Good question. I’m not sure I’ve figured that out (and should I really share my favorite spots)? But I can tell you a good mine to visit first. Here are instructions to the famous Mi Vida Mine, pictured left. From Moab, UT, head south about 30 mi. on US 191. Turn east at the junction of Steen’s Rd. (CR-114) and US 191. Follow Steen’s Rd. past CR-111, past the hairpin turn, and up a gently rising gulch until you see the big ore bins in the photo. This
  is the Mi Vida Mine. It’s on BLM land, so feel free to fill your backpack with screaming hot rock. Focus on the road, and on the conspicuous dumps for the Standard Mine, slightly SW of the Mi Vida itself. If you continue east on Steen’s Rd. past the Mi Vida, the road gets rougher and you come out on the western wall of Big Indian Valley with impressive views of the La Sal Mountains to the north. This western escarpment is dotted with dozens of uranium mines. Get busy!
Big rocks must be turned into very small rocks in order to easily access the uranium in them with chemicals. Leaching solutions have a hard time getting inside big rocks. My method for turning big rocks into very small rocks is nothing fancy. I begin by placing big, brick-sized ore chunks on a very hard slab of other rock situated in the center of a shallow plastic bin out on the back porch, and I apply a crack hammer liberally, returning to attack any remnants larger than about the size of a pea. This is hard, manual labor. Anything passing through a 1/4″ chicken-wire mesh is done feeling the hammer, and anything passing a fine-screened kitchen sieve is considered leachable. The fraction passing the 1/4″ mesh but not the kitchen sieve is sent to be ball-milled.
 My ball mill was purchased on eBay from the seller Hobfir. This is his 15-lb model, entirely adequate for the quantity of rock I process and a very good deal. To give the mill drum better traction on the rollers, I apply duct tape around the circumference of the drum and a few drops of honey on the rollers. Works wonders at keeping that puppy rollin’. The milling media is a mixture of 1/2″ and 3/4″ chrome steel balls purchased from McMaster-Carr. I tend to put in about 5 lb of balls to 5 lb of crushed ore. A day’s worth of milling turns most of the charge into powder that passes my kitchen sieve.
 Leaching uranium can be done with acids, or with carbonates. In industry, the choice depends on ore chemistry. Acid is uneconomical if the ore has lots of carbonates in it, but acid is more aggressive. Bob Lazar of UnitedNuclear.com describes a carbonate leach process here. I like an acid process with this Utah ore—-acid reacts very quickly and completely, even though it is not at all selective for uranium. My acid leachate goes on to feed a secondary carbonate leach, so in a sense I am only using the acid to break down / pulverize the ore further than the ball mill. The acid used here is “muriatic acid” (20° Baume HCl solution sold at Lowes and Home Depot), straight out of the jug. The ore is first wet with water to make a fluid slurry in the bottom of a 5-gallon bucket, and then HCl is added. A large quantity of CO2 is evolved as the acid reacts with calcite and dolomite in the sandstone. I periodically stir the leaching bucket to resuspend the solids, and I add HCl to keep pH < 0.
Acids will only extract significant uranium if it is in the U(VI) oxidation state. Therefore, an oxidizer is added to the leach pail to help get the U(IV) in the mixed-state pitchblende into the U(VI) state. Being cheap, I prefer chlorine bleach. (You should be getting a picture of why it is important that this process be done outside!) I add bleach, stir, and repeat, dodging the cloud of chlorine gas wafting out of the bucket. The leachate is a dark forest-green color before bleach is added, but after we’re “done,” it becomes a lighter apple-green hue owing to the oxidation of Fe(II) to Fe(III). The iron is actually a catalyst in this leaching process: when in the Fe(III) state, it will oxidize U(IV). Bleach is alkaline, so typically I have to adjust the pH again after an addition of bleach. Other oxidants will do the job at considerably higher cost: KClO3, KMnO4, MnO2, and H2O2.
 Finished leachate is siphoned off after several days of sitting / stirring. It is apple-green, and very turbid despite efforts to give it several days to settle out. I gravity-filter it using coffee filters, coffee strainers, and plastic funnels. Then I vacuum-filter it through fine qualitative filter paper. The result is shown at left.
Summary: The acid leaching process described above comprises the following reactions:
Oxidation and dissolution of U(IV): UO2(s) + Cl2(aq) → (UO2)2+(aq) + 2Cl–(aq)
Dissolution of U(VI): UO3(s) + 2H+(aq) → (UO2)2+(aq) + H2O(l)
_______________________________________________________________
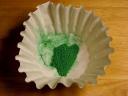
Carbonate solutions are good solvents for U(VI), holding uranium in solution when most other elements that precipitate with ammonia remain insoluble. At left is pictured the product of this step: a yellow and very fluorescent solution containing uranylcarbonate anions, e.g. UO2(CO3)3-4. Before getting to this point, however, the acid leachate from Part II is reacted with ammonia to precipitate most of the transition metals and uranium, while leaving the alkali metals and certain other contaminants dissolved. This step requires the following chemicals:
- Household ammonia (I insist on Ace Hardware Janitorial Strength Ammonia for any kind of chemistry project. It comes in a gallon jug, it’s very strong, and it’s the only ammonia sold in my area that I know to be free of surfactants.)
- Sodium carbonate, Na(CO3)2. (The anhydrous material can be found in the pool supply section of Lowe’s or Home Depot, or the decahydrate Na(CO3)2·10H2O can be bought at a grocery as Arm and Hammer Super Washing Soda. I prefer the latter for reasons of cost and availability, and my mass quantities given here pertain to the use of washing soda.)
- Sodium bicarbonate
We start with green HCl leachate made in Part II. Enough household ammonia is stirred into the leachate to raise the pH to 10. A voluminous precipitate forms. At pH = 5 the solids are yellow, reflecting the precipitation of uranium as diuranate (U2O72-). As more ammonia is added, the solids become a dark olive-green color. Some people might argue that I should stop adding NH3at pH = 5-7 and achieve some selectivity for the uranium. That might be a good idea; I haven’t tried it. My reason for adding to pH = 10 is to (A) ensure complete precipitation of the uranium and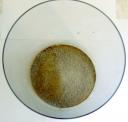 (B) have excess NH3 to complex Zn, Cu, Ni, Ag, and Cd. Anyway, an airtight cover is placed on the container and the precipitate allowed to settle. After settling, the clear, purplish supernatant solution containing the ammonia complexes is decanted and the precipitate is washed and settled 3-5 times in boiling tapwater to remove ammonia and soluble salts. Drying the precipitate is unnecessary, but if done, a yellowish-brown powder is obtained, as shown at left.
 (B) have excess NH3 to complex Zn, Cu, Ni, Ag, and Cd. Anyway, an airtight cover is placed on the container and the precipitate allowed to settle. After settling, the clear, purplish supernatant solution containing the ammonia complexes is decanted and the precipitate is washed and settled 3-5 times in boiling tapwater to remove ammonia and soluble salts. Drying the precipitate is unnecessary, but if done, a yellowish-brown powder is obtained, as shown at left.
Carbonate leaching of the ammonia precipitate will be used to separate uranium and a very few other metals (vanadium, molybdenum) from everything else (probably mostly iron). I could simply leach the crushed ore with carbonate, but in my experience, carbonate is slow to attack Utah ore. The acid leach / ammonia precipitation essentially are used here to efficiently produce a more concentrated, finely-divided, and oxidized feed for the carbonate leach. My lixiviant recipe is as follows: in a five-gallon pail, dissolve 2 kg of washing soda in 13 l of hot tap water. This solution is too alkaline to dissolve uranium, so must be buffered at pH 10.5 with baking soda. 2-3 boxes seem to be required. Atmospheric CO2 is also part of this equilibrium.
 The leaching itself is fun: I made a leaching system comprising a small microwave oven, a length of PE tubing, a pail, and a submersible aquarium pump, see photo left. Two small holes are drilled in the wall of the oven cavity (they are too small to radiate microwaves). A length of 1/4″ PE tubing is loosely coiled inside the oven and brought out through the holes. The submersible pump sits in the leach pail and drives solution through the coil and back into the pail. Discharge temperature of this coil is close to 80 °C after the system has been running awhile. Obviously, some care went into determining the right length of tubing; you don’t ever want to boil its contents! The pail is charged about half full with
  carbonate solution, and the ammonia precipitate produced by neutralization of 2 l of acid leachate is added. After starting the pump and oven, a uranium yellow color is evident in the carbonate solution almost immediately. I typically operate this system for a few hours in the evening over 2-3 days. The consumption of CO32- by uranium drives the pH up noticably, so baking soda must be occasionally added to keep the pH around 10.5. Pregnant leachate is extracted when needed by directing the heater coil discharge into a funnel with a coffee filter in it. A receptacle under the funnel collects the clear yellow solution shown at the top. I subsequently vacuum-filter
  the solution through fine qualitative filter paper to remove all traces of turbidity. Oh, and I should mention the fluorescence! The uranyl ion glows a brilliant green color under long- and short-wave UV.First of all, “yellowcake” is a not a specific chemical compound. In industry, the word simply refers to uranium mill concentrates, regardless of their chemistry. Yellowcakes may consist of alkali or ammonium uranates or diuranates and / or uranium oxides. In most processes today, the mill concentrate is U3O8, which is not even yellow! Here we precipitate a yellowcake of uranyl peroxide (UO4·nH2O) that is indeed a very satisfying shade of yellow. More importantly, this precipitation is highly selective for uranium. Uranium peroxide is one of few inorganic peroxides that are insoluble in water. In fact, the only known naturally-occurring peroxide mineral is studtite — uranyl peroxide.
The uranylcarbonate solution from Part III is divided into two portions, one large (about 700 ml / l of original solution) and one small (about 300 ml / l). The large portion is neutralized with muriatic acid to pH = 3, accompanied by much effervescence of CO2, and then boiled to remove dissolved CO2. Some precipitate may fall out during the neutralization process and this should be kept in the liquid. The small portion of solution is set aside for later.
Hydrogen peroxide in excess is added to the de-carbonated large portion of the solution from above while it is still boiling hot. The hotter the solution, the more manageable the precipitate. My preferred source of peroxide is Baquacil Ultra, 27% H2O2 sold locally by the gallon as a swimming pool oxidizer. I add about 20 ml Baquacil / l solution. (Note, 27% H2O2 is feisty stuff, quite unlike 3% drugstore H2O2. It will flense the living skin right off a dude by way of large white burns.) Two results obtain: a fine light-yellow precipitate quickly falls out of solution, and the pH falls dramatically. As the summary at bottom illustrates, this is due to acid formation that accompanies uranyl peroxide formation.
Here’s where the small portion of uranylcarbonate solution comes in. The remaining uranylcarbonate solution is used to neutralize acid formed by peroxide addition and return the pH to the range of 3-4. Stir quickly during this addition, which like the above step should be completed while the main solution is still almost boiling hot. I typically reach pH = 3.5 with uranylcarbonate to spare. I simply return the excess to the container whence it came and save it for another batch. A brief reddish or orange coloration may be noted upon addition of the carbonate solution—-see Part VIII below for the explanation.
Finishing up: Allow the precipitate to continue forming and settling for several hours in a covered container. Decant the liquid and wash several times with boiled distilled water. Dry in a glass casserole dish via microwave oven.
Summary: The impure uranylcarbonate made in Part III is neutralized with acid to form a uranyl solution, and an insoluble uranium peroxide is selectively precipitated from the uranyl solution to free the uranium from impurities. It should be noted that the stoichiometry of the uranylcarbonate anion and the uranyl peroxide water adduct depend on certain uncontrolled variables, so the below balanced reactions are only generally representative.
Neutralization: 6H+(aq) + UO2(CO3)34-(aq) → (UO2)2+(aq) + 3CO2(g) + 3H2O(l)
Precipitation: (UO2)2+(aq) + H2O2(l) → UO4·2H2O(s) + 2H+(aq) + 2H2O(l)
_______________________________________________________________ Uranium as the peroxide from Step IV can be purified further by converting it to UO3 or U3O8.Fiesta-orange UO3 is the final product of my purification routine, and the gateway to other uranium compounds. It is produced by heating dry UO4·nH2O in an open-air container at about 300 °C. During the process of heating, volatile contaminants (water, oxygen, ammonia, halogens, hydrogen peroxide) are driven off. During preparation, keep stirring the yellow peroxide as it turns orange. If the temperature is managed properly, the product will be a clean orange color. If allowed to overheat, U3O8begins forming and the orange color fades to darker shades of brown-green. What I like about UO3 as an endpoint is that this oxide is readily acid-soluble, has definite stoichiometry, and does not require a lot of heat to form. I store my “stock” of uranium as UO3.
If U3O8 is desired, simply heat orange UO3 until it is uniformly dark brownish-green. This takes a lot of heat, and produces a mixed-valence product of variable stoichiometry that has some difficulty dissolving in acid. One neat trick in the preparation of U3O8 is to exploit its large dielectric loss tangent by finishing the reaction from UO3 in a microwave oven. Fill a large alumina crucible about half full with with a “seed layer” of finished U3O8 and top off the crucible with fresh UO3. The lossy U3O8 becomes orange-hot and the heat finishes the conversion of the fresh UO3.
_______________________________________________________________ Thin layers of UO2 can be electroplated onto metal cathodes in a uranyl salt bath. The technique is not efficient from an electrochemical standpoint (the vast majority of input energy goes toward production of H2and O2 and heat), but potentially very handy for production of UO2 semiconductor components or fabrication of experimental fission chambers.
Supplies needed include the following:
- UO3 (see Part V)
- Dilute sulfuric acid (e.g. battery acid from Pep Boys or Checkers)
- Ammonia (Ace Hardware Janitorial Strength)
- An accurate pH meter
- Cathode(s) to be plated; I used copper sheet and box cutter blades with success.
- An anode that will not get oxidized. I recommend the platinum-plated titanium anode from Jumpin’ Jack Flash Pyro Supplies. It has many uses!
- 15 V, 10 A DC power supply
- A plastic or glass container
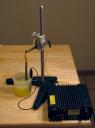
In my experiment I used a plastic ~300 ml food-storage container as the electrolysis cell. In the future I plan on using glass because of the ohmic heating of the electrolyte. To make the electrolyte, I dissolved 6 g UO3 in battery acid and then partially neutralized with ammonia to pH = 2.0. The resulting solution was placed into the electrolysis cell and diluted to ~300 ml with a 0.2 M (NH4)2SO4 solution made earlier from acid and ammonia. Finally, the pH was adjusted to 2.5 with a few drops of acid. Time to turn on the juice!
 The electrolysis setup is assembled by arranging the anode on the vertical axis of the cylindrical cell and clipping the cathode to the wall. See photo at left. I have had best results in my experiments when the cathode presents no more than about 15 cm2 of area in the direction of the anode. (The “back” of the cathode will be minimally plated except around the periphery.) The power supply is turned on and electrolysis begins with heavy evolution of gas at both electrodes. During electrolysis, the solution becomes hot and current may rise or fall. I move the cell to bring the anode closer to or farther from the cathode to help hold current to about 10 A. The finished plating is an adherent, velvety black layer. I plated my cathodes for about 5 min. apiece; longer plating tends to make a less adherent layer that can crack off, although more UO2 is present. Between platings, electrolyte level can be restored with distilled water.
 Plated cathodes read about 2000-3000 CPM on a pancake GM tube, indicating that the black deposit is indeed the intended UO2. If the cathodes are dirtied with precipitated uranyl salts, they can be washed by a quick dunk in dilute HCl and the UO2 layer will be unaffected. I have successfully used a UO2-plated copper strip in a “crystal radio” with the diode junction formed between it and a tuft of steel wool. The radio works, but poorly. I need to continue experimenting with junction materials and bias to better understand the semiconductor properties of UO2.
Summary: U(VI) is reduced to U(IV) at the cathode of an electrochemical cell. The intermediates and byproducts in this process seem to not all be well-known.
This procedure is adapted from a paper by Maya and Gonzalez entitled“Electrodeposition of uranium dioxide films,” J. Radioanalytical and Nuclear Chemistry, 261(3) 605-607 (2004). I link to the Springer full text reluctantly—-Springer is a major Google-spammer and does not deserve your money.
_______________________________________________________________ Uranium tetrafluoride (UF4), known as “green salt” in the uranium processing business, is an important intermediate in the production of both uranium metal and the uranium hexafluoride needed for gaseous diffusion enrichment. It is insoluble in water and one of the most well-behaved U(IV) compounds. The procedures described here produce a hemipentahydrate adduct, UF4·2.5H2O.
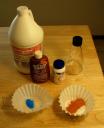
 This procedure starts with a trip to the grocery store to pick up a bottle of Whink Rust Stain Remover (“as advertised on Dr. Laura”) and a bottle of plain 1000 mg Vitamin C tablets. I caution the reader (and Dr. Laura’s braindead Republican audience) that Whink is hardly a benign household chemical—-it is 2-3M HF, and in this procedure, a solution containing it gets heated to boiling! Plan on being careful and do not breathe any fumes. In this process, I reduce uranium from U(VI) to U(IV) in solution with ascorbic acid and a Cu(II) catalyst, and simultaneously precipitate the U(IV) so formed with HF. Cl– ions are necessary also, so the solvent here is dilute HCl prepared from muriatic acid. In the image at left, I have the reactants laid out. They are as follows:
- 2 g CuSO4·5H2O (Roebic K-77 root killer from Home Depot)
- 10.2 g UO3
- 100 mL Whink
- 20 mL muriatic acid
- Boiling distilled water
- (7) 1000 mg Vitamin C tablets
 acid. The uranyl solution immediately turns a bluish-green hue, with a flash of yellowish right where the ascorbic acid enters, and a precipitate forms. Return to microwave, boil, add ascorbic acid, and repeat until the latter is consumed. At this point the flask contains Cu+ and Cu++ in solution and a fine UF4precipitate. Let flask sit an hour to cool down and settle precipitate (picture at left). Decant the supernatant solution. Wash and settle the precipitate twice in boiling water. Dry in microwave. The product should appear as at the top of this section. My yield was 12.6 g, nearly quantitative.
My inspiration for this procedure comes from US Patent 3023078 (1962), “Production of Uranium Tetrafluoride,” by Robert J. Allen and Henry G. Petrow and assigned to the USAEC. They prefer a reduction with sulfur dioxide rather than Vitamin C, but for the kitchen chemist the latter is far easier to use. I also experimented with an H2S reduction of a mildly acidic uranyl chloride solution and had success, but at the expense of great effort to build the closed gas-flow system and make aluminum sulfide needed to feed the gas generator. H2S is very nasty stuff.
Summary: U(VI) is indirectly reduced to U(IV) by ascorbic acid (which is oxidized to dehydroascorbic acid), and precipitated with F–. Cu and Cl– are catalysts and bystanders and are omitted from the accounting below, though very necessary for success.
Reduction: (UO2)2+(aq) + C6H8O6(aq) + 2H+(aq) → U4+(aq) + C6H6O6(aq) + 2H2O(l)
Precipitation: U4+(aq) + 4HF(aq) + 2.5H2O(l) → UF4·2.5H2O(s) + 4H+(aq)
_______________________________________________________________
The reaction of uranyl peroxide and sodium carbonate forms a blood-red solution that when more dilute appears dark orange. What’s particularly odd about the compound is that when it is generated in a 70% isopropanol (rubbing alcohol) solution, the solution separates into two transparent liquid layers–one blood-red, the other golden. You can shake the mixture all you want, but like oil and vinegar, the liquids separate again with the uranium “blood” on the bottom. Both liquids are soluble in excess water. Neither sodium carbonate nor uranyl peroxide by themselves form such an oil with isopropanol. Clean sodium hydroxide forms a yellow solution; the carbonate is evidently necessary for the red liquid precipitate to form.
In 1903, a report by J. Aloy entitled “A New Class of Peruranates” appearing in The Chemical News mentions the following:
“A solution of nitrate of uranium is treated with peroxide of hydrogen in sufficient quantity to precipitate the whole of the metal; wash by decantation and add some solid alkaline carbonate. In this manner we obtain a red solution which, when treated with ordinary alcohol, gives a red oil […]”
Aloy goes on to describe a method for precipitating a dark red unstable solid “peruranate” with methanol. He assigned it a formula of UO5Na2·5H2O based on quantitative analysis.
_______________________________________________________________First off, I should point out that certain aspects of this high-temperature metallothermic reduction are not exactly “kitchen chemistry.” I am reducing anhydrous UF4 with finely-divided calcium metal in a special MgO crucible. The bill of materials is as follows:
- UF4·2.5H2O (from Part VII)
- ~25 g granular calcium metal, 8 mesh (purchased on eBay, $55 for 500 g)
- A 100-ml MgO straight-wall crucible, from Ozark Technical Ceramics($35)
- 1 kg MgO powder, from Ozark Technical Ceramics ($10)
- An empty paint can
- Sand
- A short piece of Mg ribbon
- ~5 g crushed iodine
- Ice-cold white vinegar
- Acetone
- A vacuum pump
- A vacuum chamber rated to ~400 °C
 The UF4 used in a metallothermic reduction must be anhydrous. If it’s not, the water of hydration may consume the fuel metal, and steam may cause the reaction to erupt or splatter dangerously. UF4·2.5H2O cannot be dehydrated in air (it will react with oxygen to give uranium oxides), so a vacuum system is called for.
  I use a 2.75″ ConFlat nipple linked by a long run of 1/4″ copper tubing to a two-stage mechanical vacuum pump. A quantity of UF4·2.5H2O is sealed into the chamber, the pump is started, and the chamber is directly heated on “high” on a gas stovetop. Progress may be checked via a simple electrodeless discharge tube mounted at the pump inlet and excited by a “leak tester” Tesla coil. When the grey-purple water discharge disappears, she’s done. My job took almost three hours.
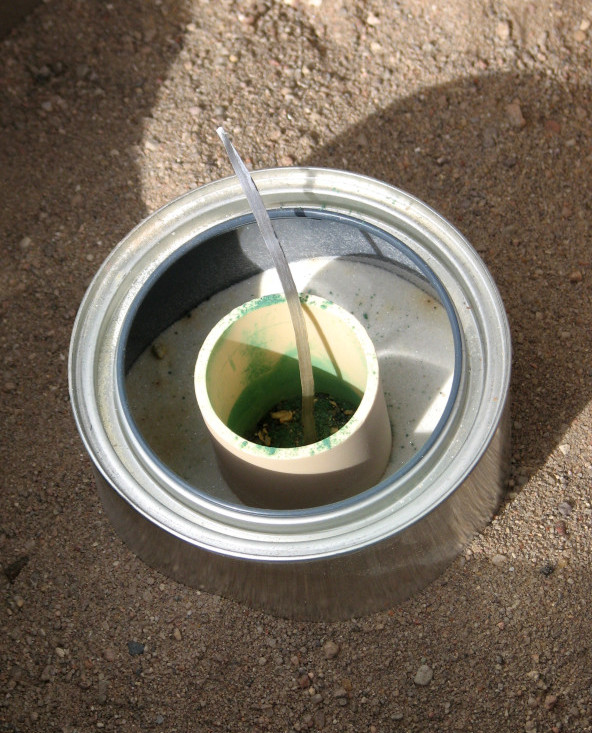 Mixing and igniting the charge: The anhydrous UF4was cooled, removed from the vacuum pump, and mixed with granular calcium. I prepared 67 g of UF4, and in a tightly-capped plastic bottle I shook this with 21 g calcium (about 25% stoichiometric excess). The mixture was then packed into the 100-ml MgO crucible, filling it about 2/3 full. Packability is
  very poor with this fluffy powder. A short piece of Mg ribbon was inserted into the center of the charge. Finally, a layer composed of about 5 g crushed iodine mixed with a pinch more of Ca metal was sprinkled atop the charge to help initiate the reaction, and provide CaI2to lower the melting point of the slag. The crucible was surrounded with dry MgO powder in a paint can; this in turn was placed in a container of sand. Ignition is straightforward: light the Mg ribbon. Avoiding the smoke is probably a very good idea! Click here to watch the video (AVI format, 10.0 MB).
 After sitting about three hours, the crucible was cool enough to recover the slag. In this experiment, the nature of the slag varied with depth in the crucible: at the top was some unconsolidated granular material that was minimally radioactive, followed by dense, brownish-black, consolidated slag at the bottom that was quite radioactive. (The crucible itself was destroyed by the reaction, breaking into several pieces). I retained the black bottom-slag, and found it to have the following properties:
- Measurable (but poor) electrical conductivity
- Strongly radioactive (a couple chunks read 150 kCPM on a pancake GM tube)
- Flammable (if ignited, black powder will spall off and orange clinkers will “worm” through the mass)
- Evolves H2 gas from dilute HCl (photo below)
- Does not evolve noticeable gas from vinegar


I crushed the slag and attempted to wash it in ice-cold vinegar (a technique for dissolving calcium oxide / nitride / iodide, hopefully breaking up the slag and allowing isolation of the entrapped uranium metal). The slag as a whole was very resistant to vinegar, but some calcium salts evidently did dissolve because mixing acetone with the decanted vinegar resulted in a characteristic “Sterno” precipitate. Of course, vinegar will not dissolve the main expected byproduct, CaF2.
Conclusions and summary:
UF4(s) + 2Ca(s) → U(l) + 2CaF2(l)
My metallothermic reduction in a 100-ml crucible did indeed produce some uranium metal. I can infer as much from the slag’s flammability, electrical conductivity, radioactivity, and displacement of H2 gas from HCl. However, the uranium is bound up in a hard and chemically intractable CaF2 slag, along with other impurities that probably include uranium oxides. When these reactions are done on a large scale, they apparently work quite well, generating and storing enough heat to separate out molten uranium metal as a derby that settles to the bottom of the vessel. If one can’t isolate the metal in relatively pure form, then there is really no practical point to the exercise! In the future, I will probably explore the electrolytic synthesis of the metal described by Shiokawa et al. (J. Alloys and Compounds 255 (1997) p. 98-101). This ain’t exactly kitchen chemistry, either: it involves amalgamation of the product on a mercury cathode, which then must be distilled to isolate the U.
https://carlwillis.wordpress.com/2008/02/20/uranium-chemistry/


