Wednesday, April 29, 2015

How to Build a Radio/Drone Jammer


sparkgap-motorRadiohax
Spark gap transmitters are the oldest type of radio transmitter made by man. They were first used around 1888 and remained legal until the 1920s when their use became greatly restricted. World War II delayed their complete ban outside of emergency communications for a few years. Now the only way to use them legally is inside a faraday cage. They operate as jammers for the same reason they were banned, they take up a lot of the radio spectrum.
A spark gap transmitter is fairly simple. Send a high voltage current through an air gap, when the resistance of the air breaks down a spark will cross the gap. When this happens electromagnetic radiation is emitted. You can test this in your house fairly easily. Turn on some speakers so they are powered but nothing is coming out of them. Computer speakers that are on will work as will a stereo set to CD or tape with no CD or tape playing. Flip your room lights on and off in rapid succession, you should hear a clicking from the speakers. The clicking is RF energy that is being picked up from the light switch.

Effective Range

The range of this type of jammer is based on a few properties.
  • Antenna resonance
  • Field strength
  • Modulation
  • Terrain
The antenna of this particular device will be more resonant on one frequency than others. As a result there will be more RF energy on that frequency, and harmonics or multiples of that frequency. The range for this frequency will be further than others. Using multiple antennas will cause the transmissions to be greater on more frequencies.
The field strength, or amount of RF energy given off, is directly related to the difference in voltage between the two states. With the type of transmitter we are making one state will be totally off or 0 volts while the other will be on or the full voltage. It is not required to switch between an off and on state you may switch between a lower and higher voltage as well. The higher the input voltage the stronger the RF, the more range you will have. You have normal free space losses that all radio transmissions have which means that in order to double the effective range you will have to apply 4 times more power.
Another consideration is the modulation that is being utilized. Modulation also includes some of the data that is carried over that mode such as digital data. FM signals for example will lock onto the strongest relative signal from the receivers point of view, a weaker but closer signal will appear stronger than a further but more powerful signal due to free space losses. FM can flip back and forth quickly between two stations that have a nearly equal signal strength at the receivers antenna and make it appear like it is mixing the two stations, the reality is that it is not. SSB will mix the two signals, while you may hear noise in with the desired audio you can still hear the desired audio. Spread spectrum will tolerate the most noise.
Digital systems can be jammed even if the underlying modulation is not by introducing noise the decoding circuitry in the radio may not be able to decipher the bits correctly and reconstruct the message. This can result in heavy packet loss on that system rendering it unusable. Many digital systems are more sensitive to noise than their less sophisticated counterparts. Many digital systems are either FM or spread spectrum. FM is more often used for longer range applications.
The specific type of system that you are trying to jam is important to know as it will tell you how much power you have to have and at what distance. The best way to determine what is suitable is to get a similar system and see how far it will work from the spark gap transmitter at a given power.
Terrain includes buildings, trees and other objects that the radio signals will interact with. If you stash the spark gap transmitter in a metal box the signal will be attenuated compared to that same transmitter being placed in an open field. Elevation can also influence the distance the signal may go.

Construction

The construction of this type of spark gap generator is fairly simple. You should be able to get everything for under $50 new, used items may be even less expensive. You will need the following items:
  • high voltage source
  • batteries
  • small bit of wood to mount things on
  • small motor
  • a few nails or screws
  • wire
The high voltage source could be an automotive ignition coil. This takes the battery or alternator output and makes the voltage much higher so that it will jump across the electrodes of a spark plug igniting the fuel. A spark plug is a spark gap, although it is not suitable in its current form as a radio jammer, it could be made into one.
The battery should be suitable to run your high voltage source and the small motor. A motorcycle battery is smaller but will go dead faster than a larger car battery.
The wood should be large enough to let you mount the ignition coil, motor and screws on. This can be any scrap wood or similar non-conductive material that you can find. It should be rigid enough that the components will not just fall apart although it does not have to be that strong. It’s purpose is just to hold everything together. A block of cheese or dried mud would work if that is all you have available.
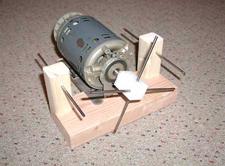
The small motor can be anything from a vibrator out of an old pager or mobile phone, an electric fan or one you may find at an electronics or hobby store. It just has to have a shaft that allows mounting of a cross member onto.
The first step will be to assemble the motor so that it will function the way you want. When mounting the cross member you should make sure that it is insulated from the rest of the motor either by a plastic shaft or a plastic mounting block. The rod can be a nail although you will want it equidistant from the center.
sparkgap-motor-block.jpg
You can see how the metal rod goes all the way through the plastic insulating block. You may install either one rod all the way through or two rods forming an X. If you install two rods you will have twice the sparks and thus the transmission cycle will be twice as great.
sparkgap-motor.jpg
Once the insulating block is mounted on the motor you should affix two other nails or screws on either side so that they almost touch the cross members you installed in the previous step. You do not want them touching but you do want them as close as possible. The closer the better. You should connect the motor to your battery and ensure that it can spin correctly with no problems and that it does not vibrate itself off of the wood.
Now prepare your antenna. This is a length of wire cut to 1/4 wavelength of the desired target frequency. If you do not know the target frequency you can just make some guesses. You can also connect multiple antennas together to cover various frequencies. Remember you will have RF emitted on all frequencies it will just be more powerful on the frequencies that the antenna is resonant for. Mobile phones are about 0.5 inch antennas and older police radios are 2.86 inches. For a good spectrum coverage if you make antennas of 0.5, 1.0, 1.5, 2.0, 2.5 and 3.0 inches most of the usable spectrum will be covered.
Connect the antenna(s) that you made to one of the stationary side rods. To the other end you will need to connect a ground. This can be to a metal water pipe in your house or to a rod driven into the ground. If you do not have a ground the radio will still transmit although it will be at a slightly lower power.
Now connect the output of the ignition coil to the stationary rods on either side of the motor. Connect the negative terminal to the ground side and the positive terminal to the side with the antenna(s). The idea here is that when the motor spins current will pass from one rod to the other and out the antenna. The motor will switch the output of the coil on and off in rapid succession.
The last and final step is to connect the battery to the motor and the coil. You may optionally install a switch to turn the device on or off or you may just disconnect the battery.
Remember building this is not illegal (in most places) but using it is. You will be causing harmful interference and probably upsetting people.
http://radiohax.wikispaces.com/Spark+gap+transmitter

Sunday, April 12, 2015

:) :) :) :) :)

Security features maintained in the enhanced Federal Reserve Notes include a portrait watermark visible when held up to a light, two numeric watermarks on the $5s, an enhanced security thread that glows under an ultraviolet light, micro printing, improved color shifting ink that changes color when the note is tilted, and on the newly redesigned $100 notes, a 3-D security ribbon and enhanced, raised printing...
is primarily made of wood pulp; however, United States currency paper is composed of 75% cotton and 25% linen...
and watermark are already built into the paper when it is received.
All bills, regardless of denomination, utilize green ink on the backs.  Faces, on the other hand, use black ink, color-shifting ink in the lower right hand corner for the $10 denominations and higher, and metallic ink for the freedom icons on redesigned $10, $20, and $50 bills.  
details such as outlines, tone, and shading will "translate" when engraved and printed on an intaglio press.
Then using a high-resolution film recorder, each color separation is imaged onto a sheet of sensitive film in negative form.  A thin sheet of steel, coated with a light-sensitive polymer, is exposed to ultraviolet light while covered by the film negative which contains the imagery.  The areas on the film that allow light to pass onto the plate are transferred or exposed. The unexposed areas around the images are washed away with water and soft scrubbing brushes.  This process is called "burning a plate."
One plate contains the background pattern that will be printed in green and peach. The second plate contains the images that will be printed in blue — an eagle and the words TWENTY USA. The photoengraver takes great care to make sure the images are perfectly aligned on both plates, or else the images will not line up properly when printed on the bills
The blank sheet of paper passes in-between the face and back blankets and simultaneously prints the complete image on the paper. The press has eight print units, four on the face and four on the back, with two comprehensive computer control consoles.  Many of the press settings can be controlled from these consoles and their status displayed on the computer screens
next section, Intaglio printing
Paper is then laid atop the plate, and the two are pressed together under great pressure.  As a result, the ink from the recessed areas is pulled onto paper, creating a finished image
Sharp tools (commonly called gravers) and acids are used to cut the fine lines, dots and dashes that uniquely describe the subject the engraver is creating.  Additionally, the engraver must cut the image in reverse to how it will actually print on a highly polished steel die. 
individual plastic molds are made from the master die and are assembled into one plate containing 32 exact duplicates of the master die.  Plate makers will then process this plate to create the metal printing plates that go on the presses
signatures into the plates using a pantograph machine.  A pantograph copies the die engraving onto the plate.  As one part of the machine traces the original engraving another part engraves the image onto the new plate.
Electroplating is how this is done. The plastic master, which is called the "basso", is sprayed with silver nitrate to act as an electrical conductor. The plate is then placed into a tank filled with a nickel salt solution, and an electric current is generated. Nickel ions leave the solution and deposit themselves on the electrically charged surface of the master. After about 22 hours, a nickel plate, called an "alto" has literally grown. The alto is separated from the plastic master, trimmed, and inspected by the engravers.  The plate contains the mirror image of the master in all its intricate detail and is an exact replica of the original engraved die.
That final printing plate is coated with a thin layer of chrome to make it hard and slick. It contains the Intaglio image in recessed grooves only 2/1000 (0.002) of an inch deep — but that is deep enough to hold ink for intaglio printing.
High-speed, sheet-fed rotary I-10 Intaglio printing presses are used to print the green engraving on the back of U.S. currency
Paper is applied directly to the plate and under tremendous pressure (approximately 20,000 lbs. per sq. inch), the paper is forced into the engraved plate, thereby removing the ink and printing the image. 
Sheets that were printed from the Back Intaglio process require 72 hours to dry and cure. During this drying process, the sheets bond and stick together. Therefore the sheets must be separated and neatly jogged before they can be printed on the Face Intaglio press.  To do this the BEP employs automated joggers shaped much like the letter "C."  Support personnel retrieve the load and place it into the jogger.  The load is turned on its side and, through the combination of vibration and forced air, the sheets are separated.  The process takes approximately 10 minutes.  Once jogged, the load is moved to the designated Face Intaglio press.
Special cut-out ink rollers transfer the different inks to a specific portion of the engraving, thus allowing three distinct colors to be printed on the face of the note; the black for the border, portrait engraving, and signatures of the Secretary of the Treasury, and the Treasurer of the United States; the color-shifting ink in the lower right hand corner for the $10 denominations and higher; and the metallic ink for the freedom icons on redesigned $10, $20, and $50 bills or color shifting ink on the redesigned $100 notes' freedom icons.  Bills printed in Fort Worth, Texas, will also have a small "FW" printed in black ink.  The loads of these freshly printed sheets will still require 72 hours to dry and cure before they can continue to the next operation.
To recap, the subtle background colors are printed first using Offset print technology, then the green engraving on the back is printed second using the Intaglio printing process. The third printing operation is the Face Intaglio printing process
 transmissive camera is used to inspect the paper by looking through the sheets to ensure the thread and portrait watermark are in the correct position.  In addition, two separate cameras take a digital picture of both the front and back of the sheets, breaking the images down into four million tiny pixels.  After the sheets are trimmed, a trim camera takes measurements of the sheets.  All data is gathered from the sheets and compared to what is considered a perfect "golden image," and within three tenths of a second, the computer decides if the sheet is acceptable or a reject, looking for defects such as ink spots, ink deficiencies, or smears.
The new serial numbers consist of two prefix letters, eight numerals, and a one-letter suffix.  The first letter of the prefix designates the series (for example, Series 1996 is designated by the letter A, and Series 1999 is designated by the letter B).  The second letter of the prefix designates the Federal Reserve Bank to which the note was issued. The serial numbers are overprinted in sequential order and remain in order until the 16-subject sheets are cut.  
inspected by the COPE Vision Inspection System (CVIS)

Wednesday, April 8, 2015


Supplying the science hobbyist, industry, government, schools & universities since 1998.
"We specialize in small orders"
Uranium Extract
from bulk Carnotite/Gummite Uranium Ore

The Uranium contained in bulk Carnotite and associated Uranium ores can be easily extracted to form various Uranium compounds.
Typical Carnotite/Gummite Uranium ore.
Use a hammer or rock crusher to smash the rock into a granular form.
Wear proper safety equipment (gloves, dust mask, eye protection) when breaking the rock so you don't get rock fragments in your eye, or inhale piles of ore dust.
Sift the crushed rock through a screen (a window screen or a spaghetti strainer will do).
This will separate the large chunks from the fine, granular material.

Weigh out 300 grams of the fine granular ore.
Pour the 300 grams of fine ore into the barrel of your Ball Mill.
A hard milling media is required, such as steel balls which are used here.
Place the barrel on the mill and let it run for approximately 2 hours.
This will reduce the ore into a very fine dust.
This is necessary so the extraction chemicals will be able to react with the ore material.
If Ball Milling is not done, very little Uranium will be extracted.

After 2 hours of milling, the ore is as fine as Talcum powder.
Separate the steel balls from the powdered ore by using either a magnet to pull out the balls,
or dumping the barrel contents through a strainer.
Certain types of Uranium ore (Pitchblende, Uraninite) can be simply extracted with Nitric Acid. However, Carnotite and its associated matrix minerals are far too alkaline for Acid extraction and many of the minor Uranium ores will not dissolve in acid. Alkaline extraction is called for when dealing with Carnotite ore.
To begin, you'll need 200 grams of powdered Uranium ore, 50 grams of Sodium Carbonate,
25 grams of Sodium Bicarbonate (use Arm & Hammer Baking Soda) and 1000 ml of water.
Place a large flask with the 1000 ml of water in it on a magnetic stirrer/hot plate,
drop in a spinbar and heat to about 70-80ьз╕ C.
Set the stir speed to maximum and slowly add each ingredient into the water while it is being stirred & heated. Let the mixture heat & stir overnight. 
The next day, turn off the hot plate/stirrer and set the flask aside to cool and settle for 1 hour.
After an hour, the heavy sediment will sink to the bottom leaving the cloudy extracted Uranium in a carbonate solution floating on top.


Pour the cloudy Uranium solution through a fine filter being careful not to let the bottom sediment to stir up or get into the filter. 
The finished product will be a bright, clear yellow liquid: Uranyl Tricarbonate.
In our next experiment, we'll use Kerosene and thttp://www.unitednuclear.com/extract.htmhe Solvent Extraction method to remove the carbonate from the Uranium.

Cielo e terra (duet with Dante Thomas)